This is the fourth in a series of articles that unpacks optimization tips for your Unity projects. Use them as a guide for running at higher frame rates with fewer resources. Once you’ve tried these best practices, be sure to check out the other pages in the series:
See our latest optimization guides for Unity 6 developers and artists:
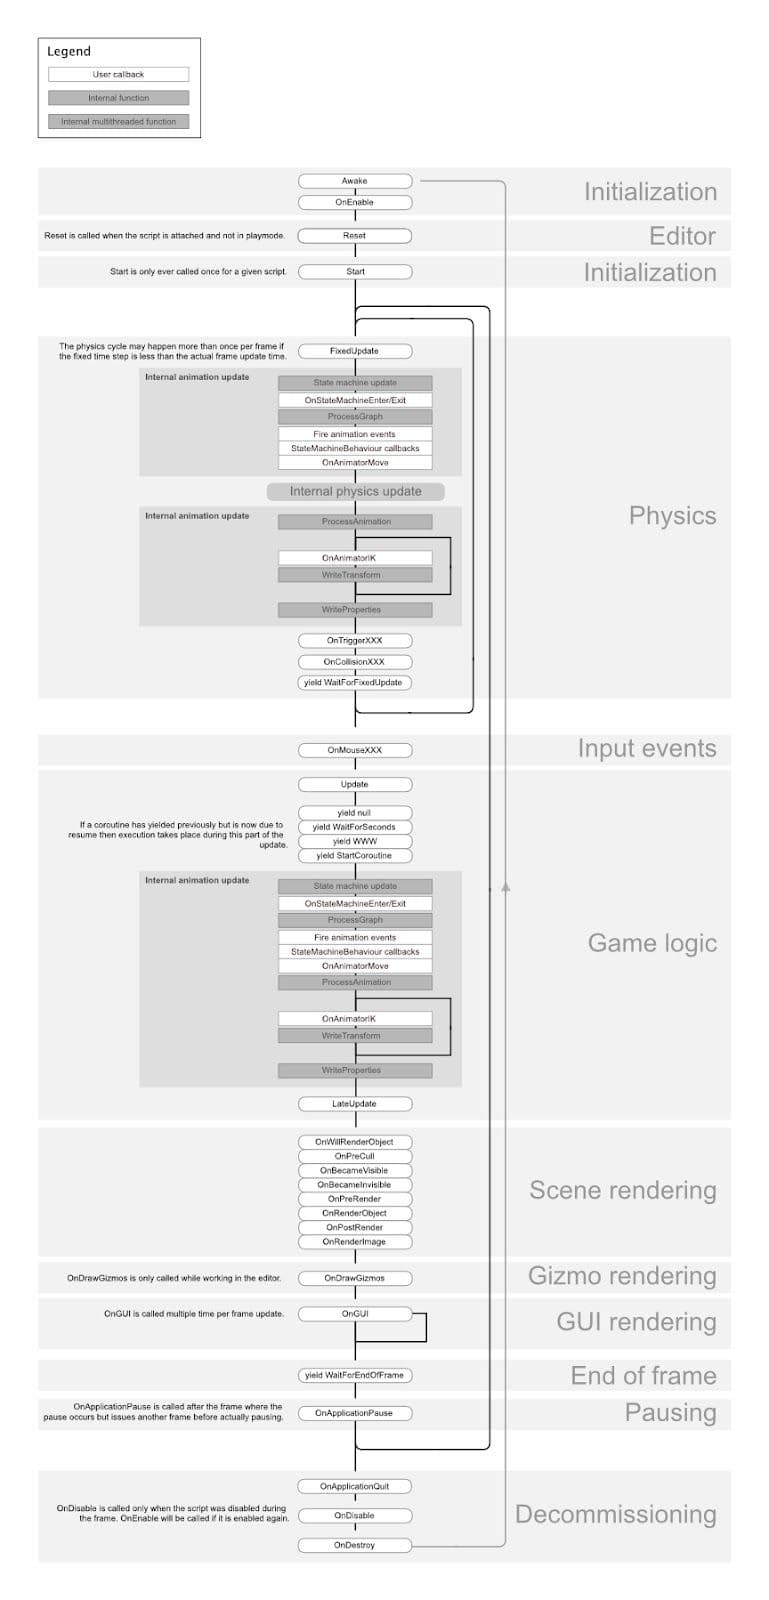
Make sure you understand the execution order of Unity’s frame loop. Every Unity script runs several event functions in a predetermined order. You should understand the difference between Awake, Start, Update, and other functions that create the lifecycle of a script. You can utilize the Low-Level API to add custom logic to the player’s update loop.
See the Script lifecycle flowchart for the event functions’ specific order of execution.

A common usage pattern for Update or LateUpdate is to run logic only when some condition is met. This can lead to a lot of per-frame callbacks that effectively run no code except for checking this condition.
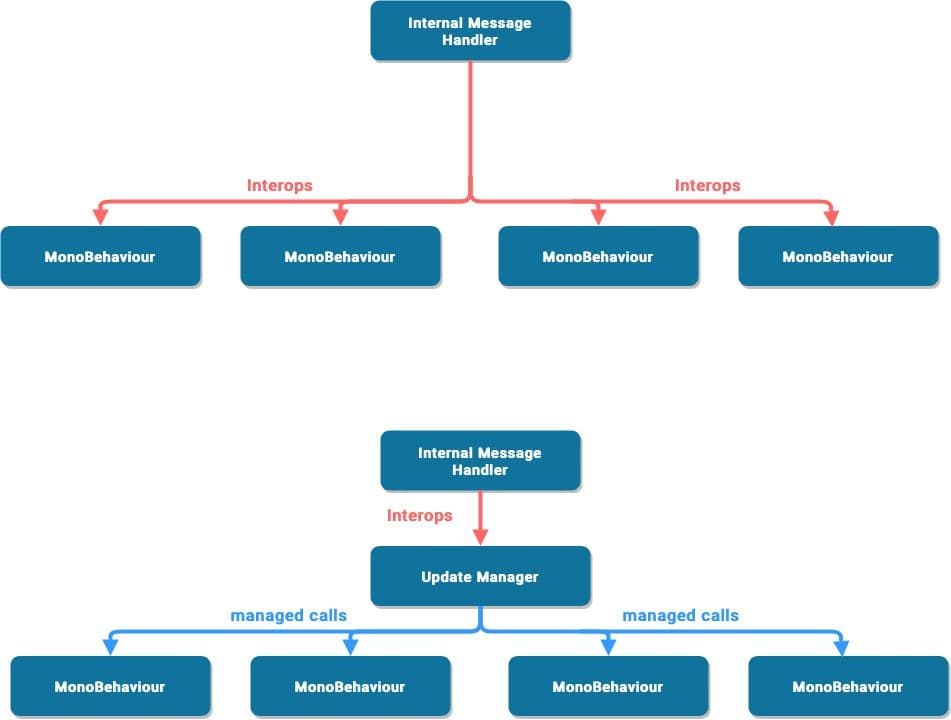
Everytime Unity calls a Message method like Update or LateUpdate, it makes an interop call, a call from the C/C++ side to the managed C# side. For a small number of objects, this is not an issue. When you have thousands of objects, this overhead starts becoming significant.
Consider creating a custom UpdateManager if you have a large project using Update or LateUpdate in this fashion (e.g. an open-world game). Have active objects subscribe to this UpdateManager when they want callbacks, and unsubscribe when they don’t. This pattern could reduce many of the interop calls to your Monobehaviour objects.Subscribe active objects to this Update Manager when they need callbacks, and unsubscribe when they don’t. This pattern can reduce many of the interop calls to your Monobehaviour objects.
Refer to the Game engine-specific optimization techniques for examples of implementation.

Consider whether code must run every frame. Move unnecessary logic out of Update, LateUpdate, and FixedUpdate. These event functions are convenient places to put code that must update every frame, while extracting any logic that does not need to update with that frequency. Whenever possible, only execute logic when things change.
If you do need to use Update, consider running the code every n frames. This is one way to apply time slicing, a common technique of distributing a heavy workload across multiple frames. In this example, we run the ExampleExpensiveFunction once every three frames:
private int interval = 3;
void Update()
{
if (Time.frameCount % interval == 0)
{
ExampleExpensiveFunction();
}
}
Better yet, if ExampleExpensiveFunction performs some operation on a set of data, consider using time slicing to operate on a different subset of that data every frame. By doing 1/n of the work every frame rather than all of the work every n frames, you end up with performance that is more stable and predictable overall, rather than seeing periodic CPU spikes.
The trick is to interleave this with other work that runs on the other frames. In this example, you could “schedule” other expensive functions when Time.frameCount % interval == 1 or Time.frameCount % interval == 2.
Alternatively, use a custom UpdateManager class (below) and update subscribed objects every n frames.
It’s best to cache references in either Awake or Start in order to avoid calling them in the Update method.
Here’s an example that demonstrates the inefficient use of a repeated GetComponent call:
void Update()
{
Renderer myRenderer = GetComponent<Renderer>();
ExampleFunction(myRenderer);
}
It’s more efficient to invoke GetComponent only once, as the result of the function is cached. The cached result can be reused in Update without any further calls to GetComponent.
private Renderer myRenderer;
void Start()
{
myRenderer = GetComponent<Renderer>();
}
void Update()
{
ExampleFunction(myRenderer);
}
Note: In Unity versions prior to Unity 2020.2 GameObject.Find, GameObject.GetComponent, and Camera.main used to be very expensive, however this is no longer the case. That said, it's best to avoid calling them in Update methods and follow the practice above by caching the results.
Log statements (especially in Update, LateUpdate, or FixedUpdate) can bog down performance. Disable your Log statements before making a build.
To do this more easily, consider making a Conditional attribute along with a preprocessing directive. For example, create a custom class like this:
public static class Logging
{
[System.Diagnostics.Conditional("ENABLE_LOG")]
static public void Log(object message)
{
UnityEngine.Debug.Log(message);
}
}
Generate your log message with your custom class. If you disable the ENABLE_LOG preprocessor in the Player Settings, all of your Log statements disappear in one fell swoop.
The same thing applies for other use cases of the Debug Class, such as Debug.DrawLine and Debug.DrawRay. These are also only intended for use during development and can significantly impact performance.
This blog post on 10,000 Update calls explains how Unity executes the Monobehaviour.Update.

Use the Stack Trace options in the Player Settings to control what type of log messages appear.
If your application is logging errors or warning messages in your release build (e.g., to generate crash reports in the wild), disable stack traces to improve performance.
Learn more about Stack Trace logging.

Unity does not use string names to address animator, material, and shader properties internally. For speed, all property names are hashed into property IDs, and these IDs are actually used to address the properties.
When using a Set or Get method on an animator, material, or shader, harness the integer-valued method instead of the string-valued methods. The string methods simply perform string hashing and then forward the hashed ID to the integer-valued methods.
Use Animator.StringToHash for Animator property names and Shader.PropertyToID for material and shader property names. Get these hashes during initialization and cache them in variables for when they’re needed to pass to a Get or Set method.
Related is the choice of data structure, which impacts performance as you iterate thousands of times per frame. Follow the MSDN guide to data structures in C# as a general guide for choosing the right structure.
Instantiate and Destroy can generate garbage and garbage collection (GC) spikes, a generally slow process. Apply object pooling techniques when you need to instantiate a large number of objects to help avoid GC spikes.
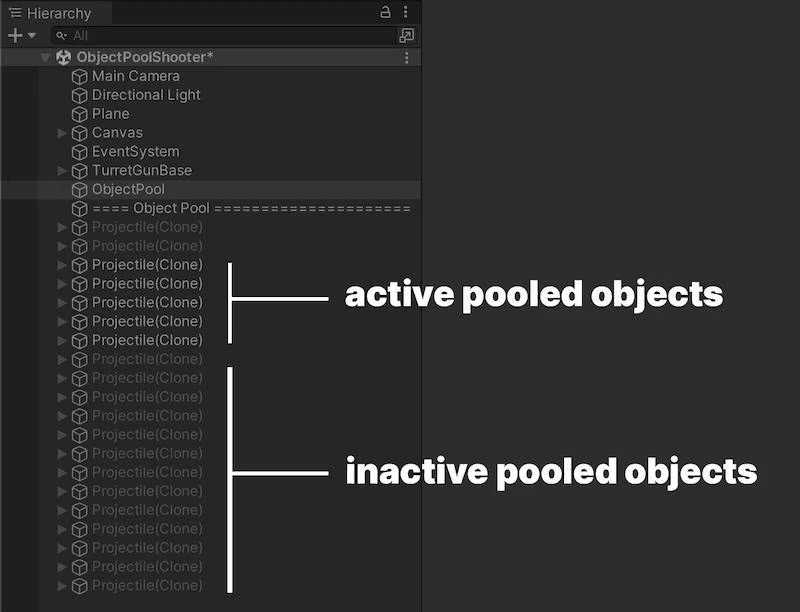
Object pooling is a design pattern that can provide performance optimization by reducing the processing power required of the CPU to run repetitive create and destroy calls. Instead, with object pooling, existing GameObjects can be reused over and over.
The key function of object pooling is to create objects in advance and store them in a pool, rather than have them created and destroyed on demand. When an object is needed, it’s taken from the pool and used. When it’s no longer needed, it’s returned to the pool rather than being destroyed.
Rather than regularly instantiating and destroying GameObjects (e.g., shooting bullets from a gun), use pools of preallocated objects that can be reused and recycled.
This reduces the number of managed allocations in your project and can prevent garbage collection problems.
Unity includes a built-in object pooling feature via the UnityEngine.Pool namespace. Available in Unity 2021 LTS and later, this namespace facilitates the management of object pools, automating aspects like object lifecycle and pool size control.
Learn how to create a simple object pooling system in Unity here. You can also see the object pooling pattern, and many others, implemented in a Unity scene in this sample project available on the Unity Asset Store.

Store static unchanging values or settings in a ScriptableObject instead of a MonoBehaviour. The ScriptableObject is an asset that lives inside of the project that you only need to set up once.
MonoBehaviours carry extra overhead since they require a GameObject – and by default a Transform – to act as a host. That means that you need to create a lot of unused data before storing a single value. The ScriptableObject slims down this memory footprint by dropping the GameObject and Transform. It also stores the data at the project level, which is helpful if you need to access the same data from multiple scenes.
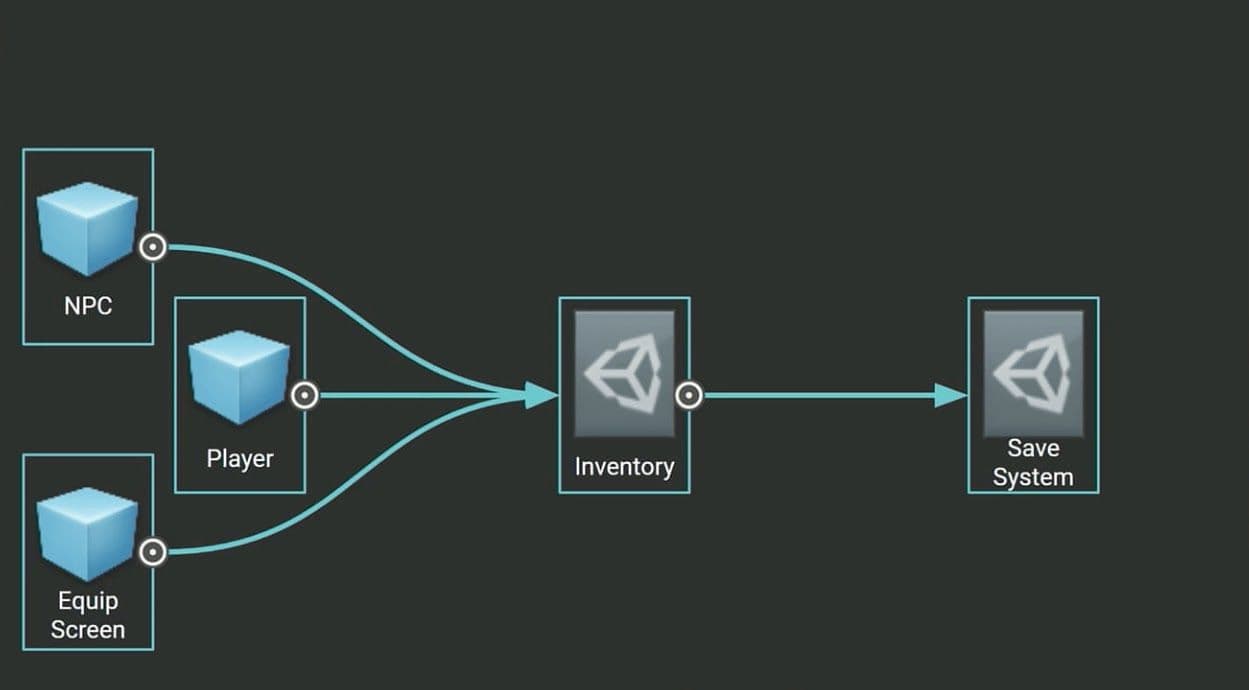
A common use case is having many GameObjects that rely on the same duplicate data, which does not need to change at runtime. Rather than having this duplicate local data on each GameObject, you can funnel it into a ScriptableObject. Then, each of the objects stores a reference to the shared data asset, rather than copying the data itself. This is a benefit that can provide significant performance improvements in projects with thousands of objects.
Create fields in the ScriptableObject to store your values or settings, then reference the ScriptableObject in your MonoBehaviours.
Using fields from the ScriptableObject can prevent unnecessary duplication of data every time you instantiate an object with that MonoBehaviour.
In software design, this is an optimization known as the flyweight pattern. Restructuring your code in this way using ScriptableObjects avoids copying a lot of values and reduces your memory footprint. Learn more about the flyweight pattern and many others, as well as design principles in the e-book Level up your code with design patterns and SOLID.
Watch this Introduction to ScriptableObjects tutorial to see how ScriptableObjects can benefit your project. Reference Unity documentation here as well as the technical guide Create modular game architecture in Unity with ScriptableObjects.


You can find many more best practices and tips for advanced Unity developers and creators from the Unity best practices hub. Choose from over 30 guides, created by industry experts, and Unity engineers and technical artists, that will help you develop efficiently with Unity’s toolsets and systems.