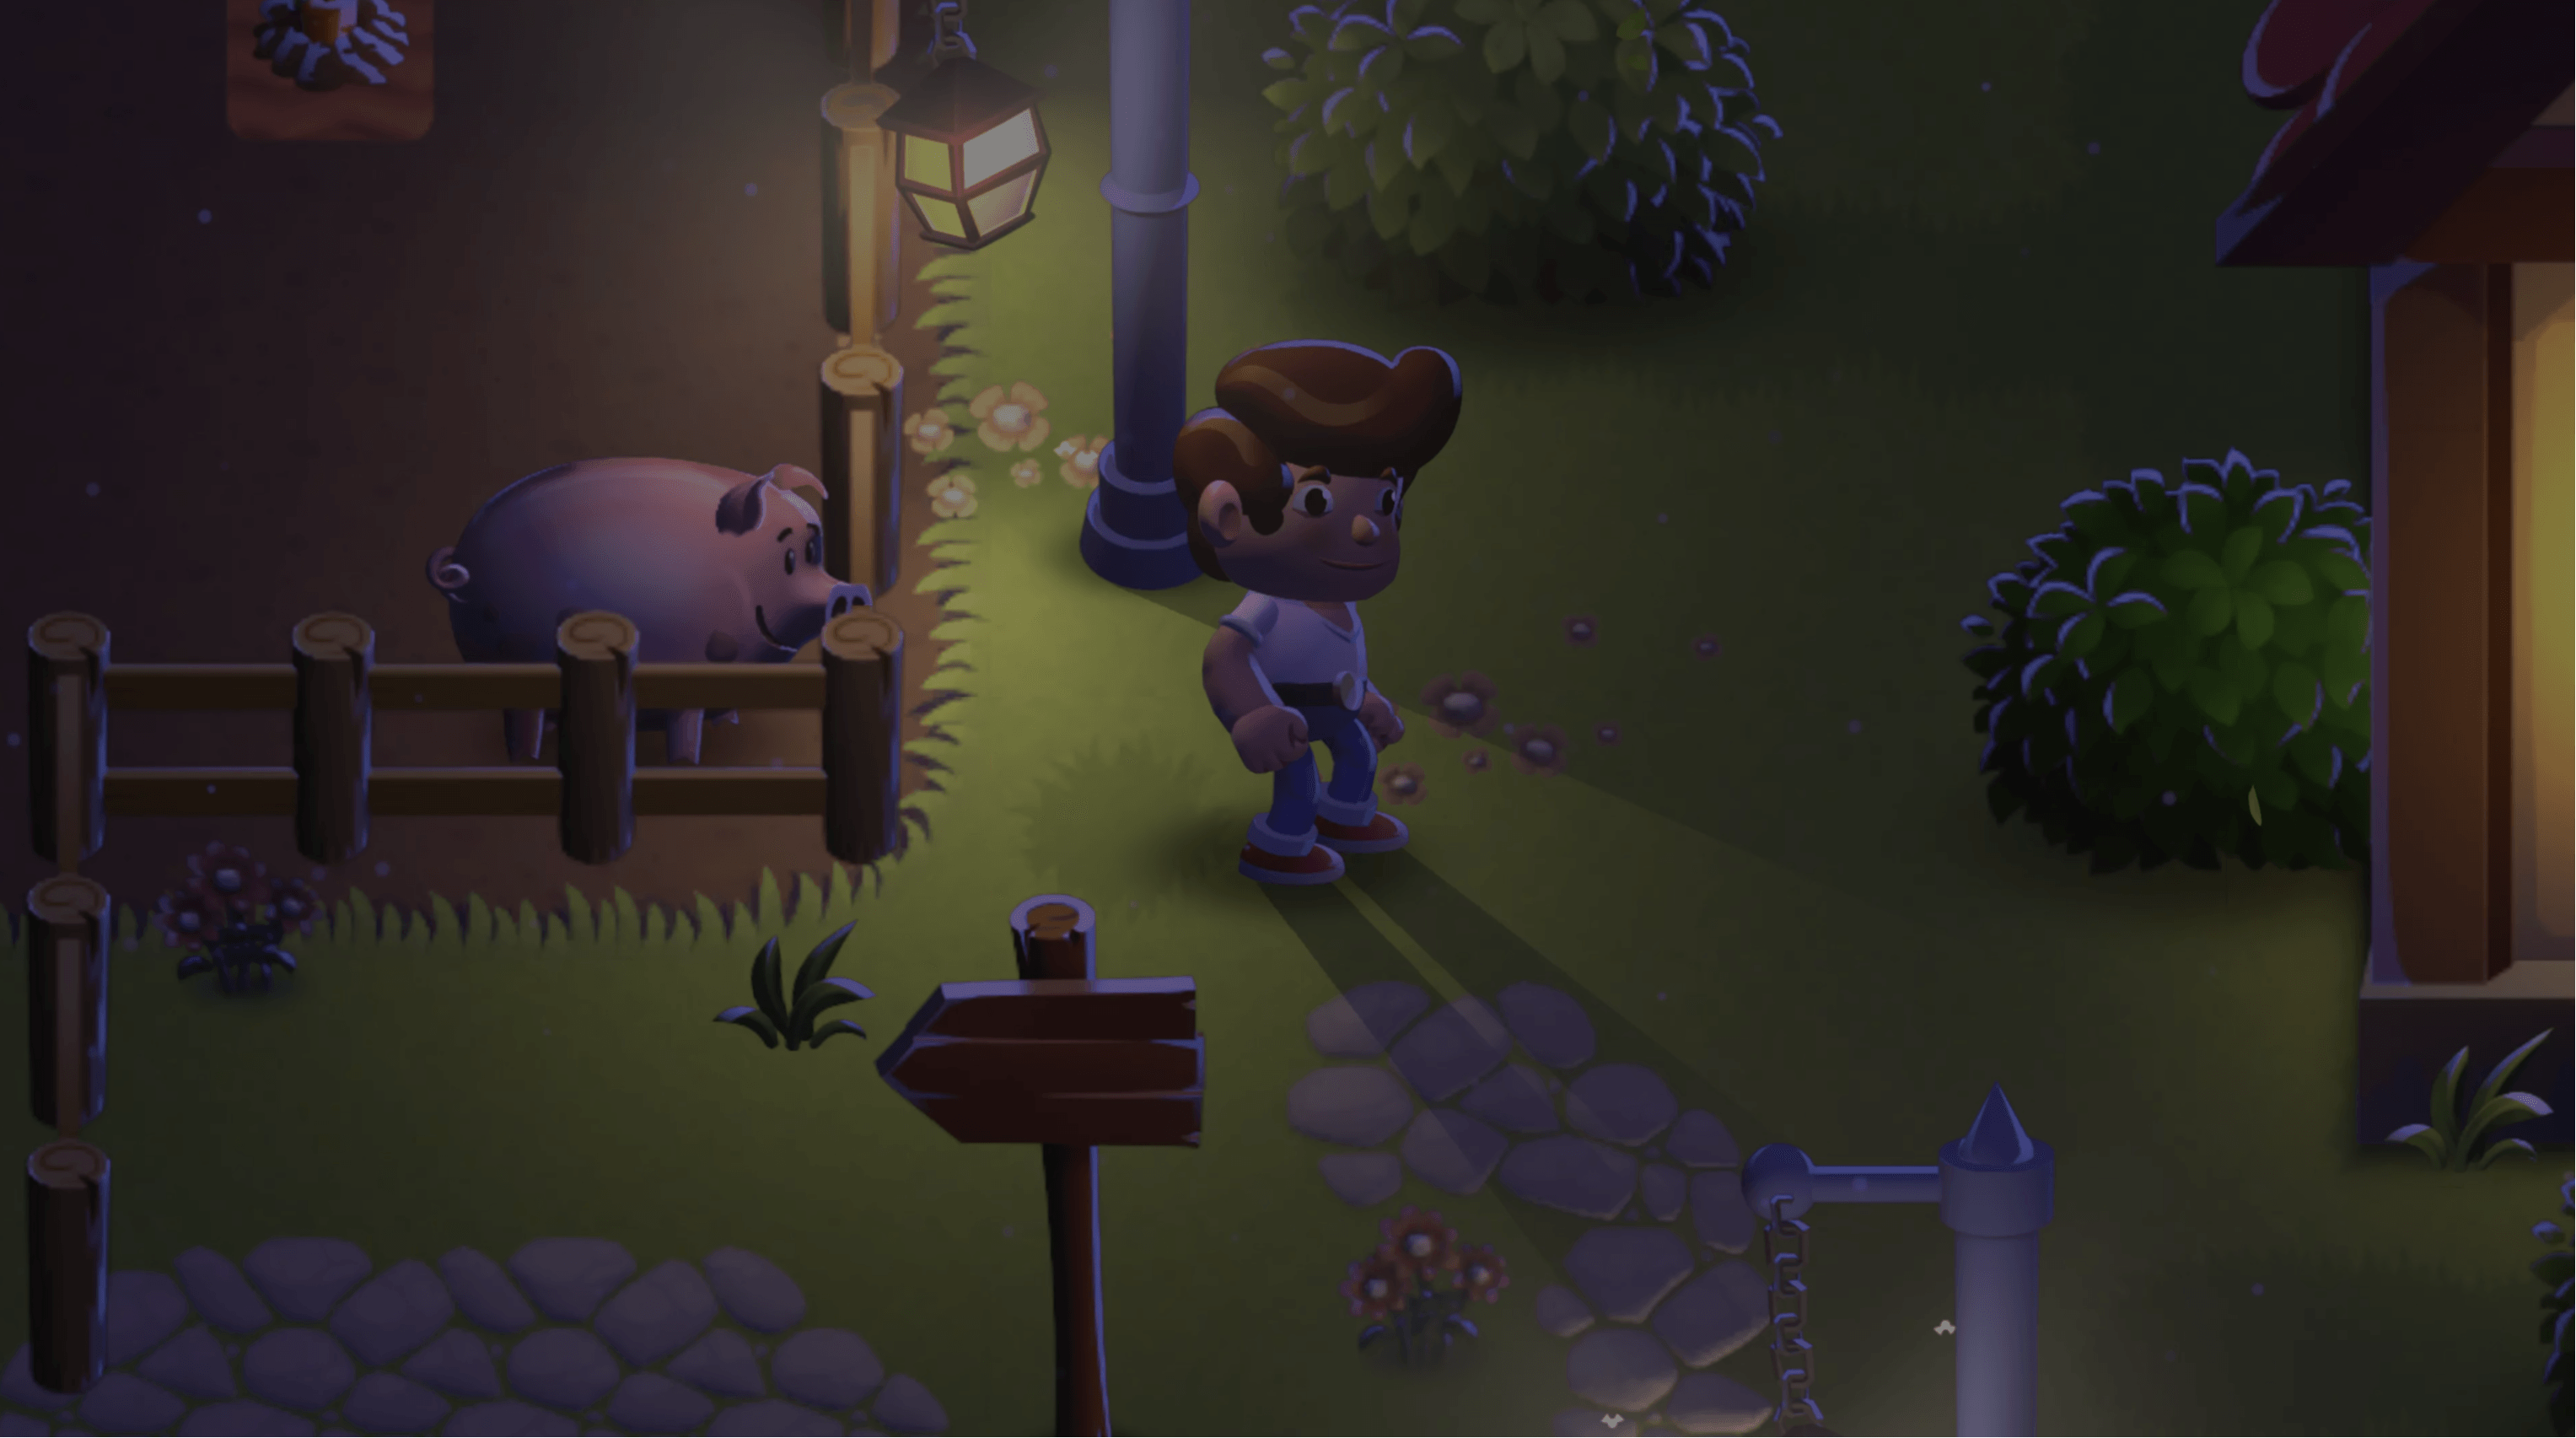
Learn how the character in the Unity sample project, Happy Harvest, was animated. This article covers rigging, 2D skeletal animations, sprite swapping, and more.
Happy Harvest is a sample 2D top-down farming simulation game made possible with the latest capabilities of the Universal Render Pipeline (URP) and Unity 2022 LTS.
You can find these techniques, plus many more, in the e-book 2D game art, animation, and lighting for artists.
Read the other articles in this series to learn how to replicate the effects and visuals in Happy Harvest:
- How to create art and gameplay with 2D tilemaps
- 2D light and shadow techniques in the Universal Render Pipeline
- 2D special effects with the VFX Graph and Shader Graph (coming soon)
Download Happy Harvest from the Unity Asset Store today.
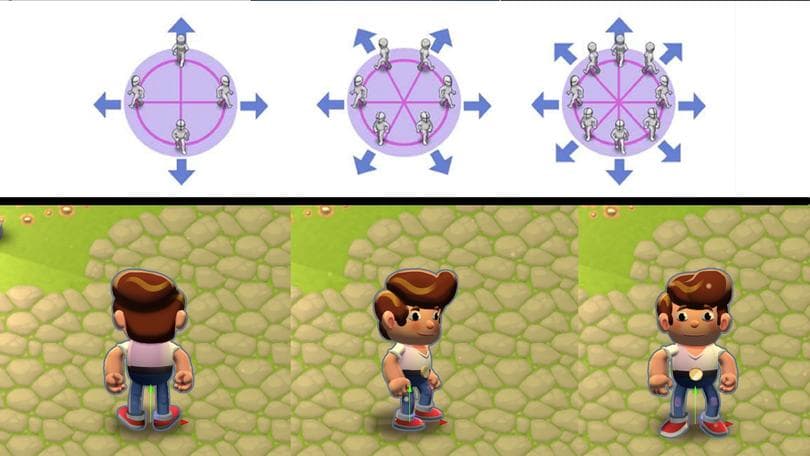
Happy Harvest’s main character
In addition to 2D lighting, other techniques used to create the skeletal animated character in Happy Harvest include rigging the character’s face to create different expressions, sprite libraries for character variations, and Sprite Swap for switching between sprites attached to the same bone during the animation process.
Perspective considerations
In a top-down game, characters need to be drawn and animated from different perspectives. With Happy Harvest’s cartoon style, you can achieve nice visuals by limiting the directions to four.
There are three animation sets for the character: Right (or “side”), up, and down. The character is also flipped for left- or right-facing animations.
This comes with a trade-off. If the character faces right and holds a watering can in their right hand, the watering can will have to switch hands when the character is flipped to face left.
Handling variations per direction
Handling the change in direction can be challenging with a top-down perspective. You can add complexity if you create one child GameObject per direction for the character, and enable or deactivate them based on the current direction of the character. In Happy Harvest, the artist opted to use a single skeleton with different direction-facing sprites that were swapped based on direction. This solution worked for the blocky, cartoon style of the sample.
General 2D animation rules
Here are some techniques from the demo for designing a character that is rigged and animated:
Draw the character in a neutral position with arms and legs straight. If parts of the body are bent, it can cause issues when you’re animating.
Make the resolution a little higher than your game’s Pixels per Unit (PPU) suggests. A resolution might look good at rest, but rotating and stretching images can cause pixelation.
If you’re using 2D lighting extensively in your game and want to make the most of normal maps, don’t paint the light and shadow onto your sprite. Instead, paint nondirectional shadows. This technique is called ambient occlusion. Your sprite will look better, but you’ll want to avoid using any directional light like sunlight.
Body part layers swapped using the Sprite Swap feature should be grouped accordingly. For example, all layers with mouth position
Set up a character in 2D animation
Traditional 2D animation can be the most time-consuming and challenging part of developing art for a 2D game. Skeletal animation can help you save time, create smooth and adaptable animation, and enable you to create more animations with fewer assets.
The PSD workflow
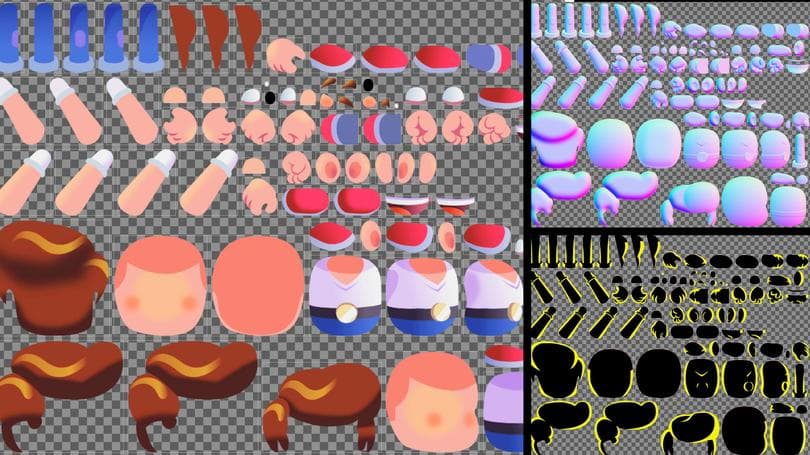
The 2D Animation package enables you to import your character artwork directly from Photoshop into Unity. The PSD Importer package handles layered PSD and PSB files for this purpose. You can import all of the character’s layers as sprites and place them exactly as they were painted in the app.
When you select an imported PSD or PSB file, it shows options similar to the sprite import settings, but with additional ones for 2D animation and rigging. The key options you’ll need to select are:
Import Hidden Layers: This option imports all layers from a PSD or PSB file, including hidden layers.
Individual sprites (Mosaic): This setting is only available if the Texture Type is set to Multiple. It makes sprites from imported layers and puts them onto a texture atlas. Leave this option enabled if you want to rig a character.
Use as Rig: This option generates a character prefab with the same layer hierarchy and position as the PSD or PSB file.
Use Layer Group: This adds layer grouping from the PSD or PSB file. Turn it on to group parts of a character, like sprite-swapped parts.
In the Layer Management section you can see the hierarchy of layers, and manually add or remove layers to be imported.
Rigging in the Sprite Editor
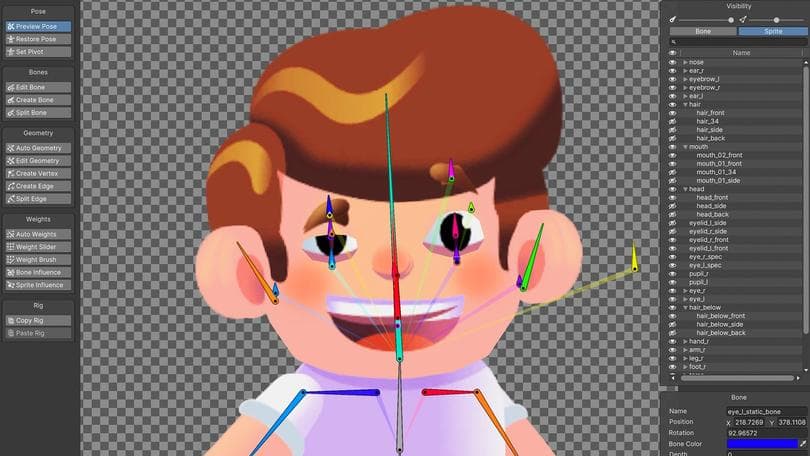
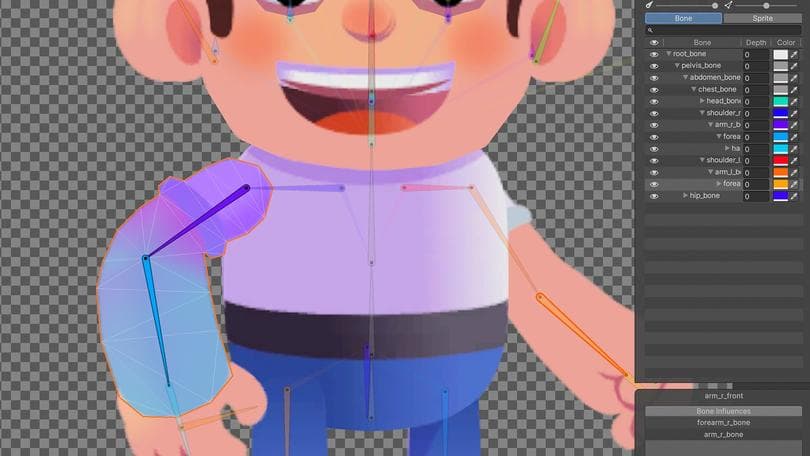
You can create a character’s skeleton in the Skinning Editor inside the Sprite Editor. Start by clicking the Create Bone button and then left-click on the main window area. The first click creates a bone center, and the second marks the bone tip location. This tool chains and nests bones inside one another.
Use the Edit Bone button to refine bones. The Split Bone button enables you to split bones in two. This is a good option for making limbs. If you make one leg bone and click where the knee should be, the bone will split into thigh and calf.
If you check the file named PSD_Character_Boy.psd in Happy Harvest, you’ll notice a few extra bones, like the one named face_bone. These allow the character’s head to turn slightly, giving it a near-tridimensional look. You can also look at the bones used to move the eyebrows and eyelids to make the character more expressive. These are effective details to add if the main character is talking to NPCs.
You can reparent and rename bones in the Bone list view. To open this view, click the Visibility button on the right of the top bar, and select the Bone tab. To change the bone’s parent, drag it in the list view. You can rename bones by clicking on the active bone’s name. Naming bones will help you find them later.
To verify that the hierarchy is correct, select the Preview Pose button and test some poses. To reset the position of bones, press the Reset Pose button on the toolbar.
Connecting sprites to bones, geometry, and weights
In order to assign sprites to bones, you’ll need to create geometry. Start by pressing the Auto Geometry button. A small pop-up window will open, and you can define how the geometry will be created.
It’s a good idea to set all sliders to zero to keep the geometry as simple as possible. Enable the Weights option to bind bones to the sprites automatically. Clicking the Generate For All Visible button creates and sets bone weights for all sprites. To do this for an individual sprite, double-click on the sprite. This is useful for tweaking the geometry of certain sprites.
To fully control a number of vertices and how the geometry bends, you’ll need to edit the mesh manually with the tools in the Geometry section.
Use as few vertices as possible. Fewer vertices helps you save on performance, since each vertex position needs to be calculated based on the bones’ rotation. Fewer vertices also make for better-looking mesh bending since it’s easier to set weights for fewer points. Additionally, each target platform has an ideal game vertex count, so it’s always a good idea to optimize geometry.
Weights
Once the geometry of your sprites is cleans, it’s time to set up weights. Weights define bone influence on each vertex from zero to one. Zero means that a bone has no influence over the vertex, and one means that the vertex will move like it’s glued to the bone. Good weights on the mesh can result in realistic-looking bending. Setting weights incorrectly can break the game’s illusion and distort your sprites.
To start setting up weights, you need to define which bones will affect a certain sprite. Click the Bone Influence button, and select a sprite. In the small pop-up window, you can set which bones influence the selected sprite. Set only the relevant bones that need to affect the sprite, and remove the rest.
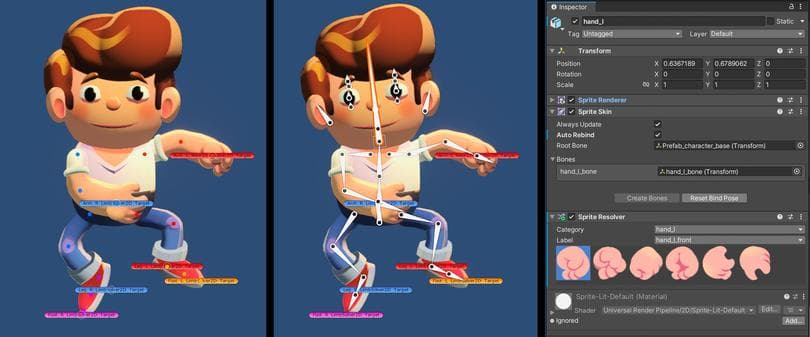
In Happy Harvest, you can see how several sprites are influenced by the same bone. For example, the hand_l_bone influences many versions of the hand, including side, front, and back.
Sprite libraries
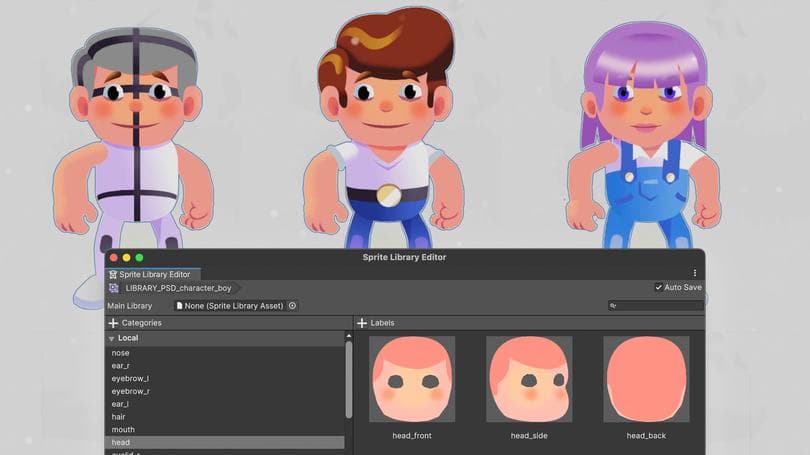
Not everything can be animated by rotating a bone. Sometimes you need another facial expression or hand pose, especially if you want the character to change the direction they’re facing. In this case, you can exchange one sprite with another with Sprite Swap. To do this, you first need to organize sprites into Categories and Labels in a Sprite Library Asset.
The Sprite Library Editor window is where you edit the content of a selected Sprite Library Asset. Select a Sprite Library Asset and then select Open in Sprite Library Editor in its Inspector window. You can also open the Sprite Library Editor window via Window > 2D > Sprite Library Editor.
A Sprite Library Asset groups the sprites it contains into Categories and Labels, and enables you to edit their contents in the Sprite Library Editor window. In Happy Harvest, look for LIBRARY_PSD_character_base, which contains a dummy character. Once we made sample animations to confirm that the categorization worked, we created variations like LIBRARY_PSD_character_boy. Since each Label has a matching version in all the Sprite Libraries, the referenced Label or sprite can be animated and shown correctly when one library is swapped for another.
You can see that the variations also share the same rig or skeleton by checking the different PSD files, like PSD_character_base and PSD_character_boy (matching bones and structure). These also bend during animation.
Sprite resolvers
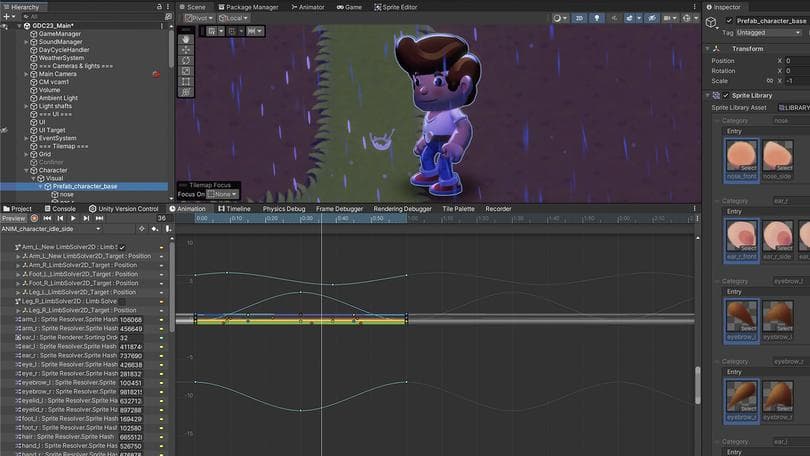
To observe the animations, select the character prefab and then select Prefab_character_base inside Visual (it’s recommended to include the visual part of a character as a child GameObject and use the root GameObject for collisions or other logic.)
The first frame of the animations, for example, ANIM_character_idle_side, is modifying key parameters for the direction the animation is created for. These include:
Sprite Resolver values: Sprite Resolver is a component attached to the GameObject of the limb that enables easy swapping between sprites of the same category in the Sprite Library. In this case, when you’re creating the animation, select the “side” versions of the different sprites.
Bone position: There’s a slight change in perspective from front or back facing to the ¾ side view. You can create this perspective by moving the starting position of the shoulder and leg bones, using the same rig for the front and back facing animations.
2D Inverse Kinematics for initial target position: The arm, foot, and legs use 2D Inverse Kinematics (2D IK) to calculate the position of the chain of bones based on a target position. You can see how the target position of those GameObjects is reset by looking at the LimbSolver2D_Target items.
The way the switch from right facing animations to left facing is handled in Happy Harvest is to use ANIM_character_face_left or ANIM_character_face_right. The only parameter they modify is the scale of the parent GameObject, changing X to a value of one or negative one, which makes the entire visual flip on the X axis. This is used in the animator that controls the character, which is explained in the next section.
Animation controller
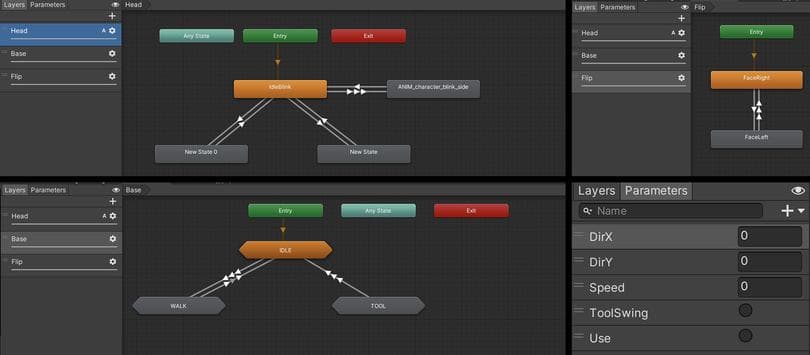
The arrangement and transition between animation clips in the demo is done with the Animator Controller, which sets up the flow of Animation Clips and Transitions that can read variables from the game or trigger changes of state.
In Happy Harvest, if you open the Animator window or the file CONTROLLER_PSD_Character_base_prefab, you’ll see that the Animator Controller for the project is set up. Examine the layers on the left side that manage different body parts. The head can play one animation while the body plays another, and so on. This offers more possibilities without increasing the number of animations to make. Here are the animation layers in the sample:
Head: This layer is used to make the character blink and look around. It’s marked with an A to indicate that it’s an additive layer. As an additive layer, it blends the animations of the head (blinking and looking around) with those in the other layers, like idle or walking. If this layer was an override instead of additive, it would not blend animations for a property used at the same time by several other animations.
Base: This is used for the main body animations – walk, idle, and using a tool. Each state has a hexagonal shape to indicate they are sub-state machines. If you double-click on IDLE, for example, you’ll see how the parameters DirX, DirY, and Speed are used under the Conditions property of the transition arrows to trigger the transition between animations, based on speed and facing direction.
Flip: This layer makes the character flip right or left based on the DirX parameter. The animation, as mentioned before, changes the scale of the entire GameObject, from X scale of one to negative one (flipped X direction).
You can use the Parameters tab (next to Layers) to connect the Animator
Creating new animations
You’ll be able to see the results in your game if you learn basic animation principles and spend time polishing character movement.
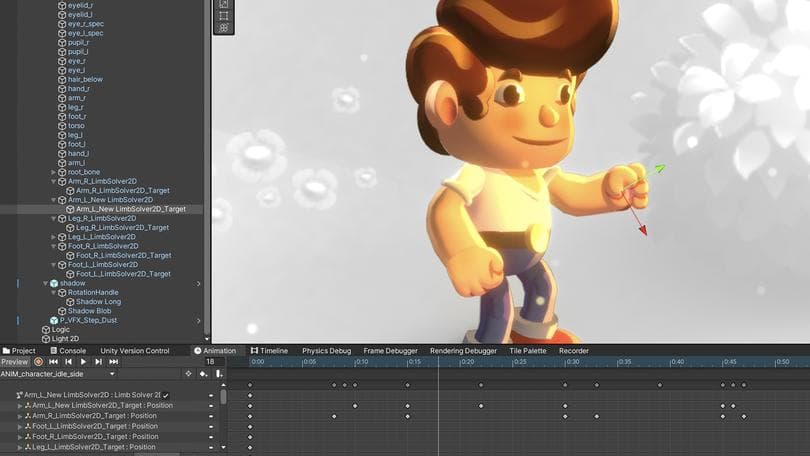
To create new animations for the main character, open an Animation window via Window > Animation > Animation.
Select the prefab Prefab_character_base. Clicking the Create New Clip option from the drop-down menu with existing animations creates a new Animation Clip. An Animation Clip is like a linear recording of how an object’s position, rotation, scale, and other properties change over time. Your new animation will automatically be added to the existing Animation Controller in the first animation layer.
Start animating by clicking the red Record button. Now all the changes you make to the character are recorded to an Animation Clip. You can continue to modify the animation by switching to curves or looking at individual properties. Start moving the bones under root_bone and see how the character behaves like a puppet.
2D Inverse Kinematics
The human body’s movement is complex. If you want to grab a glass of water off of a table, your hand must move to the point in space that the glass occupies. You do all this without even thinking about rotating your arm and forearm, because your brain processes these calculations unconsciously.
To achieve the same movement in a game, you’ll need to animate the rotation of both the arm and forearm at the same time. It’s a challenging task to match both rotations while making a believable hand movement. The 2D Inverse Kinematics tool, which is part of the 2D Animation package, calculates the rotations and allows a chain of bones to move them to target positions.
You’ll first need to add an IK Manager 2D component on the GameObject at the top of the hierarchy, similar to that of the Prefab_character_base. This component is responsible for managing all the IK Solvers on the character. Clicking the + button adds a new solver. The solver calculates the rotation of bones to match the target transform.
In Happy Harvest, we added Limb solvers. This is the standard solver for legs and arms, which can solve up to two bones and the Effector (the property that defines the bone or Transform the IK Solver solves for). You can see how these work and are organized by looking at the GameObjects named LimbSolver2D at the bottom of the hierarchy of the character’s parent GameObject.
Other 2D animation effects in the project
Happy Harvest includes a number of simple and useful animations for background props or other characters. A few highlights include:
- The pig prefab has a simple setup without 2D IK that works well for a decorative element.
- The swinging movement of the street lamps (P_Lantern_Hanging) is an animation clip that plays in a loop and only changes the rotation of the sprite over time, without the need for rigging.
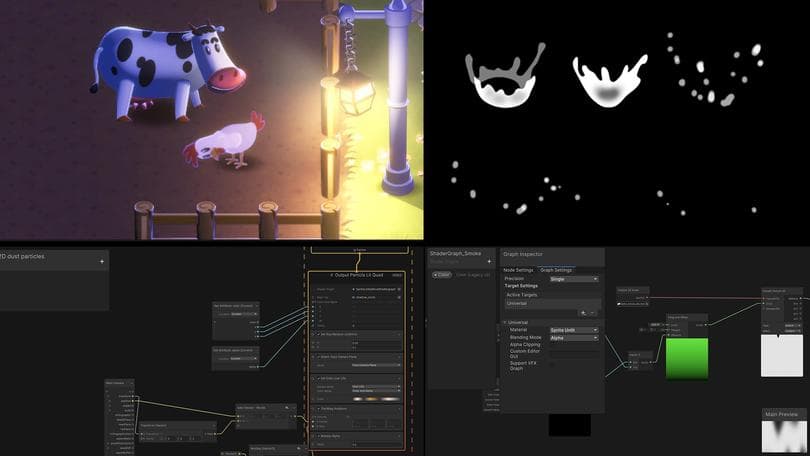
- Flipbook, or frame-by-frame, animation is a fast method for animating minor background characters with less overhead because it involves fewer frames. It’s also well suited to the water splash effect.
- The water effect and the breeze moving the bushes and trees are special effects created with the Shader Graph and VFX Graph.
More resources
If you haven’t yet, be sure to download these advanced e-books that cover 2D game development and rendering and visual effects (3D and 2D) in Unity:
2D game art, animation, and lighting for artists
Introduction to the Universal Render Pipeline for advanced Unity creators
The definitive guide to creating advanced visual effects in Unity
Plus, check out our other 2D demos, The Lost Crypt and Dragon Crashers.
You’ll find more resources for advanced programmers, artists, technical artists, and designers in the Unity best practices hub.