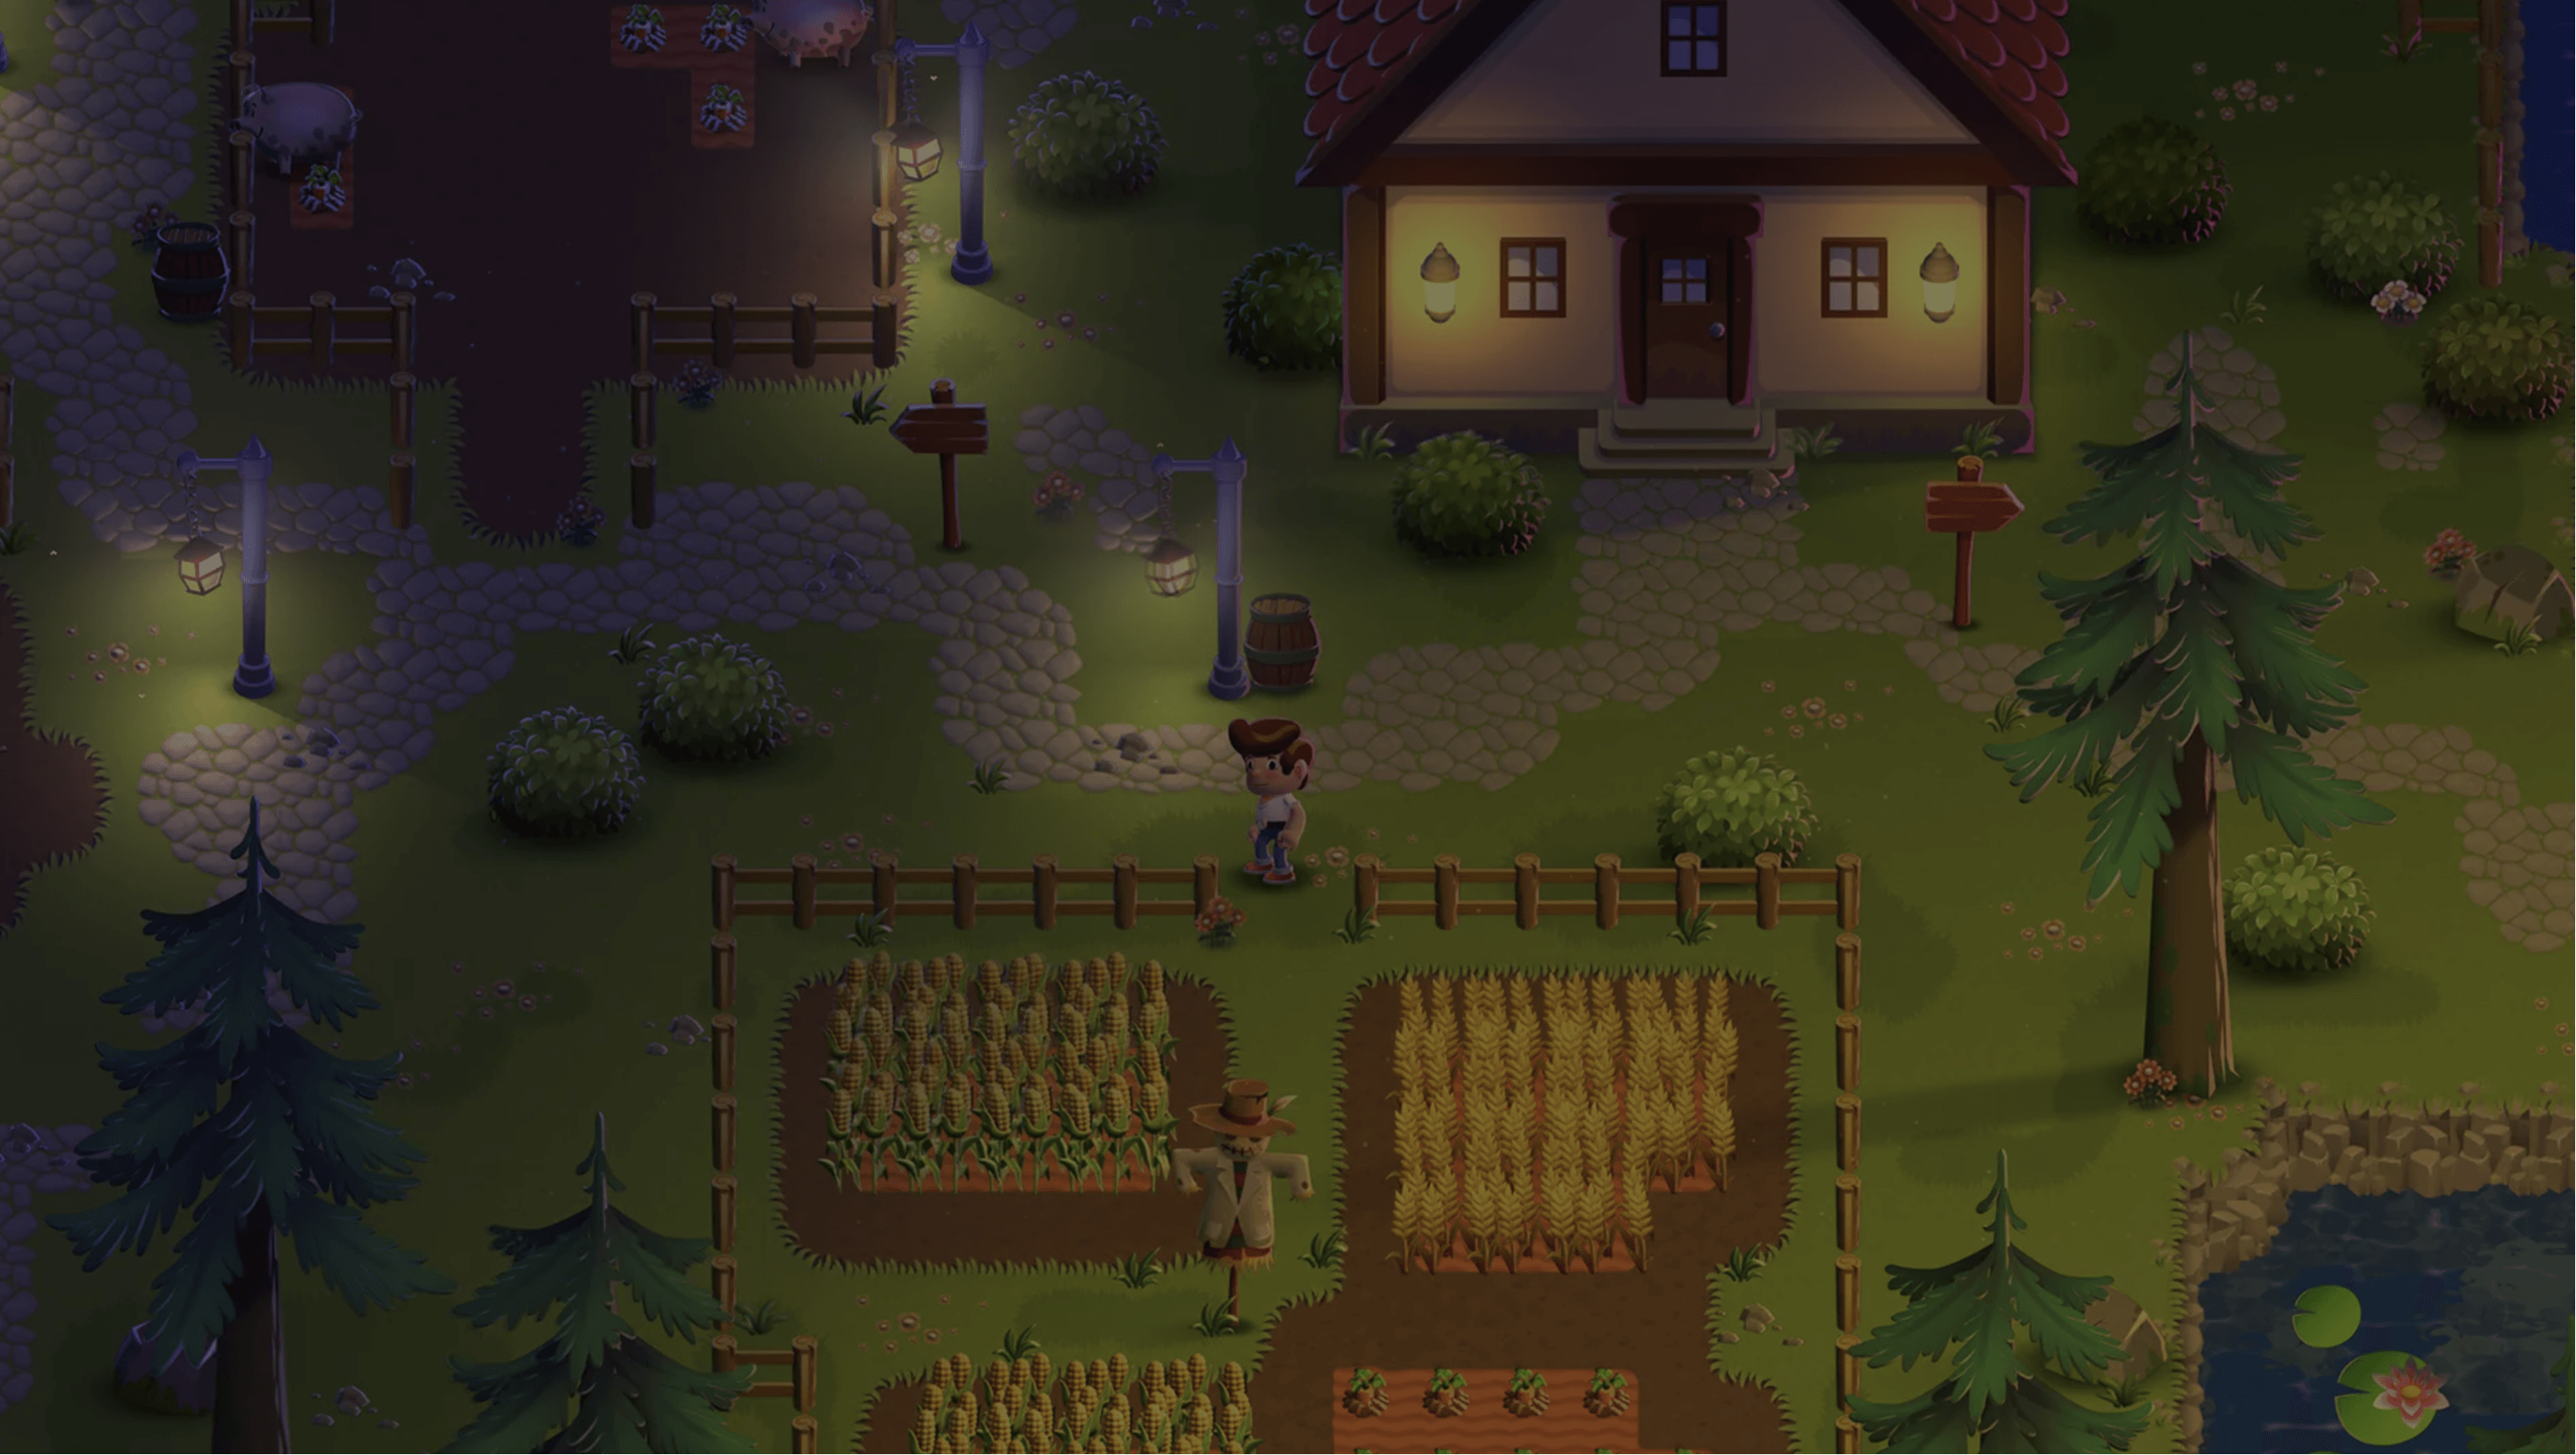
Learn how lights and shadows in the Happy Harvest demo were created using the Universal Render Pipeline (URP) in Unity 2022 LTS.
Happy Harvest is a sample 2D top-down farming simulation game. The techniques in this article, plus many more, are covered in detail in the e-book 2D game art, animation, and lighting for artists.
Read the other articles in this series to learn how to replicate the effects and visuals in Happy Harvest:
- How to animate 2D characters in Unity 2022 LTS
- How to create art and gameplay with 2D tilemaps
- 2D special effects with the VFX Graph and Shader Graph (available soon)
Download Happy Harvest from the Unity Asset Store today.
Dynamic lighting in 2D
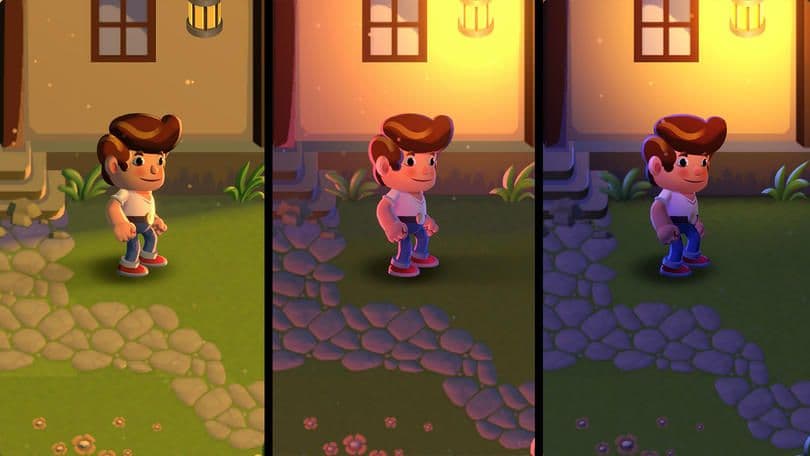
Dynamic 2D lighting can dramatically change a level’s mood and enhance gameplay. Examples include illuminating a cave with a torch, beaming light through a window to highlight sparkling dust motes and, in the case of Happy Harvest, animating a simulation of the day-to-night cycle.
Unity’s advanced 2D dynamic lighting system, together with Secondary Textures on your sprites, can make your characters pop with effective rim lighting and clearly shaded details.
2D light types and settings
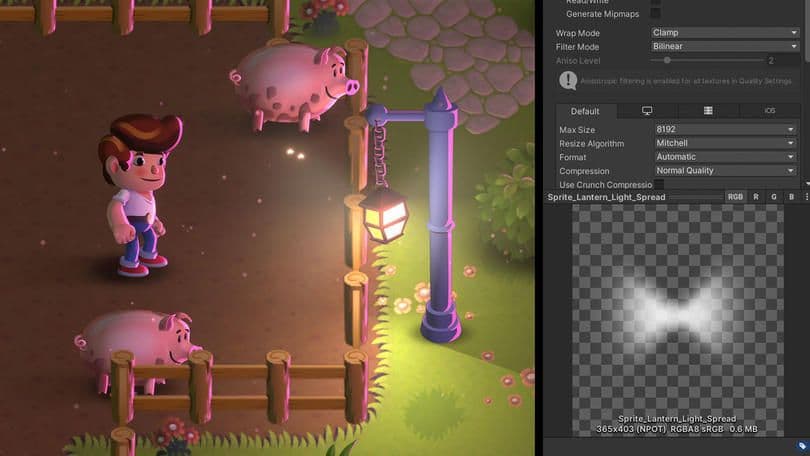
2D Lights are GameObjects with the Light 2D component attached. They work with the Sprite Renderer, Sprite Shape Renderer, and Tilemap Renderer. They also use sorting layers, and each light is able to affect one or more layers. You can select which layers will be affected in the Target Sorting Layers dropdown list.
There are four different types of 2D Lights:
Freeform: These can be shaped like an n-sided polygon. You can use this type of light in non-organic or stylized environments. It’s a good choice for efficiently lighting a large part of the environment (like a lava pool), simulating light shapes (like god rays coming through a ceiling opening), or conforming to the shape of a window where the light is projected.
Sprite: This shape enables you to use any sprite as a light’s texture. This comes in handy if you want a particular shape that is impossible to achieve with other light types. Examples of possible textures include lens flares, glares, light cookies, light shape projections such as disco ball lights, or lamps projecting stars against a wall.
Spot: This light can be a circle or a circle sector. It’s for spotlights, or to light a specific point with torch fire, candles, car lights, flashlights, volumetric light, and so on.
Global: This light doesn’t have a shape, but instead lights all objects on the targeted sorting layers. Only one Global Light can be used per Blend Style (the method of interaction between light and the sprites), and per sorting layer. Use it first to add a base environment light.
These settings are available for each light type:
Blend Style: A Blend Style determines the way a particular light interacts with sprites in the scene. All lights in the scene must have one of the four available Blend Styles, or modes: Additive, Modulate, Subtractive, and Custom. Each mode controls the way a sprite is lit by light.
Light Order and Overlap Operation: These enable you to control what happens when several lights are affecting the same pixels.
Shadows: When you enable this option, GameObjects with a Shadow Caster will cast shadows from this light source.
Volumetric: This allows you to control the light and darkness falloff of the projected shadow.
Normal maps: When enabled, the normal map information on the sprite is used to calculate the amount of light based on the pixel direction.
Secondary Textures in Happy Harvest
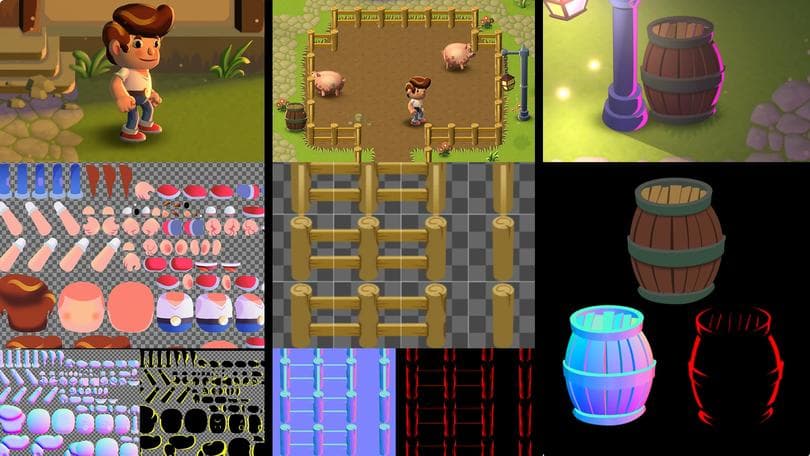
You can assign optional Secondary Textures to every sprite asset in a 2D project via Sprite Editor > Secondary Textures. There are two types of Secondary Textures: Normal map and mask map. In Happy Harvest, normal and mask maps are used for all elements, from the character to tilemaps and props, making it possible to create high-quality real-time lighting and shadow effects.
Normal map
Lights and normal maps are used throughout Happy Harvest to create the illusion of volume and give the demo a unique look and feel. You can use normal maps with Spot, Point, and Freeform lights.
The way a normal map is done can make or break the illusion of a sprite being 3D. Every pixel in a normal map stores data about the angles of the main texture. The red, green, and blue (RGB) channels store angle data for the X, Y, and Z coordinates. Every light that uses a normal map has a direction, and pixels on a texture with a normal map are shaded based on this direction as well as the direction of the pixel. This mimics how light works in real life – if a pixel is facing the light’s direction it will be lit, and if it’s facing away it receives no light.
Mask map
Masks control where lights can affect a sprite. There are four channels to select from as the mask channel: Red, Blue, Green, and Alpha. A mask max value means full light, and min value means no light.
Mask maps help polish your game by enabling you to add details to your visuals. They’re also used by the 2D Light Blend Styles.
The Blend Style takes a light’s value at a given pixel and multiplies that value by the mask at the same pixel. The resulting masked light value is then added, subtracted, or multiplied by the color at that pixel, based on which Blend Style is chosen.
Mask maps used for rim lights
For readability purposes, characters often have a rim light around their silhouette as they move. Rim lighting is an effect used to highlight the contours of a character. It simulates light coming from behind an object and the natural properties of light scattering. This is also called the Fresnel effect. In a side-scrolling 2D game, the ground surface and background can help amplify the silhouette of the character. In top-down games, silhouettes are more embedded in the environment, so they benefit from a clear rim light to differentiate their shapes.
The main character and props in Happy Harvest include a mask map for the rim light effect. For the main character, the light area is drawn in the R channel, and the G channel is used for props. The reason for this is to light the character’s silhouette differently from the normal props (with different sets of lights that only affect the R channel in the Blend Style channel).
Remember, normal maps should be imported in Unity as Normal Map, and mask maps as the texture type Default. This ensures that, when packing textures with Sprite Atlas, each texture is packed only in its correct atlas to avoid duplication.
How to create normal maps for 2D
2D lighting doesn’t look good on a sprite that already has shadows painted on. You’ll also end up doing double the amount of work because you’ll be “painting” the lighting in normal maps. If you paint non-directional shadows instead, your sprite will look better as long as you avoid any directional light, like sunlight.
Making normal maps for every sprite, tile, or sprite shape can be time consuming. Consider combining different techniques for generation, investing time in manual work where it really matters, and automating processes for background props. Note that if you generate the 2D sprite from a 3D modeling software like Blender or 3ds Max, this texture should be easy to generate.
Let’s look at some examples:
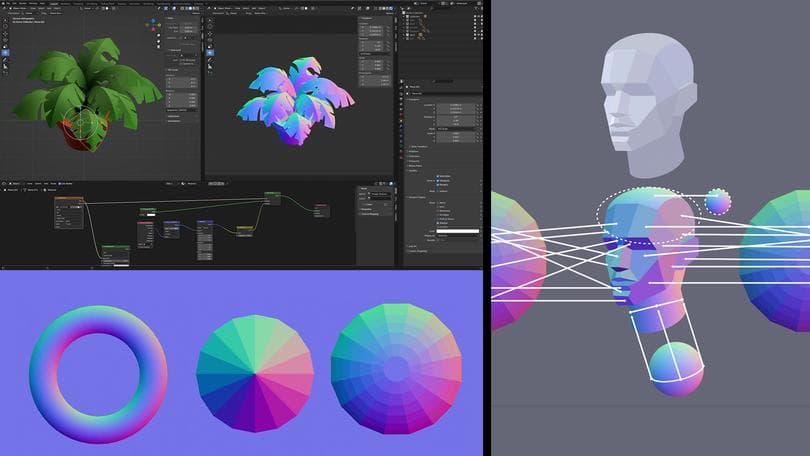
- Morph an existing normal map to adapt it to the 2D object at hand. For example, a ring or gem could use the sample normal maps from the image.
- Use a normal map generator tool like SpriteIlluminator, NormalPainter, Krita’s Tangent Normal Brush, or Laigter.
- Generator apps don’t take the angles of your sprite into account, so avoid using them on the entire sprite. They also don’t recognize the objects. Instead, they estimate shapes from the sprite colors or by adding a general filter similar to bevel or emboss in image editing apps.
- They can’t recognize the angles of a face, but attempt to guess where there should be a change in an angle. Despite this limitation, they’re still useful for generating normal maps of sprite sections that are beveled, like chains, cables, or a dragon’s tail, as well as surface normals for bricks, stones, wood, and more.
- Unity offers a way to generate normal maps from a grayscale heightmap. This is a texture where black represents the minimum surface height and white the maximum height. Import an image as a normal map and check the Create from Grayscale option. This technique is handy for quickly generating normal maps without leaving the engine.
- Sample the color from a sample image. First, obtain a normal map palette (you can find some online) so you can sample the colors used to represent the surface angles. You’ll only need to copy a palette to your favorite painting app and use the color picker to select a color to paint on your normal map.
- Angle colors don’t need to be 100% accurate. However, be sure to keep the overall shape of the sprite believable. If you use an angle color that doesn’t make sense in context, the shape will fall apart when lit.
- Painting normal maps can be tricky initially because it requires a good spatial imagination. Try starting with something simple like the base planes of the head. The example used here is a simplified human head model with a low-poly look.
- When painting a normal map, try to imagine the basic 3D shapes that are parts of your sprite, then visualize the angles of each individual part. If you know the angle, you’ll know which part of the palette sprite to sample color from.
- The example image shown here is working on a flat surface, but the process is similar when you’re painting with softer brushes. You can blend hard edges to achieve a more natural look.
- Manually paint the lights and shadows on the object from three different angles, one per RGB channel, and combine the color channels. The light coming from the top should be using the G channel, the light coming from the right side should use the R channel, and the light coming from the center should use the B channel. Note that the B channel is optional, so you can reduce the workload while still achieving a believable look.
2D ambient lighting
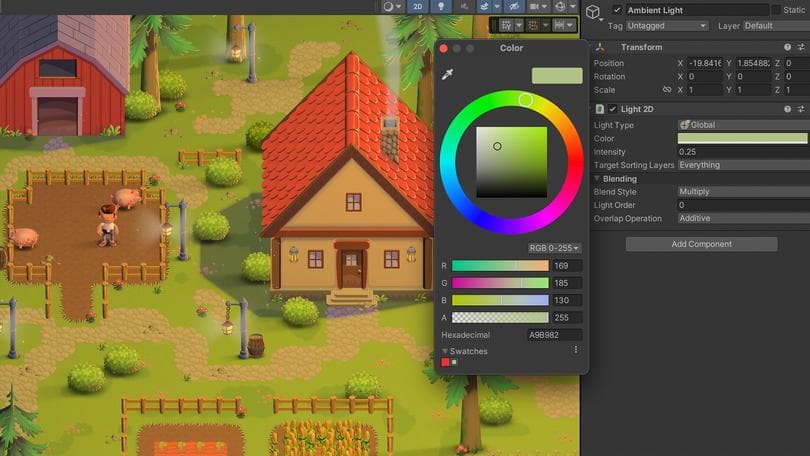
Global Lights affect the whole scene, making it easy to change the mood. They are used in the demo (the GameObject called Ambient Light) to apply a general tint and avoid dark areas.
A 2D Global Light is added by default in every new scene. They don’t need to be white or change the color, intensity, or layers affected to apply a uniform tint to the scene.
There should only be one Global Light in the scene. By manipulating its parameters, you can easily simulate different environment conditions, such as nighttime, by lowering intensity and applying a purple tint to the scene. In the demo, the color changes based on the time of the day, an effect managed by the DayCycleHandler script, explained later.
2D directional light or sunlight
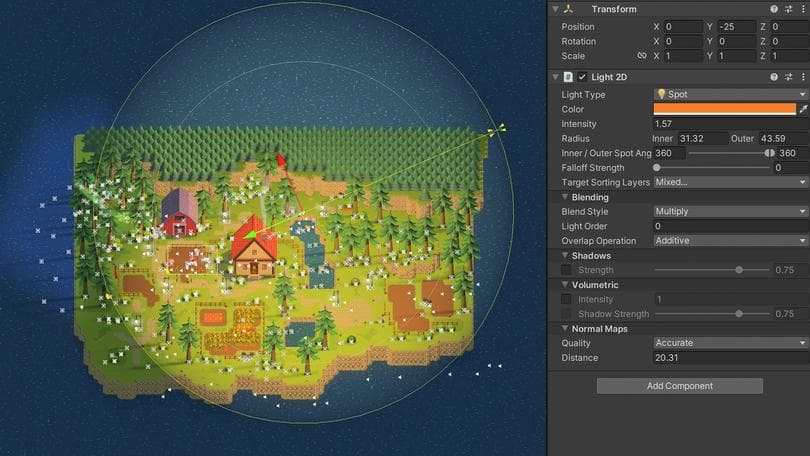
A large Spot light is used in Happy Harvest as the key light. It’s attached to the camera, so it’s always on the screen and rotates with a script that simulates the sun’s movement.
A 2D scene doesn’t have a direction light like 3D scenes. However, you can use a light source that will light up the sprites from the X and Y positions. This enables you to create effects like the sun moving as the day progresses, which can be important in top-down and simulation games. It’s also worth noting that using large lights comes at a cost if you are targeting low-end platforms. Check the performance tips section at the end of this article.
In the demo, look for the child GameObject named LightsRotator, which has four lights attached:
NightLight: Simulates moonlight direction
DayLight: Simulates sunlight direction (opposite position to the NightLight)
NightLightRim: Similar to the NightLight moon direction light, but only for the character and prop rim lights
DayLightRim: Similar to the DayLight sunlight direction light, but only for the character and prop rim lights
The script that controls the movement of these lights also controls the color change throughout the day. Gradients pick the color for each light at a particular time. You can see these gradients in the DayCycleHandler script attached to the DayCycleHandler GameObject.
Creating depth with lights
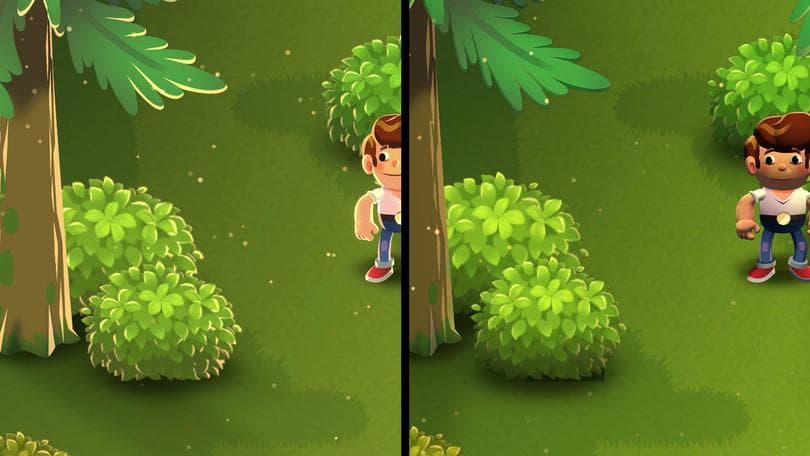
Lights and normal maps are used everywhere in Happy Harvest to create the illusion of volume. You can use normal maps with Spot, Point, and Freeform lights. Remember that you need to enable normal maps in the light object to use them in the sprites. Two quality settings are available: Fast and Accurate.
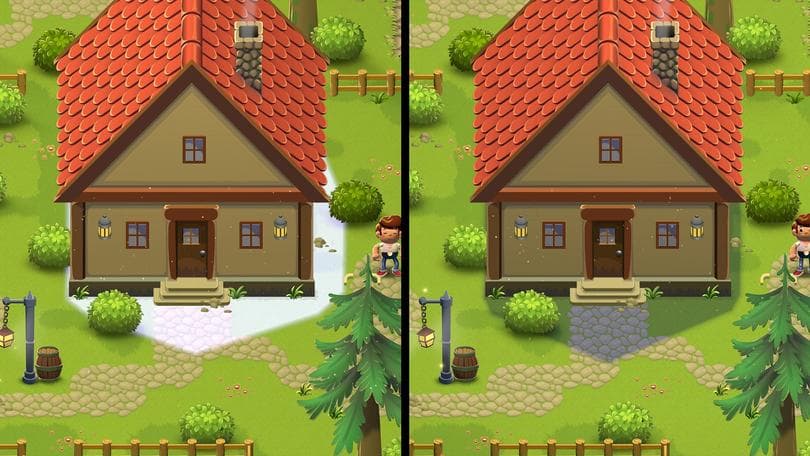
You can see how the bushes simulate volume based on the light position when normal maps are enabled. The street lamps and other props illuminate areas of interest and help the player navigate the path.
Creating 2D shadows
Infinite projection shadows
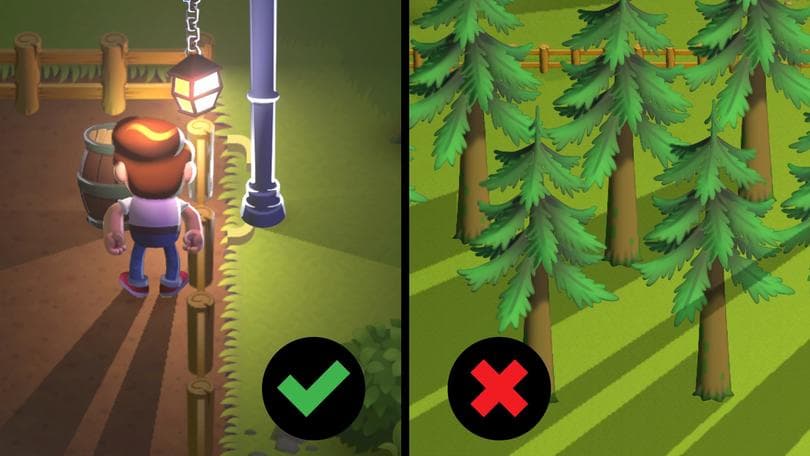
2D objects can project infinite shadows by attaching the Shadow Caster 2D component to any sprite or animated character.
Infinite shadows produce a nice effect when the area of light is limited or there’s a strong and focused light source like street lamps or a fireplace.
Remember to enable normal maps in the light object to use that texture in the sprites, and to activate the Shadows option.
Additionally, the silhouette of the character shouldn’t project a shadow since it would look unrealistic for a top-down game. A Shadow Caster 2D component affects the feet only since it’s attached to the foot bones inside the character GameObject (Visual > Prefab_character_base > root_bone > … > foot_r_bone and foot_l_bone).
Using blob shadows
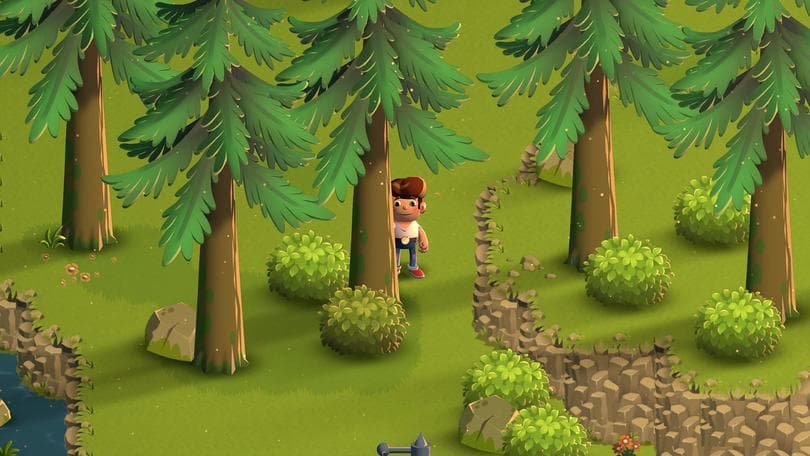
In a top-down game, an endless shadow projection coming from sunlight can look strange. A technique employed in Happy Harvest is using a blob shadow on the trees and bushes that rotates and stretches based on the time of day. The result is a softer shadow that follows the art direction better.
The function UpdateShadow in the script rotates this shadow. Like other blob shadows, this one is a sprite-based light. You can check this by inspecting any GameObject inside the parent GameObject called Trees. Look for the child GameObject called ShadowLong inside the GameObject named RotationHandle. The Shadow Instance script adds RotationHandle to the UpdateShadow script. This script then acts as the manager, using a function to update the size and rotation of the shadows.
The day-to-night cycle
Blob shadows work well for objects that are small or flat, like billboards or trees. However, a big building with depth and a sharply defined shape needs to cast a precise-looking shadow. In Happy Harvest, Freeform lights create these shadows. They mimic the projection that the building would produce on the ground, a necessary approximation, since there’s no depth information in 2D.
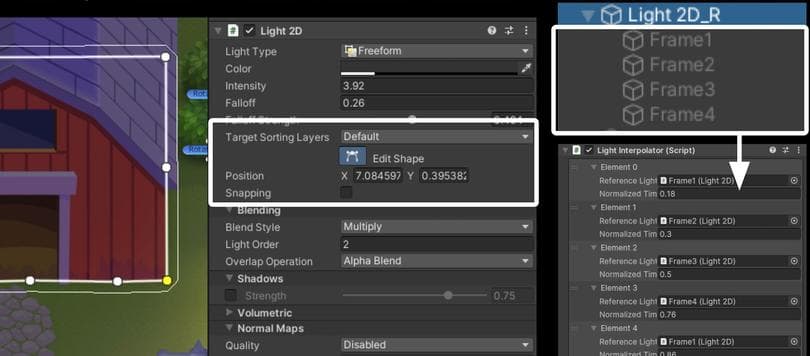
The challenge with well-defined shadows is how to make them work with the day-to-night cycle. To make the shadows react to the different positions of the sun, a Light Interpolator script tweens the vector points of the Freeform light between different reference shadows.
In the hierarchy of the demo, find the GameObject named Light_2D_Warehouse. Four Freeform lights are attached to it, mimicking the shadow that the building would project when the sun is up, down, and to the right and left of the building. This script creates a smooth interpolation, moving the different vector points using the API.
The top shadow is created first and then modified to create the other shadows. It’s important to ensure that each shadow has the same number of points and that the transition between those points is considered when creating each shadow.
Once the shadows are created, they are added to the Light Interpolator component script with a Normalized parameter that indicates the weight in time of each shadow during the day. The Preview Time feature in the script enables you to previsualize how they will look in the Editor.
Controlling the time of the day
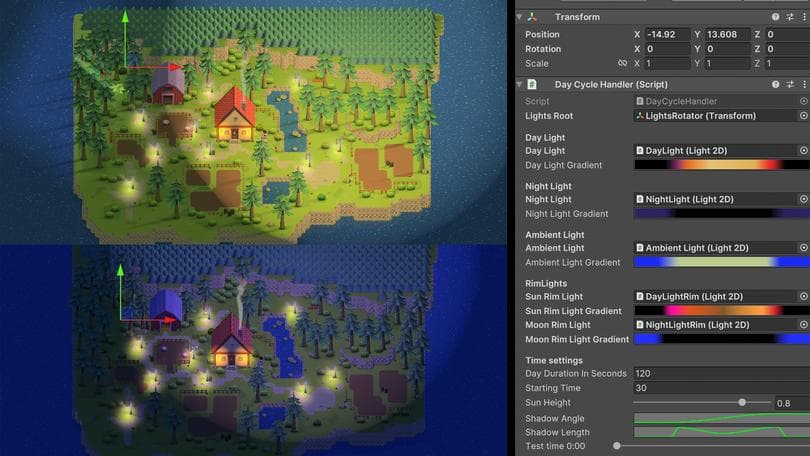
The DayCycleHandler manager is the script that orchestrates the day-to-night cycle. Let’s take a closer look at some of its features.
The GameObject named Lights Root is the parent that contains Spot lights for simulating sunlight and moonlight. It is rotated by the DayCycleHandler script.
The Night, Ambient, and Rim lights are named to convey their purpose. The gradients are the color tint each light displays to create the appropriate atmosphere.
For the Day Duration in Seconds variable, you can define the duration of the daytime in seconds and set the starting time. In Test Time, you can previsualize how the game will look at different times in the Editor.
The parameters to control the finite shadow effects are Shadow Angle and Shadow Length. In each of those fields, the animation curve indicates the clockwise angle of shadows throughout the day. The length parameter defines the length of the shadows in a given moment. For example, you might need a longer shadow when the sun is setting, and a shorter one when the sun illuminates the scene perpendicularly. Note that you might need to move the Test Time slider to refresh the Shadow Angle and Shadow Length settings.
Performance tips for 2D lights
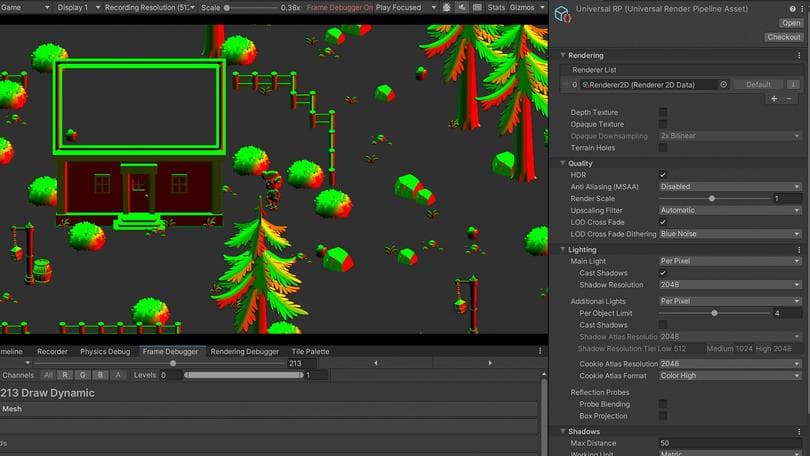
A common concern when using 2D lighting, especially on mobile platforms, is the cost of adding lights in the game. It’s recommended to test on the actual target hardware at the lowest specs supported. There are also a few general optimizations you can apply to boost performance:
Keep the fill rate as low as possible. One large light might perform worse than several small lights.
Lights perform best when batchable. Lights with the same lighting setup across contiguous layers can all be drawn together.
Keep your render scale as low as possible. Render scale adjusts the texture size used when rendering lighting, and a lower texture size means fewer pixels to be rendered.
Minimize the number of shadow casting lights on screen. There is a non-trivial performance cost when switching to draw shadows.
Minimize the number of different Blend Styles onscreen. There is a significant cost when switching to draw the Blend Styles.
Adjust the number of Max Light Render Textures and Max Shadow Render to fit your project’s needs. Higher numbers will increase performance (up to a limit), but they will also increase the memory needed. You will need to find the right number.
More resources
If you haven’t yet, be sure to download these advanced e-books that cover 2D game development and rendering (3D and 2D) in Unity:
2D game art, animation, and lighting for artists
Introduction to the Universal Render Pipeline for advanced Unity creators
The definitive guide to lighting in the High Definition Render Pipeline in Unity
Plus, check out our other 2D demos, The Lost Crypt and Dragon Crashers.
You’ll find more resources for advanced programmers, artists, technical artists, and designers in the Unity best practices hub.