Introduction to the VFX Graph in Unity
The Visual Effect Graph (VFX Graph) enables the authoring of both simple and complex effects using node-based visual logic. As one of several major toolsets available in Unity, the VFX Graph allows artists and designers to create with little or no coding.
Visual effects are key to crafting deeply immersive experiences for your players. And thanks to continuous hardware advancements, what used to be available only for Hollywood blockbusters can now be attained in real-time.
This article is an excerpt from our 120-page e-book, The definitive guide to creating advanced visual effects in Unity, which guides artists, technical artists, and programmers using the Unity 2021 LTS version of VFX Graph. Leverage it as a reference for producing richly layered, real-time visual effects for your games.
Getting started with real-time VFX in Unity
For complex, AAA-level visual effects on high-end platforms, use the VFX Graph to create GPU-accelerated particles in an intuitive, node-based interface.
More specifically, leverage the VFX Graph to:
Create one or multiple particle systems
Add static meshes and control shader properties
Create events via C# or Timeline to turn parts of your effects on and off
Extend the library of features by creating subgraphs of commonly used node combinations
Use a VFX Graph inside of another VFX Graph (e.g., smaller explosions as part of another, larger effect)
Preview changes at various rates and/or perform step-by-step simulation
The VFX Graph works with the Universal Render Pipeline (URP)* and the High Definition Render Pipeline (HDRP). It also adds support for the Lit outputs and 2D Renderer available with URP. Check the VFX Graph feature comparison for all render pipelines here.
The VFX Graph requires compute shader support to maintain compatibility with your device. Supported devices include:
macOS and iOS platforms using Metal graphics API
Linux and Windows platforms with Vulkan or GLES3 APIs
Android for a subset of high-end compute capable devices (only with URP)
Core graphics packages
As of Unity 2021 LTS, you can efficiently install VFX Graph in your project. Core graphics packages are now embedded within the main Unity installer to ensure that your project is always running on the latest, verified graphics code.
When you install the latest release of Unity, the most recent packages for URP, HDRP, Shader Graph, VFX Graph, and more, are included in the installation.
For details, see Getting started with VFX Graph or read this blog post.
* For Unity 2021 LTS onward, Camera Buffer access is only available with HDRP. Read more about the VFX Graph’s compatibility in the documentation.
The VFX Graph Asset and component
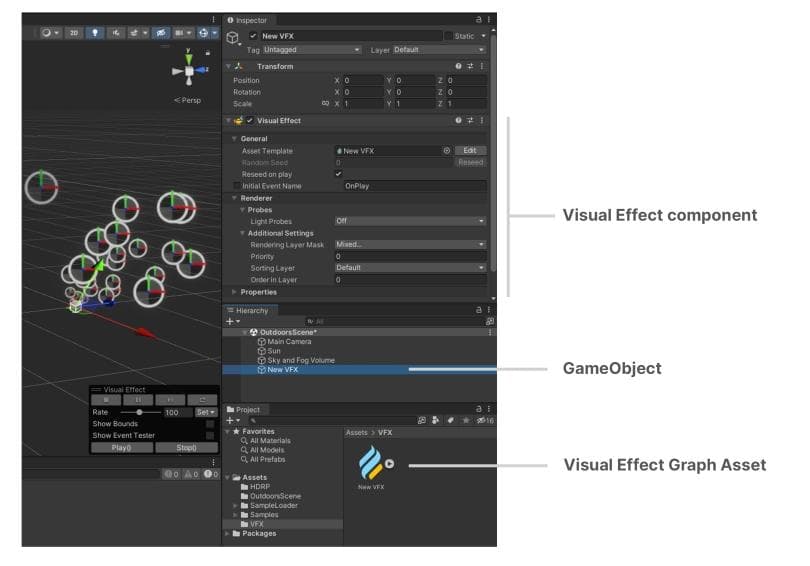
Any visual effect in the VFX Graph is made up of these two parts:
Visual Effect (VFX) component attached to a GameObject in the scene
Visual Effect (VFX) Graph Asset that lives at the project level
As Unity stores each VFX Graph in the Assets folder, you must connect each asset to a Visual Effect component in your scene. Keep in mind that different GameObjects can refer to the same graph at runtime.
To create a new visual effect, right-click in the Project window and navigate to Create > Visual Effects > Visual Effects Graph. This results in the VFX Graph Asset.
Unity provides a few ways of connecting the VFX Graph Asset to a GameObject with a Visual Effect component:
Drag the resulting asset into the Scene view or Hierarchy. A new default GameObject will appear in the Hierarchy window.
Assign the asset to an existing Visual Effect component in the Inspector. Create a GameObject separately and use the Add Component menu.
With a GameObject selected, drag and drop the asset into the Inspector window. This creates the Visual Effect component and assigns the asset in one quick action.
The VFX Graph Asset contains all the logic. Select one of the following ways to edit its behavior:
- Double-click the VFX Graph Asset in the Project window.
- Select the VFX Graph Asset in the Project window and click the Open button in the header.
- Click the Edit button next to the Asset Template property in the Visual Effect component.
The asset opens in the VFX Graph window, available under Window > Visual Effects > Visual Effect Graph.
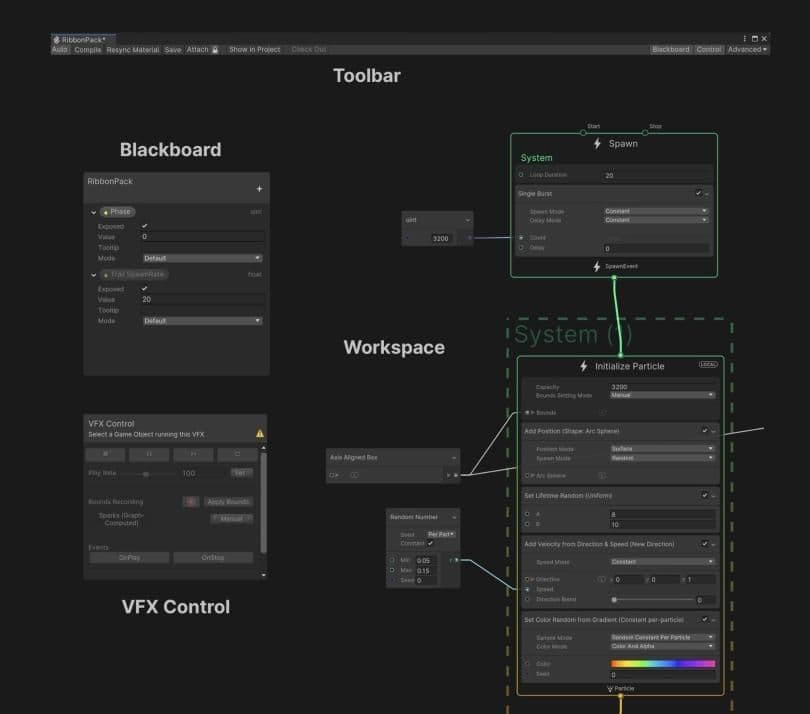
The VFX Graph window
Familiarize yourself with this window’s layout, including its:
Toolbar: To access Global settings, as well as toggles for several panels
Node workspace: To compose and edit the VFX Graph
Blackboard: To manage properties and Global variables that are reusable throughout the graph
VFX Control panel: To modify playback on the attached GameObject
Make sure you leave some space in the Editor layout for the Inspector. Selecting part of the graph can expose certain parameters, such as partition options and render states.
Graph logic
You must build your visual effect from a network of nodes inside the window’s workspace. The VFX Graph uses an interface similar to other node-based tools, such as Shader Graph.
Press the spacebar or right-click to create a new graph element. With the mouse over the empty workspace, select Create Node to create a graph’s Context, Operator, or Property. If you hover the mouse above an existing Context, use Create Block.
Opening up a complex VFX Graph can be daunting at first. Fortunately though, while a production-level graph can include hundreds of nodes, every graph follows the same set of rules – no matter its size.
Let’s examine each part of the VFX Graph to learn how they work together.
Systems
A VFX Graph includes one or more vertical stacks called Systems. Systems define standalone portions of the graph and encompass several Contexts. A System is denoted by the dotted line that frames the Contexts it consists of.
Each Context is composed of individual Blocks, which can set Attributes (size, color, velocity, etc.) for its particles and meshes. Multiple Systems can work together within one graph to create the final visual effect.
Find prebuilt templates under the Create Node > Systems menu to view some examples of graph logic.
Contexts
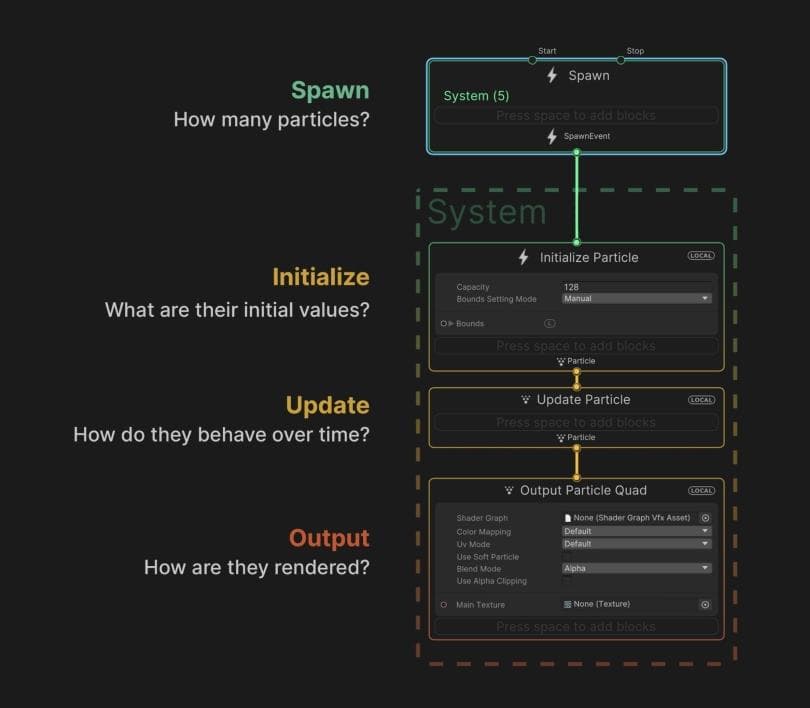
In the image above, you’ll notice the four Contexts present in the empty particle system graph.
The flow between the Contexts determines how particles spawn and simulate. Each Context defines one stage of computation:
Spawn: Determines how many particles you should create and when to spawn them (e.g., in one burst, looping, with a delay, etc.)
Initialize: Determines the starting Attributes for the particles, as well as the Capacity (maximum particle count) and Bounds (volume where the effect renders)
Update: Changes the particle properties each frame; here you can apply Forces, add animation, create Collisions, or set up some interaction, such as with Signed Distance Fields (SDF)
Output: Renders the particles and determines their final look (color, texture, orientation); each System can have multiple outputs for maximum flexibility
Systems and Contexts form the backbone of the graph’s “vertical logic,” or processing workflow. Data in a System flows downward, from top to bottom, and each Context encountered along the way modifies the data according to the simulation.
Systems are flexible, so you can omit a Context as needed or link multiple outputs together.
Contexts themselves behave differently depending on their individual Blocks, which similarly calculate data from top to bottom. You can add and manipulate more Blocks to process that data.
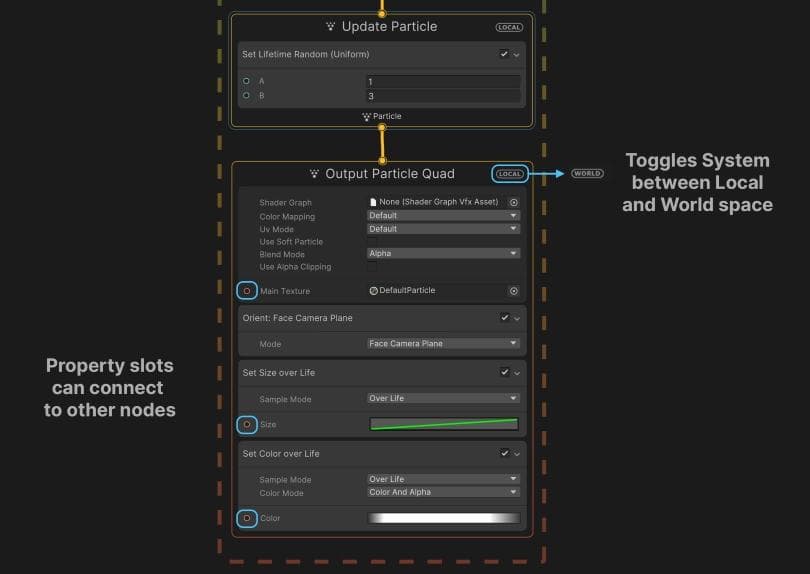
Click the button at the top-right corner of a Context to toggle the System’s simulation space between Local and World.
See the Node Library for a complete list of Contexts and Blocks.
Blocks
Blocks can do just about anything, from simple value storage for Color, to complex operations such as Noises, Forces, and Collisions. They often have slots on the left, where they can receive input from Operators and Properties.
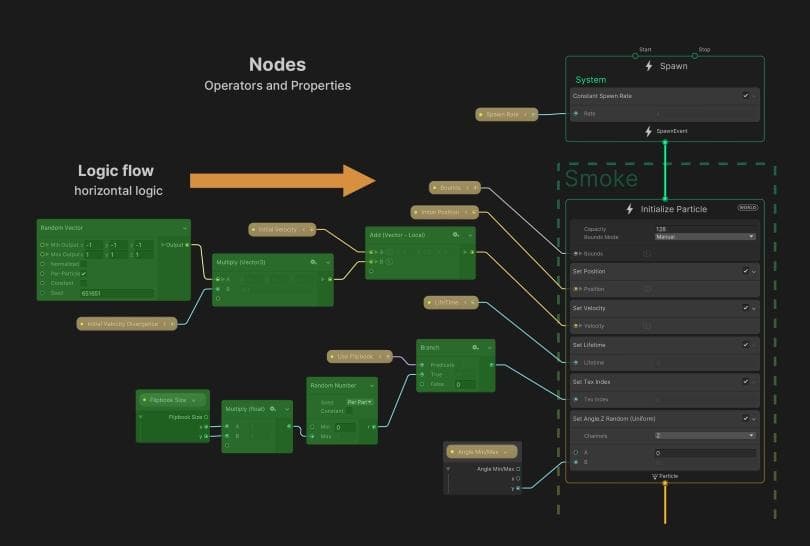
Properties and Operators
Just as Systems form much of the graph’s vertical logic, Operators make up the “horizontal logic” of its property workflow. They can help you pass custom expressions or values into your Blocks.
Operators flow from left to right, akin to Shader Graph nodes. You can use them for handling values or performing a range of calculations.
Use the Create Node menu (right-click or press the spacebar) to create Operator Nodes.
Properties are editable fields that connect to graph elements using the property workflow. Properties can be:
Any Type, including integers, floats, and booleans
Made from Compound components, such as Vectors and Colors
Cast and converted (e.g., an integer to a float)
Local or World space; click the L or W to switch between them
Properties change value according to their actual value in the graph. You can connect the input ports (to the left of the Property) to other Graph nodes.
Property Nodes are Operators that allow you to reuse the same value at various points in the graph. They have corresponding Global properties that appear in the Blackboard.
The Blackboard
A utility panel called the Blackboard manages Global properties, which can appear multiple times throughout the graph as Property Nodes.
Properties in the Blackboard are either:
Exposed: The green dot to the left of any Exposed Property indicates that you can see and edit it outside of the graph. Access an Exposed Property in the Inspector via script using the Exposed Property class.
Constant: A Blackboard property without a green dot is a Constant. It is reusable within the graph but does not appear in the Inspector.
New properties are Exposed by default, and as such, appear in the Inspector. You must uncheck the Exposed option if you want to hide your property outside of the graph, and create Categories to keep your properties organized.
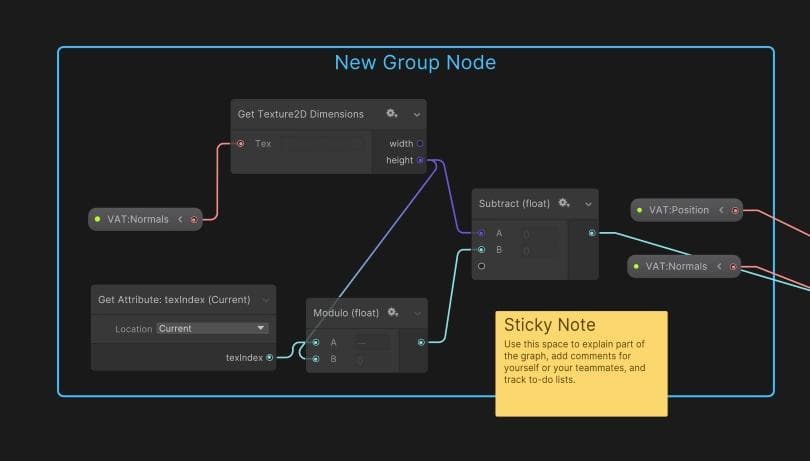
Group Nodes and Sticky Notes
As your graph logic grows, use Group Nodes and Sticky Notes to cut down on clutter. With Group Nodes, you can label a group of nodes and move them as one. On the other hand, Sticky Notes operate like code comments.
To create Group Nodes, select a group of nodes, right-click over them, then choose Group Selection from the Context menu. You can also drag and drop a node into an existing Group Node by holding the Shift key to drag it out. By deleting a Group Node, either with the Delete key or from the Context menu, you do not delete its included nodes.
Meanwhile, you can use Sticky Notes to describe how a section of the graph works, plus leave comments for yourself or your teammates. Add as many Sticky Notes as you need and freely move or resize them.
Subgraphs
A Subgraph appears as a single node, which can help declutter your graph logic. Use it to save part of your VFX Graph as a separate asset that you can drop into another VFX Graph for reorganization and reuse.
To create a Subgraph, select a set of nodes and then pick Convert To Subgraph Operator from the right mouse menu. Save the asset to disk and convert the nodes into a single Subgraph Node. You can package Systems, Blocks, and Operators into different types of Subgraphs.
Creating a Subgraph is analogous to refactoring code. Just as you would organize logic into reusable methods or functions, a Subgraph makes elements of your VFX Graph more modular.
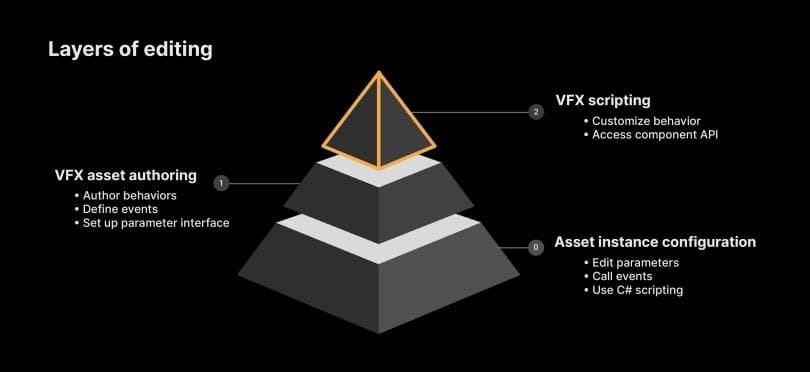
Levels of editing in VFX Graph
The VFX Graph supports three different levels of editing:
Asset instance configuration: Use this to modify any existing VFX Graph. Designers and programmers alike can adjust exposed parameters in the Inspector to tweak an effect’s look, timing, or setup. Artists can also use external scripting or events to change preauthored content. At this level, you’re treating each graph as a black box.
VFX asset authoring: This is where your creativity can truly take charge. Build a network of Operator Nodes to start making your own VFX Graph, and set up custom behaviors and parameters to create custom simulations. Whether you’re riffing off existing samples or starting from scratch, you can take ownership of a specific effect.
VFX scripting: This supports more experienced technical artists or graphics programmers using the component API to customize the VFX Graph’s behavior. With VFX scripting, your team can enjoy a more efficient pipeline for managing specific effects, and access advanced features like the Graphics Buffers.
Attributes
An Attribute is a piece of data you might use within a System, such as the color of a particle, its position, or how many of them you should spawn.
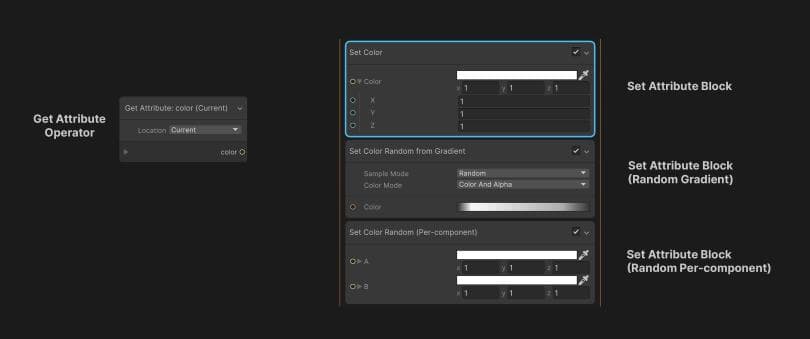
Use nodes to read from or write to Attributes. In particular, use the:
Get Attribute Operator to read from Attributes in the Particle or ParticleStrip System
Experimental Spawner Callbacks to read from Attributes in Spawn systems
Set Attribute Block to write values to an Attribute; either set the value of the Attribute directly or use a random mode (for example, set a Color Attribute with a Random Gradient or Random Per-component Block)
See the documentation for a complete list of Attributes.
Note: A System only stores Attributes when it needs them. In order to save memory, it does not store any unnecessary data. If you read that the VFX Graph has not stored the simulation data from an Attribute, the Attribute passes its default constant value.

Events
The various parts of a VFX Graph communicate with each other (and the rest of your scene) through Events. For example, each Spawn Context contains Start and Stop flow ports, which receive Events to control particle spawning.
When something needs to happen, external GameObjects can notify parts of your graph with the SendEvent method of the C# API. Visual Effect components will then pass the Event as a string name or property ID.
An Event Context identifies an Event by its Event string name or ID inside a graph. In the above example, external objects in your scene can raise an OnPlay Event to start a Spawn system or an OnStop Event to stop it.
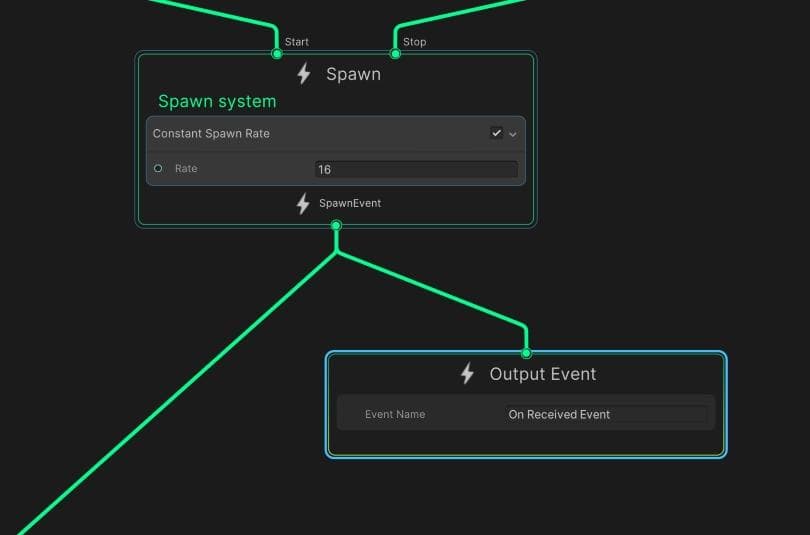
Output Events
You can combine an Output Event with an Output Event Handler. Output Events are useful if the initial spawning of the particles needs to drive something else in your scene. This is common for synchronizing lighting or gameplay with your visual effects.
The above example sends an OnReceivedEvent to a GameObject component outside of the graph. The C# script will then react accordingly to intensify a light or flame, activate a spark, etc. See the Interactivity section of the VFX Graph e-book for more information on Output Events.
At the same time, you can use GPU Events to spawn particles based on other particle behavior. This way, when a particle dies in one system, you can notify another system, which creates a useful chain reaction of effects, such as a projectile particle that spawns a dust effect upon death.
These Update Blocks can send GPU Event data in the following way:
Trigger Event On Die: Spawns particles on another system when a particle dies
Trigger Event Rate: Spawns particles per second (or based on their velocity)
Trigger Event Always: Spawns particles every frame
The Blocks’ outputs connect to a GPU Event Context, which can then notify an Initialize Context of a dependent system. Chaining different systems together in this fashion helps you create richly detailed and complex particle effects.
The Initialize Context of the GPU Event system can also inherit Attributes available in the parent system prior to the Trigger Event. So, for instance, by inheriting its position, a new particle will appear in the same place as the original particle that spawned it.
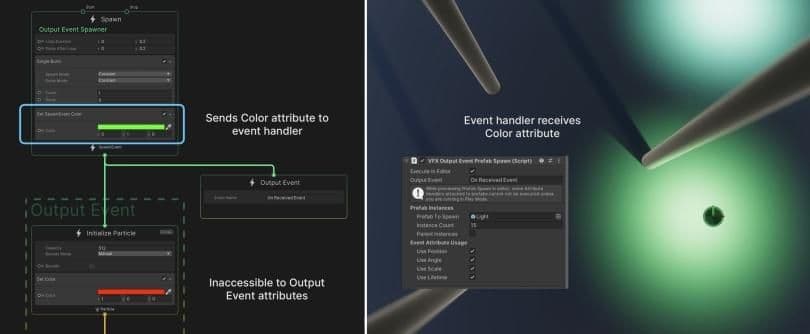
Event Attributes
Use Event Attribute Payloads to pass data like 3D position or color along with the Event. These Payloads carry Attributes that implicitly travel through the graph where you can “catch” the data in an Operator or Block.
You can also read Attributes passed with Spawn Events or Timeline Events. The Set SpawnEvent Attribute Block modifies the Event Attribute in a Spawn Context.
To catch a Payload in an Initialize Context, use Get Source Attribute Operators or Inherit Attribute Blocks.
However, it’s important to keep these caveats in mind when using Event Attributes:
Regular Event Attributes can only be read in the Initialize Context. You cannot inherit them in Update or Output. To use the Attribute in a later Context, you must inherit and set it in Initialize.
Output Event Attributes only carry the initial values set in the Spawn Context. They do not catch any changes that occur later in the graph.
See Sending Events in the Visual Effect component API for more details.
Exploring VFX sample content
A VFX Graph is more than the sum of its parts. It requires a solid understanding of how to apply nodes and Operators, along with the ways they can work together.
The VFX Graph Additions in the Package Manager demonstrate several simple graphs, making them a great starting point for learning how to manage particles.
The following sections introduce you to some of the common Blocks and Operators you’ll encounter as you explore the samples provided.
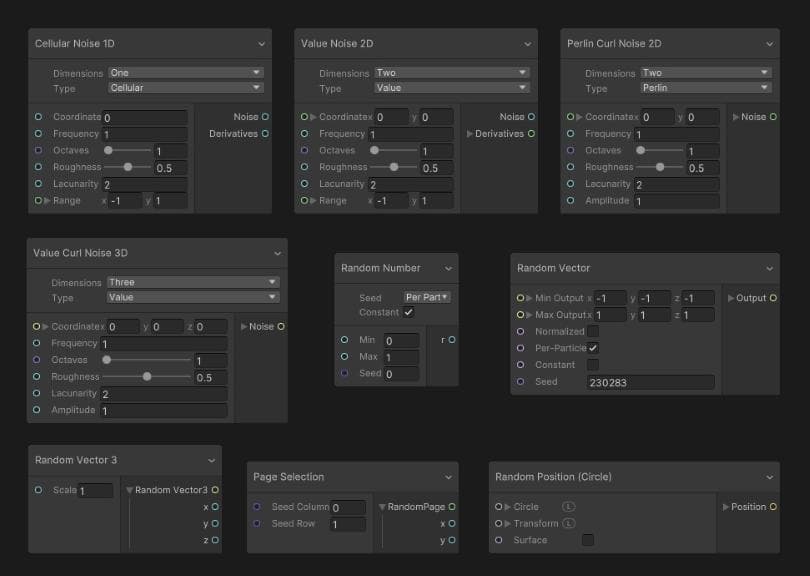
Noise and Operators
Procedural Noise helps reduce the “machine-like” look of your rendered imagery. The VFX Graph provides several Operators that you can use for one-, two-, and three-dimensional Noise and Randomness.
Attribute Blocks
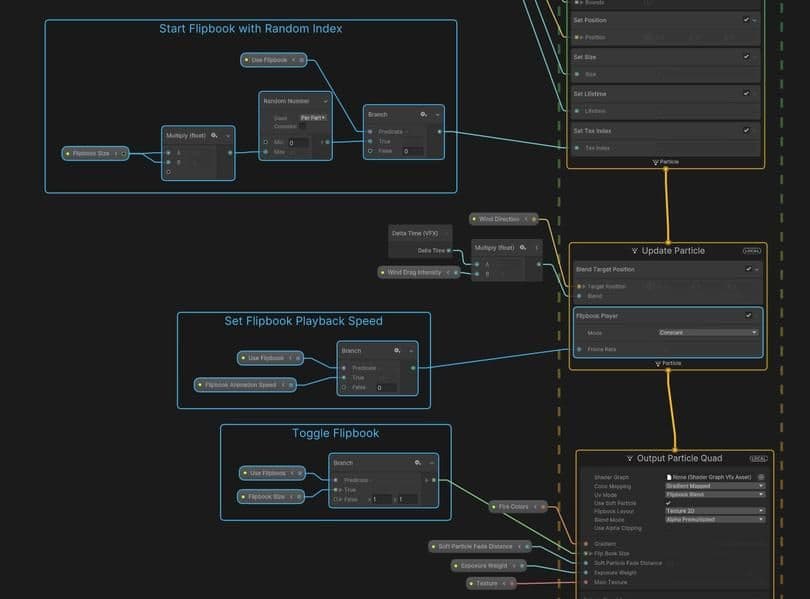
Flipbooks
An animated texture can do wonders to make your effects believable. Generate these from an external Digital Content Creation (DCC) tool or from within Unity. Use Operators to manage the Flipbook Block.
For more information on creating your own Flipbooks within Unity, check out the Image Sequencer in the VFXToolbox section of the VFX Graph e-book.
Physics
Forces, Collisions, and Drag are essential to making particles simulate natural phenomena. But don’t be afraid to push the boundaries of what’s real. As the artist, you get to decide what looks just right.
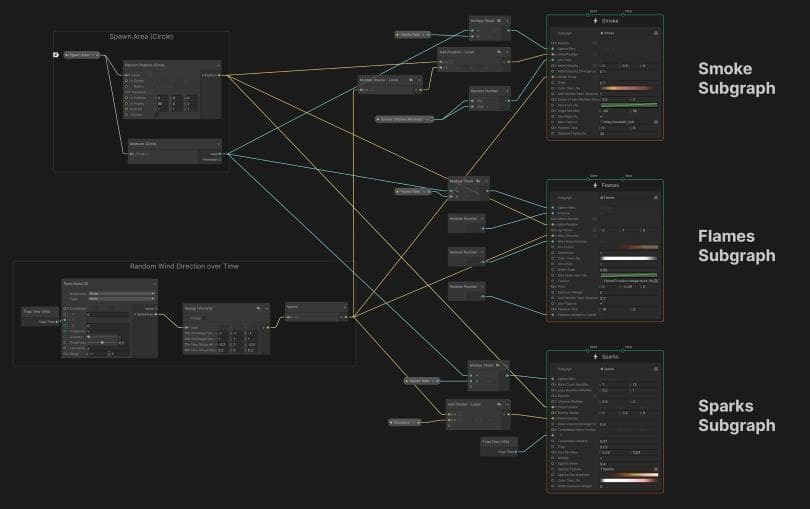
Visual Effect Subgraphs
A Visual Effect Subgraph is an asset that contains a part of a Visual Effect Graph that can be used in another Visual Effect Graph or Subgraph. Subgraphs appear as a single node.
Subgraphs can be used in graphs in the following three ways:
System Subgraph: One or many Systems contained in one Graph
Block Subgraph: A set of Blocks and Operators packaged together and used as a Block
Operator Subgraph: A set of Operators packaged together and used as an Operator
Subgraphs enable you to factorize commonly used sets of nodes from graphs into reusable assets to add to the Library.

Get the free e-book
Our 120-page e-book, The definitive guide to creating advanced visual effects in Unity, guides artists, designers, and programmers using the Unity 2021 LTS version of VFX Graph. Written by experts, it is a reference to help you take on richly layered, real-time visual effects for your games.