
Profile and optimize a Unity Web build
This article provides tips on how to optimize your Unity Web projects.
Previously referred to as “WebGL,” Unity Web platform support includes key advancements that reduce friction for more devices and take advantage of the latest graphics APIs to ensure smooth frame rates and exceptional performance for even the most ambitious web games.
This includes support for WebGL, a JavaScript API that renders 2D and 3D graphics to browsers at high speed. Google Chrome, Mozilla Firefox, Safari, and Microsoft Edge all support WebGL 2 content. WebGL 2 is based on OpenGL ES 3.0
Regardless of your graphics API, you should aim to make a Unity Web game small in size so it’s efficient to distribute and embed on websites and social media. You can also use a Web build for prototyping and game jams where easy distribution is key, as well as for testing, even when you are targeting another platform.
Web games can’t access local files or hardware and generally have slightly lower performance than natively compiled games.
Note: A new API, WebGPU, is available in early access in the Unity 6 beta (2023.3.0b1 beta). WebGPU is still in development and not recommended to use for production use cases.
WebGPU was designed with the goal of harnessing and exposing modern GPU capabilities to the web. This new web API provides a modern graphics acceleration interface that is implemented internally via native GPU APIs, such as DirectX12, Vulkan, and Metal. The specific native implementation will depend on the browser’s platform and available graphics drivers. Details for how to get started, as well as additional WebGPU demos, can be found in the graphics forum.
Create a build
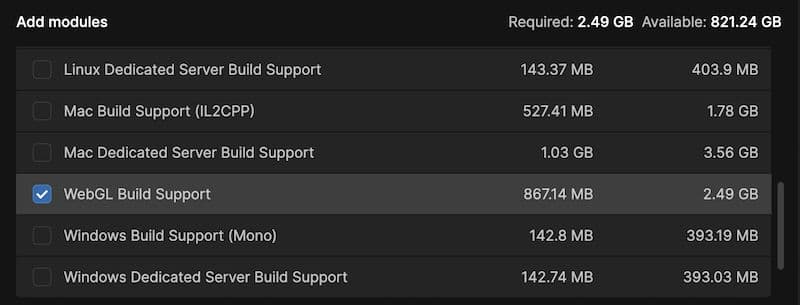
To deploy on the Unity Web platform, you first need to add the Web module to the Unity Editor to create a Web build. Find the install in the Unity Hub, click the Settings icon, and choose Add modules.
In the new dialog box, scroll down to find Web Build Support, select it, and click Done.
Reopen your project, and switch the target platform under File > Build Settings. Use the Development Build option while developing your game. It provides additional debugging information, like stack traces, detailed error messages, and logging information that can assist you in troubleshooting and making changes to your game. You can make small changes to your game code, assets, or settings and then quickly rebuild and test those changes in the browser without the need for a full build process.
Just make sure to uncheck the Development Build option in Build Settings for your final published build.
Select Build And Run to create a version of your game that runs in a browser for playtesting. Google Chrome is a good choice for playtesting because it provides a number of developer tools.
You’ll be prompted to choose a location for the build. The files in the build include an index.html file that adds an HTML5 Canvas element to the Document Object Model (DOM), which is the data representation of the objects that comprise the structure and content of a document on the web. The game is rendered to this canvas. The build files also include a TemplateData folder and a Build folder. The TemplateData folder contains HTML assets used on the page, such as the favicon used in the browser address bar and images used in the HTML markup of the page.
You can also set up automated builds, with Unity Build Automation being one option for this.

The Built-in Render Pipeline or URP?
You can use the Built-in Render Pipeline or the Universal Render Pipeline (URP) for a Web game. However, we recommend URP because it provides efficient customization and scaling of content to multiple hardware devices.
Get in-depth instruction on moving your projects from the Built-in Render Pipeline to URP with the e-book Introduction to the Universal Render Pipeline for advanced Unity creators.
Nine tips for optimizing a Unity Web build
When targeting a console, you have exact specs for memory and CPU and GPU usage. The web is a different beast altogether. To make your game available to the widest audience, you need to ensure it works well in a restricted memory environment.
Here are some tips on how to get your game running smoothly on low-end hardware, taken from the e-book Optimize your mobile game performance.
1. Optimize your game assets
Optimize assets like textures and models for the web, e.g., use compressed textures and reduce the number of polygons in your models, where applicable. While there are no set-in-stone rules, agree on some general guidelines in your team to ensure consistency in performance.
2. Use object pooling
Object pooling is a technique that can help you improve performance by reusing objects instead of creating and destroying new ones. This can be useful for games with a lot of spawning and despawning. Other programming design patterns like the flywheel can also be helpful. See the e-book Level up your code with game programming patternsfor advanced tips on how to implement design patterns in Unity projects.
3. Use the Universal Render Pipeline and SRP Batcher
Improve performance with Unity’s SRP Batcher batching system, which speeds up CPU rendering, depending on the scene. It works by grouping draw calls together based on shared material properties, such as shaders and textures, thereby reducing the number of state changes required during rendering.
4. Use occlusion culling
The occlusion culling system in Unity can help improve performance by only rendering the objects that are visible to the player. Occlusion culling works best in scenes where small, well-defined areas are separated from one another by solid GameObjects, like rooms connected by corridors.
5. Use the built-in LOD (Level of Detail) system
Unity’s built-in LOD system improves performance by reducing the complexity of objects that are farther away from the player. As the distance between the camera and an object increases, the LOD system automatically swaps the high-detail version of the object with lower-detail versions, reducing the rendering workload while maintaining a coherent appearance.
6. Bake your lighting where possible
Improve performance by precomputing lighting information for your scenes with Lightmaps and Light Probes.
7. Reduce unnecessary string creation or manipulation
In C#, strings are reference types, not value types. Avoid parsing string-based data files such as JSON and XML; store data in ScriptableObjects or formats such as MessagePack or Protobuf instead. You can also consider Binary formats for cases such as saving persistent game data (save games). Use the StringBuilder class if you need to build strings at runtime.
8. Use the Addressable Asset System
The Addressable Asset System provides a simplified way to manage your content by loading AssetBundles by “address” or alias. This unified system loads asynchronously from either a local path or a remote content delivery network (CDN).
9. Limit post-processing effects
Fullscreen post-processing effects can slow performance, so use them sparingly in your game.
Customize the host HTML
When you create a Unity Web build, Unity uses a template to generate the web page to display your game.
The default templates are:
- Default: A white page with a loading bar on a gray canvas
- Minimal: The minimum boilerplate needed to run your game
- Progressive Web App (PWA): This includes a web manifest file and service worker. In a suitable desktop browser, this will display an install button in the address bar for adding the game to the player’s launchable applications.
The easiest way to create your own custom HTML page is to start with one of the three templates, which you can find via <UnityInstallation>/PlaybackEngines/ WebGLSupport/ BuildTools/ WebGLTemplates/. On Mac, you can locate the Unity Installation folder in the Applications folder.
Copy a template, place it in your own Project/Assets/WebGLTemplates folder, and rename it so you can identify it later. You can now customize it to suit the game content, deployment site, and target platform.
Templates in your project’s WebGLTemplates folder appear in the Edit > Project Settings… > Player > Resolution and Presentation panel. The name of the template is the same as its folder. To give this option a thumbnail image for easy reference, add a 128 x 128 pixel image to the template folder and name it thumbnail.png.
During the build process, Unity preprocesses template files and evaluates all macros and conditional directives included in those files. It finds and replaces all macro declarations with the values the Editor supplies and automatically preprocesses all .html, .php, .css, .js and .json files in the template folder.
For example, take a look at this line of code:
<canvas id="unity-canvas" width={{{ WIDTH }}} height={{{ HEIGHT }}} tabindex="-1"></canvas>
If Default Canvas Widthis set to 960 and Default Canvas Height to 600 in the Resolution and Presentation panel, then the code will look like this after pre-processing:
<canvas id="unity-canvas" width="960" height="600" tabindex="-1"></canvas>.
Triple curly braces indicate to the compiler to find the value of the indicated variable.
You will also find examples in the default templates of conditional directives using #if, #else and #endif:
#if EXPRESSION
//If EXPRESSION evaluates to a truthy value
#else
//If EXPRESSION does not evaluate to a truthy value
#endif
If you want to use a custom template, the Unity Asset Store offers a number of options.
Game and code sharing sites
If you share your game on a platform for browser-based games, you’ll need to adapt the index.html page to match a specification. See the documentation for some of the more popular platforms for web games to learn how to do this:
Responsive design
You’ll often want your game to resize a browser window to accommodate a responsive design, which requires you to adapt the loading code. You can use a “Promise” in JavaScript to achieve this, which represents an operation that has not yet been completed but is expected to do so in the future.
In the index.html page for each template (see the code example below), find script.onload. The script.onload is an event that gets triggered when Unity’s engine script has finished loading. Just before that occurs, you have two global variables: myGameInstance, which holds the reference to the Unity instance, and myGameLoaded, which indicates whether the game has finished loading or not and defaults to false. They are declared as var so they have a global scope and can be accessed anywhere in the script.
The createUnityInstance() function is called to create a new instance of the Unity game. This function returns a Promise which is resolved when the game is completely loaded and ready to render (the then block of the createUnityInstance Promise).
Inside then(), myGameInstance is assigned the Unity instance and myGameLoaded is set to true indicating the game is now ready. The resizePage() function is then called to initially set the game's size, and an event listener is added to the window’s resize event so the game’s size can be updated whenever the window is resized. See code snippet below.
We then have the resizePage function at the bottom of the script, as shown in the following code snippet, which is used to resize the game to match the window’s size. If the game is loaded, it sets the style values for the canvas that displays the game to match the window size, making it fill the window:
function resizePage(){
if (myGameInstance !== undefined && myGameLoaded === true)
{
canvas.style.width = window.innerWidth + 'px';
canvas.style.height = window.innerHeight + 'px';
}
}
Add and call JavaScript
Many games that target a browser will need to interact with JavaScript code to allow you to call web services for support of user logins, high score tables, and so on, or for interacting with the browser DOM. Any JavaScript you add directly, so it can be called from a C# script, needs to have a .jslib extension and be placed in the Assets/Plugins folder. It should be wrapped in the mergeInto method. This requires two parameters: LibraryManager.library and then a JavaScript object containing one or more functions. The functions are standard JavaScript. GetExchangeRates shows how to use a simple JSON delivering web service below.
When you create a build, these functions will be added to the Build/<your game name>.framework.js file. You can call these functions from a C# script by declaring the function as a DllImport, as shown in this code example:
public class SphereController : MonoBehaviour
{
[DllImport("__Internal")]
private static extern void GetExchangeRates();
private void Start()
{
GetExchangeRates();
}
}
More Information
Use SendMessage
In addition to C# calling a JavaScript function, JavaScript can call a C# method. The mechanism involved uses a messaging protocol:
myGameInstance.SendMessage(‘MyGameObject’, ‘MyFunction’)
myGameInstance.SendMessage(‘MyGameObject’, ‘MyFunction’, 5)
myGameInstance.SendMessage(‘MyGameObject’, ‘MyFunction’, ‘A string’)
To use SendMessage, you need a reference to the game instance in scope. The usual technique is to edit index.html by adding a global variable and assigning this in the then block of the script.onload Promise as seen earlier. This simple function is added as part of a MonoBehaviour Component attached to a GameObject named Sphere.
public void SetHeight( float height )
{
Vector3 pos = transform.position;
pos.y = height;
transform.position = pos;
}
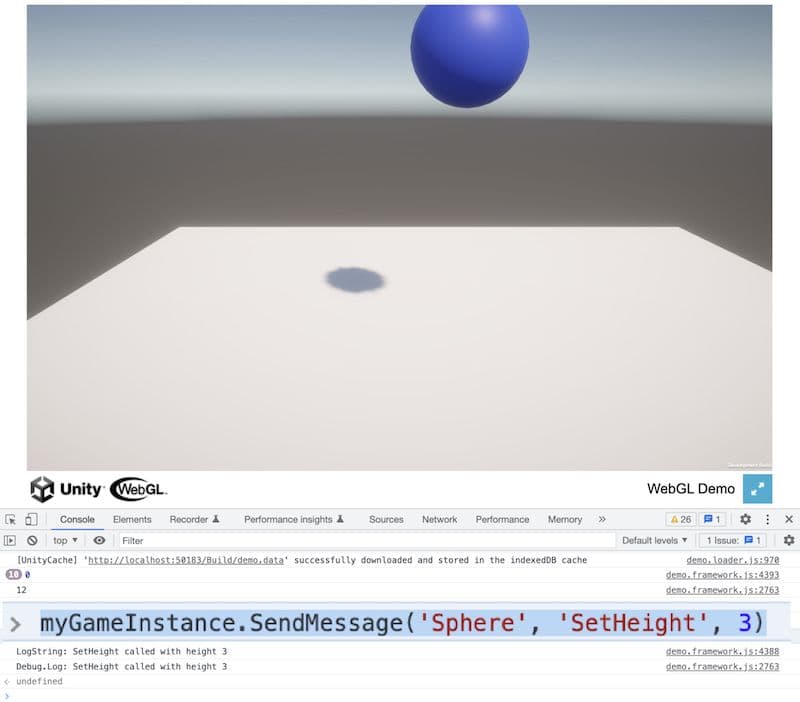
You can open Chrome’s Console using F12 and directly type:
myGameInstance.SendMessage('Sphere', 'SetHeight', 3)
Press Enter to call the function Moving the Sphere. The movement will only be reflected in the render if you have Run In Background set or you set Application.runInBackground to true. That’s because by default the render only occurs when the canvas window has focus.
Use the browser console for debugging
Use Debug.Log when debugging for browser platforms. Any messages are sent to the browsers console. For Chrome, you find this by pressing F12 and switching to the Console tab. But the Debug class offers more options. Using Debug.LogError, the Console will provide a stack trace which can be helpful.
More information
Deployment
We recommend that you use the Development Build option during development, but uncheck this option when you deploy your game to a live site. For a release build, you have the option of compression. You might need to adjust settings on your server when using compression; see the Manual for tips on how to do this.
The importance of profiling
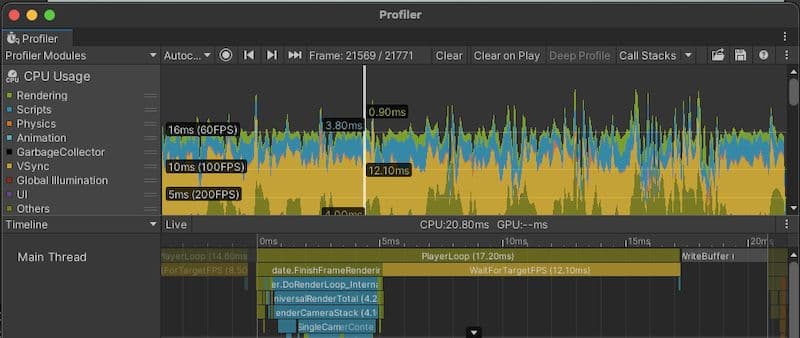
It’s important to profile your project throughout the development cycle so that you catch performance issues in time. The Unity Profiler is a good tool for identifying and fixing performance bottlenecks in your game. It tracks CPU and memory usage, helping you identify areas of your game that need optimization. You can also use the Profile Analyzer, Memory Profiler, and Web Diagnostics Overlay alongside it.
Download the e-book Ultimate guide to profiling Unity games to learn in-depth about profiling in Unity.
Let’s look at some tips for getting started with profiling a Unity Web build.
Enable Unity’s Profiler
Go to File > Build Settings in the Editor and select Development Build and Autoconnect Profiler to use the Profiler with a Web build.
Select the CPU Usage module
Use this module to analyze the performance of your code and identify areas that are causing performance issues. Analyze elements like function calls, script execution, and garbage collection.
Select the Memory Profiler module
Unity Web builds have limited memory resources compared to other platforms. Use this module to analyze the memory usage of your application and identify areas for optimization.
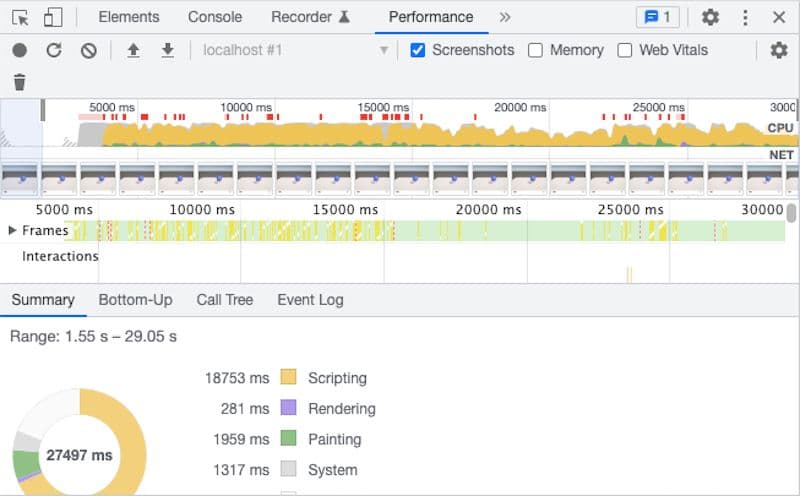
Use the Chrome DevTools Performance panel
Chrome DevTools includes a Performance panel that will help you drill down into bottlenecks in your game. Among other features, it provides a Sources panel for adding breakpoints into JavaScript files and a Console panel for viewing debug messages and entering JavaScript code.
Measure performance on different devices
This will help you identify performance issues that may be specific to a particular device or browser and can help you optimize your game accordingly.
Reduce the number of draw calls
Draw calls are one of the main performance bottlenecks for Unity Web builds. Use the Unity Profiler to identify areas with a high number of draw calls and try reducing them.
Analyze performance on low-end devices
Test on low-end devices to ensure that your application is optimized for a wide range of hardware.
Enable “Run In Background” during profiling
If Run In Background is enabled in the WebGL Player Settings or if you enable Application.runInBackground, your content will continue to run when the canvas or the browser window loses focus, which can be useful when profiling.
More Unity Web resources
Unity Web builds are a great way to distribute your game to a wide audience. During development, you should aim to keep geometry and textures to a modest size, reduce draw calls, and profile and test on a wide range of devices. Finally, use URP to ensure solid performance across the widest range of hardware.
More information
Tips and tricks for using Unity’s WebGL module
Early access to the new WebGPU backend in Unity 2023.3
Official Web runtime updates are here: Take your browser to the next level
Find all of Unity’s advanced e-books and articles in the Unity best practices hub.