Develop a modular, flexible codebase with the state programming pattern
By implementing common game programming design patterns in your Unity project, you can efficiently build and maintain a clean, organized, and readable codebase. Design patterns not only reduce refactoring and the time spent testing, they speed up onboarding and development processes, contributing to a solid foundation for growing your game, development team, and business.
Think of design patterns not as finished solutions you can copy and paste into your code, but as extra tools that can help you build larger, scalable applications when they’re used correctly.
This page looks at the State pattern and how it can make it easier to manage your codebase.
The content here is based on the free e-book, Level up your code with game programming patterns, which explains well known design patterns and shares practical examples for using them in your Unity project.
Other articles in the Unity game programming design patterns series are available on the Unity best practices hub, or, click on the following links:

Understanding states and state machines
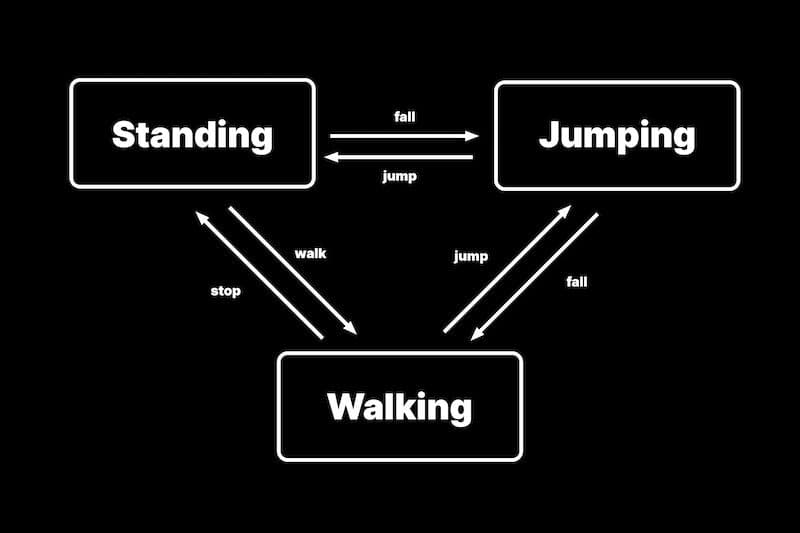
Imagine constructing a playable character. At one moment, the character may be standing on the ground. Move the controller, and it appears to run or walk. Press the jump button, and the character leaps into midair. A few frames later, it lands and reenters its idle, standing position.
The interactivity of computer games requires the tracking and management of many systems that change at runtime. If you draw a diagram that represents the different states of your character, you might come up with something like the picture above:
It resembles a flowchart, with a few differences:
- It consists of a number of states (Idling/Standing, Walking, Running, Jumping, and so on), and only one current state is active at a given time.
- Each state can trigger a transition to one other state based on conditions at runtime.
- When a transition occurs, the output state becomes the new active state.
This diagram illustrates something called a finite-state machine (FSM). In game development, one typical use case for an FSM is to track the internal state of a prop or a “game actor” like the playable character. There are many use cases for an FSM in game development, and if you have some experience developing a project in Unity, you’ve likely already employed a FSM in the context of the Animation State Machines in Unity.
An FSM is defined by a list of its states. It has an initial state with conditions for each transition. An FSM can be in exactly one of a finite number of states at any given time, with the possibility of changing from one state to another in response to external inputs that result in a transition.
The State design pattern, on the other hand, defines an interface that represents a state and a class that implements this interface for each state. The context, or the class, that needs to alter its behavior based on the state holds a reference to the current state object. When the context’s internal state changes, it simply updates the reference to the state object to point to a different object, which then changes the context’s behavior.
The State pattern is similar to the FSM in that it also allows for the management of different states and the transition between them. However, a FSM is typically implemented using a switch statement, whereas the State design pattern defines an interface that represents a state and a class that implements this interface for each state.
The state pattern is widely used in game development, and it can be an effective way to manage the different states of a game, such as a main menu, a gameplay state, and a game over state.
Let’s see the state pattern in action with the example in the following section.
Translating your state into code
A demo project is available on Github that provides the example code in this section.
A simplified way to describe a basic FSM in code might look something like the example below that uses an enum and a switch statement.
First, you define an enum PlayerControllerState consisting of three states: Idle, Walk and Jump.
Then, switch is used as a conditional statement in the Update loop to test which state you’re currently in. Depending on the state, you can call the appropriate functions to carry out the specific behavior that applies.
This can work, but the PlayerController script can get messy quickly, particularly as you need to formulate the conditions for transitioning between the states. Using a switch statement to manage the state of a game with one script is not considered the best practice because it can lead to complex and hard-to-maintain code. The switch statement can become large and difficult to understand as the number of states and transitions increases.
Additionally, it makes it more difficult to add new states or transitions because changes need to be made to the switch statement. The State pattern, on the other hand, allows for a more modular and extensible design, making it easier to add new states or transitions.
A simple state pattern
Let’s reimplement the state pattern to reorganize the logic of PlayerController. This code example is also available in the demo project hosted on Github.
According to the original Gang of Four, the state design pattern solves two problems:
- An object should change its behavior when its internal state changes.
- State-specific behavior is defined independently. Adding new states does not impact the behavior of existing states.
In the previous code example, the UnrefactoredPlayerController class can track state changes, but it does not satisfy the second issue. You want to minimize the impact on existing states when you add new ones. Instead, you can encapsulate a state as an object.
Imagine structuring each of the states in your example like the diagram above. Here, you enter the appropriate state and loop each frame until a condition causes control flow to exit. In other words, you encapsulate the specific state with an Entry, Update, and Exit.
Implementing the pattern using an interface
To implement the above pattern, create an interface called IState. Each concrete state in your game will then implement the interface by following this convention:
- An Entry: This logic executes when first entering the state.
- Update: This logic runs every frame (sometimes called Execute or Tick). You can further segment the Update method as MonoBehaviour does, using a FixedUpdate for physics, LateUpdate, and so on. Any functionality in the Update runs each frame until a condition is detected that triggers a state change.
- An Exit: The code here runs before leaving the state and transitioning to a new state.
You’ll need to create a class for each state that implements IState. In the sample project, a separate class has been set up for WalkState, IdleState, and JumpState.
The StateMachine class
Another class, StateMachine.cs, will then manage how control flow enters and exits the states. With the three example states, the state machine could look like the code sample below.
To follow the pattern, the state machine references a public object for each state under its management (in this case, walkState, jumpState, and idleState). Because the state machine doesn’t inherit from MonoBehaviour, use a constructor to set up each instance.
You can pass in any parameters needed to the constructor. In the sample project, a PlayerController is referenced in each state. You then use that to update each state per frame (see the IdleState example below).
Note the following about the state machine concept:
- The Serializable attribute allows you to display the StateMachine.cs (and its public fields) in the Inspector. Another MonoBehaviour (e.g., a PlayerController or EnemyController) can then use the state machine as a field.
- The CurrentState property is read only. The StateMachine.cs itself does not explicitly set this field. An external object like the PlayerController can then invoke the Initialize method to set the default State.
- Each state object determines its own conditions for calling the TransitionTo method to change the currently active state. You can pass in any necessary dependencies (including the state machine itself) to each state when setting up the StateMachine instance.
In the example project, the PlayerController already includes a reference to the StateMachine, so you only pass in one player parameter.
Each state object will manage its own internal logic, and you can make as many states as needed to describe your GameObject or component. Each one gets its own class that implements IState. In keeping with the SOLID principles, adding more states has minimal impact on any previously created states.
An example state
Here’s an example of the IdleState.
Similar to the StateMachine.cs script, the constructor is used to pass in the PlayerController object. This player contains a reference to the State Machine and everything else needed for the Update logic. The IdleState monitors the Character Controller’s velocity or jump state and then invokes the state machine’s TransitionTo method appropriately.
Review the sample project for the WalkState and JumpState implementation as well. Rather than have one large class that switches behavior, each state has its own update logic, allowing them to function independently from one another.

More resources
The state pattern can help you adhere to the SOLID principles when setting up internal logic for an object. Each state is relatively small and tracks only the conditions for transitioning into another state. In keeping with the open-closed principle, you can add more states without affecting existing ones and avoid cumbersome switch or if statements in one monolithic script.
You can also expand its functionality tocommunicate state changes to outside objects. You might want to add events (see the observer pattern). Having an event on entering or exiting a state can notify the relevant listeners and have them respond at runtime.
On the other hand, if you only have a few states to track, the extra structure can be overkill. This pattern might only make sense if you expect your states to grow to a certain complexity. As with every other design pattern you’ll need to evaluate the pros and cons based on the needs of your particular game.
More advanced resources for programming in Unity
The e-book Level up your code with game programming patterns, provides more examples of how to use design patterns in Unity.
All advanced Unity technical e-books and articles are available on the best practices hub. The e-books are also available on the advanced best practices page in documentation.