Realistic smoke lighting with 6-way lighting in VFX Graph


Simulating and rendering smoke and explosions in real-time has consistently been a challenge due to the complex nature of lighting interactions and dynamics involved.
More real-time technologies are introducing volumetric fluid simulation and rendering, but it still appears to be too expensive to be used widely in games. So, as with many rendering problems, it’s all about trying to best approximate appearance at the lowest possible cost.
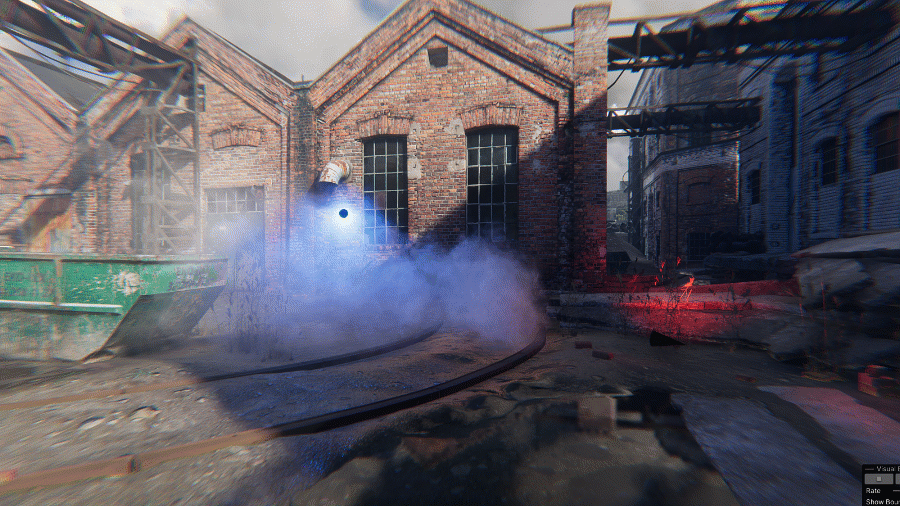
The 2022.2 Tech Stream introduces a complete end-to-end workflow (from DCC to Unity) that allows you to realistically render smoke from baked simulations. This workflow scales on all platforms, under any lighting conditions. This solution also includes a library of ready-to-use, baked maps that are designed to make it easy for anyone to push smoke effects to a new level of visual fidelity.
Rendering smoke in games is most often done with textured sprites because computing fully volumetric lighting is too expensive for a real-time budget. One of the most common questions when it comes to sprites, though, is: How can one light the smoke based on flat, 2D geometry?
Several approaches exist, such as using normal mapping or using a fully baked color map. But, these approaches either lack realism, extensibility, or both.
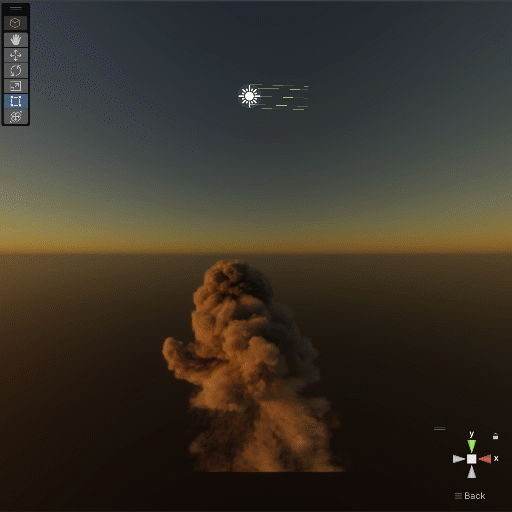
Enter 6-way lighting, an alternative approach to this problem that uses a set of lightmaps that contain the lighting response of the smoke for light coming from six different directions. These lightmaps are baked into a set of two textures, along with an alpha channel and an optional emissive mask.

Equipped with these textures, the smoke can be shaded dynamically under different lighting conditions. It will exhibit volumetric lighting phenomenon such as internal shadowing or light rims when lit from the back, which were not achievable with the other techniques.
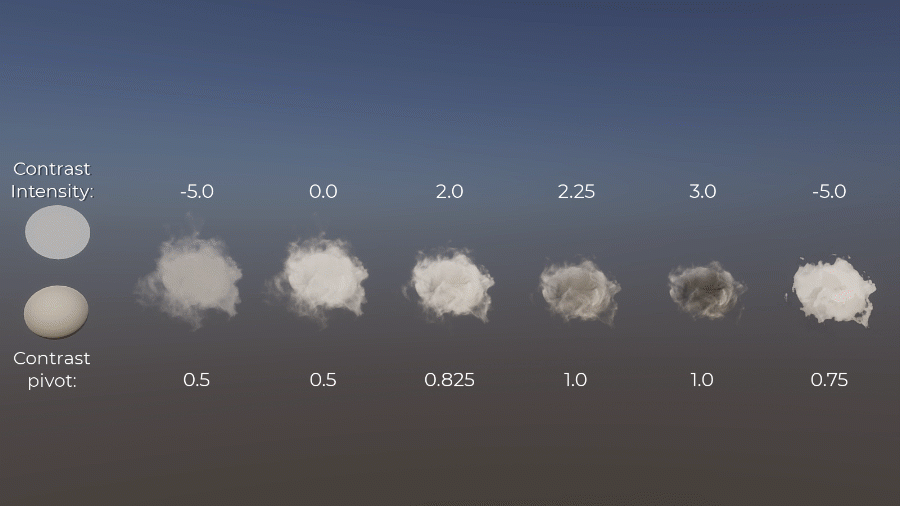
You can find several controls like color, absorption, emissive gradient, and lightmap remapping to create varied effects based on the same set of textures. This enables you to reuse your assets in many different scenarios.
This technique known under various names (6-way lighting, 6-point lighting, 6D lightmaps, 6-point lightmaps, smoke lighting, and so on) is used in multiple AAA games – check out this great overview of the technique written by the game’s former VFX tech director.
Key advantages of employing the technique include:
- Allowing complex light interaction rendering that is otherwise not possible in real-time, such as multi-bounce scattering, as it can be directly baked from simulation to lightmaps.
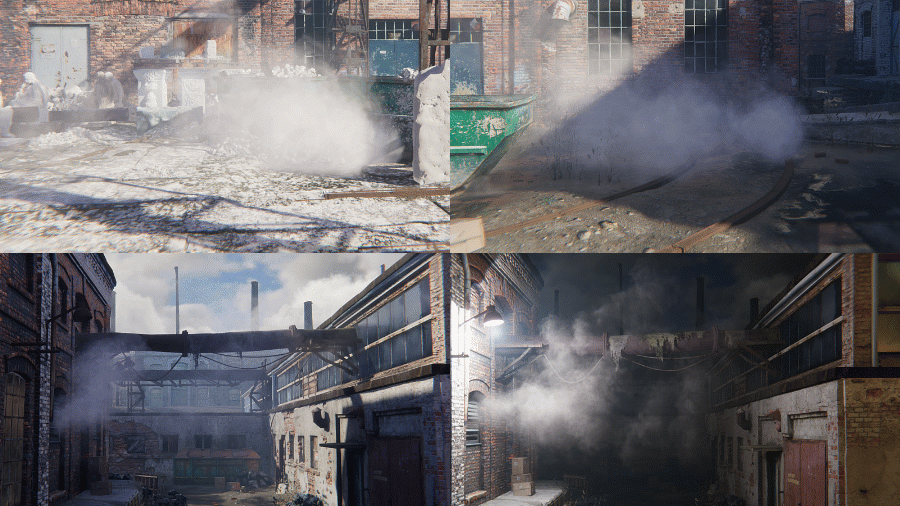
- Improving visual quality with smoke effects more integrated into the world thanks to better lighting – for example, when added in a scene, the smoke will react to any number and all types of dynamic lights (i.e., direction, point, area), as well as indirect (e.g., probes) and ambient lighting. Therefore, the same asset can be placed in different locations, but each instance will feel like it belongs to its close environment.
- Yielding low overhead despite the high quality of the visual. Smoke effects are actually quite cost-effective to render, comparable to a traditional lit sprite.
- Saving disk and texture memory. Although flipbook textures are always memory-heavy, using 6-way lighting enables you to reuse the same texture in many different places. The resulting smoke appearance can vary greatly based on and the variations applied to it (color, absorption, and so on), and the lighting conditions where it is placed. To save more memory, you can leverage baked Motion Vectors to reduce the number of needed frames (a useful tool for this is TFlow by Tuatara on the Unity Asset Store).
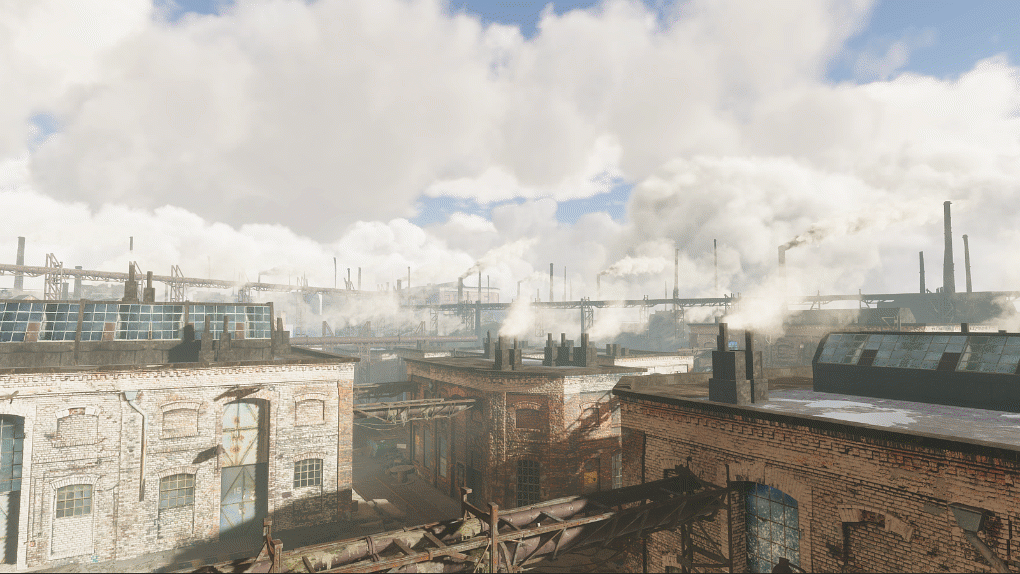
One downside to keep in mind is the flatness of this trick. If this technique provides a great impression of volume thanks to high-fidelity lighting, it is still a texture sheet and not a 3D volumetric effect. For this reason, it’s best suited for background effects, ornamental effects like steam, or explosions. To give more depth, you will need to use this effect on more particles or combine it with volumetric effects (e.g., local volumetric fog or volumetric materials in the High Definition Render Pipeline).
Here are typical use cases:
- Day: Simulates sun and sky lighting propagating through the smoke
- Night: Static or Moving Point lights and spotlights can lit the smoke
- High-fidelity smoke
- Dust
- Steam
- Volumetric Clouds: 6-way lighting for hero clouds
- Advanced effects like portals, sand storms, or tornadoes
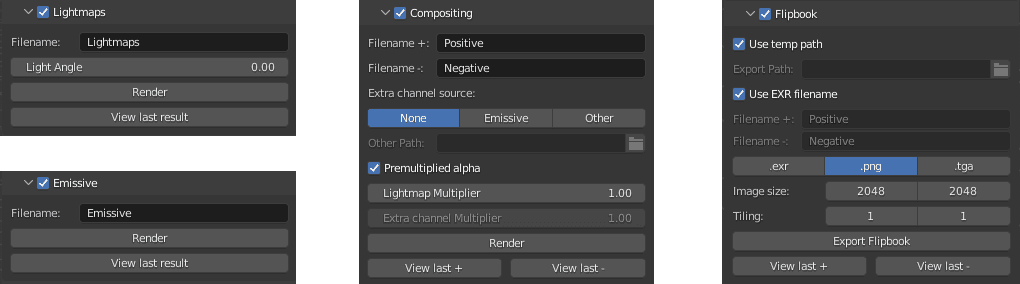
We provide some tools to help with the lightmap generation process. In the VFXToolbox repository, you will find exporters for Houdini and Blender, along with other tools like the Image Sequencer that could be used to repack 6-way lightmap flipbooks or to adjust the color intensity.
All the instructions regarding the tool installation can be found on the Readme.txt. Note that two variants of the tool coexist.The first one can be found in the Object Context. It’s based on the OpenGL render node and is very fast.
The second variant can be found in the Stage context and is built around Karma renderer. They both offer the ability to render lightmaps, emissive, and Flipbook export.

To install the add-on, follow the standard procedure in Blender. From the Preferences menu, install the file unity_6way.py, and enable the add-on. After that, you will find a panel on the 3D view, under the Unity category.
The add-on allows you to render lightmaps, render emissive channels, do some basic compositing, and create flipbooks from a lightmap sequence. These tasks can be done all at once or separately, each stage having individual settings to control the final result.
Other tools
Some tools might already provide official or user-created options and plug-ins to export 6-way lightmaps.
For instance, in EmberGen you can use an option named “Six point” in the Render node. Please note that this workflow is not officially supported because we don’t have control over the light intensity in these maps. However, you may still find it useful if you adjust it manually.
You can also build 6-way lighting maps using your own tools. To do so, you can follow the steps and format packing described below.
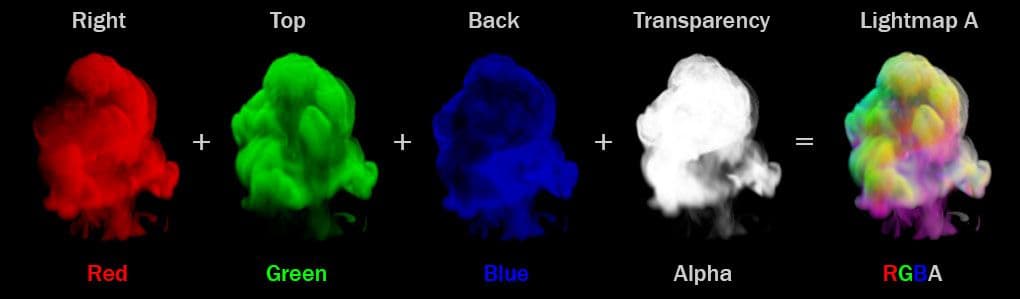
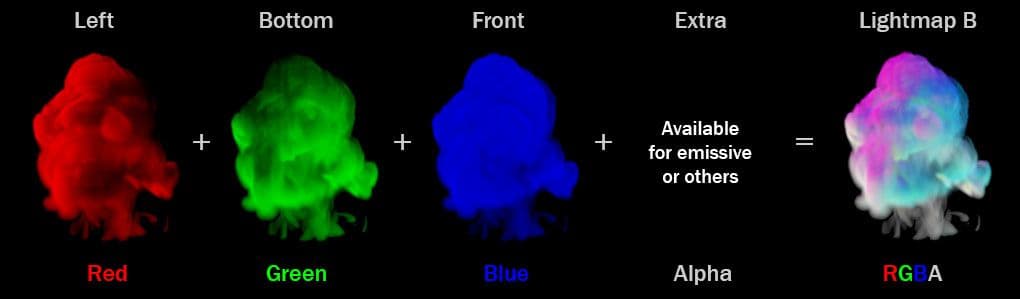
To bake the lightmaps, we need to render the objects six times with different lighting settings.
We use directional white lights with a different direction for each render: top, bottom, left, right, front, and back, all relative to the camera.
Emissive information, like fire, is not part of the lightmaps and can be rendered later on a separate texture or packed inside an extra channel of the lightmaps.
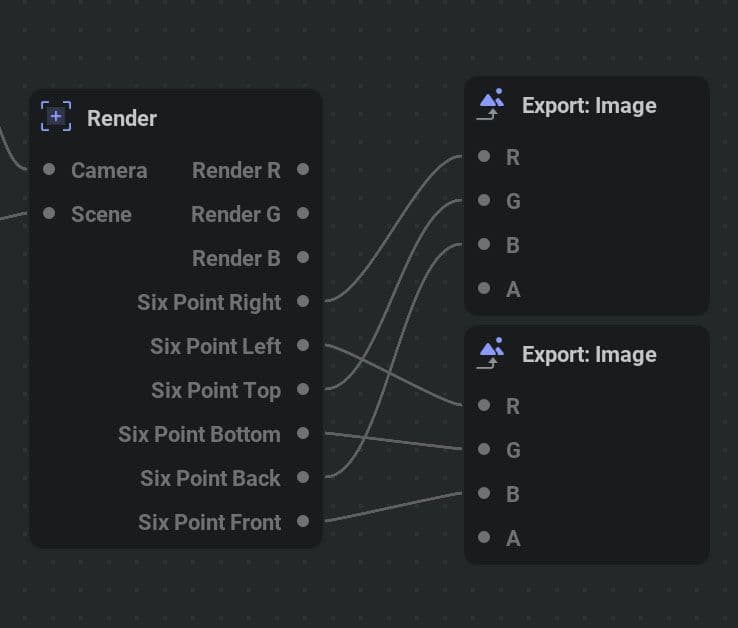
The data for 6-way lighting maps is packed in two RGBA textures. Each of the six lightmap directions is stored in a color channel (red, green, or blue) of the two textures.
Additionally, the alpha channel for the first texture contains the transparency. This leaves the alpha channel of the second texture as an extra channel available. The current workflow gives you the option to pack an emissive component in that extra channel.
You can examine the channels separately in the Unity Editor, in a preview window, when the texture is selected.
Lightmaps built by other tools may pack these channels in different order. There is basic functionality to reorder channels inside Unity using the Inspector, but you may need an image editor if you have to move channels from one texture to another.

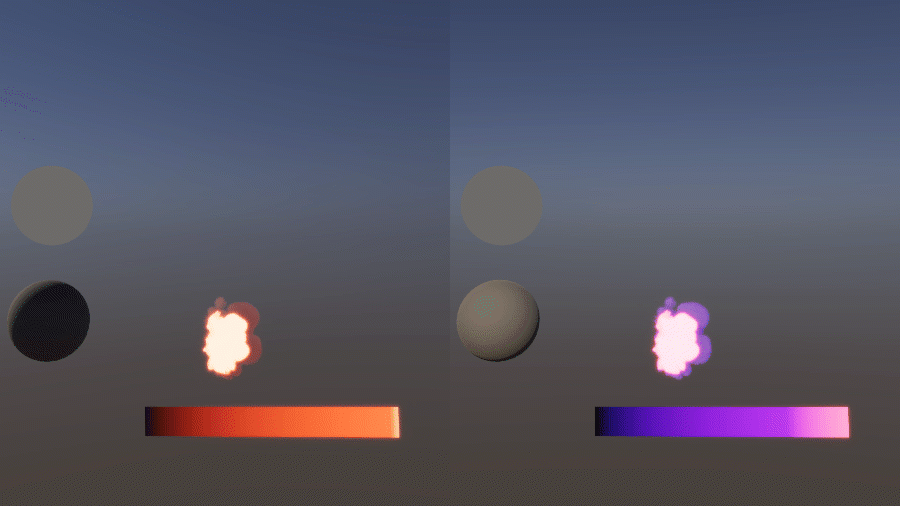
The lighting of the smoke is directly integrated in the HDRP light loop, which means that there is no specific limit on the number of lights that will affect the smoke. Of course, the more lights, the more computationally intensive it becomes (you can take advantage of light layers to mitigate this).
All types of direct lights are handled, such as Directional, Point, Spot, Rectangular, and Linear Lights. It also creates very impressive results for lights inside smoke effects to create lightning, electricity sparks, flares, fireflies, and more.
For each light, it’s important to first determine its direction relative to the particle and use this direction to blend between the different lightmaps. For area lights, we use a Most Representative Point approach, identifying the closest point on the light to compute the direction.
The particle is also affected by indirect lighting, in particular by Light Probes, Adaptive Probe Volumes (APV), Ambient Probes, and Light Probe Proxy Volumes (LPPV), depending on which types are active in the scene. For the best performance, you can use the ambient only mode to completely skip the light loop and allow very cheap lighting computation.
For performance considerations, probe contributions are evaluated in the vertex shader and then interpolated to the pixel shader. This means that if you are using a quad output, the probes will only be evaluated at the four corners of the quad. For spatially varying probes such as APVs, one or more vertices can end up on one side of a wall while the rest of the particle is on the other side. If this happens, the probe contributions will be wrong and will lead to visual artifacts. One solution, in this case, is to use a more tessellated mesh, with more vertices. Note that this is generally not an issue for outdoor scenes.
Smoke is considered as fully diffuse in our model, so specular indirect contributions are not evaluated. This means, for example, that reflection probes do not affect particles using 6-way smoke lit.
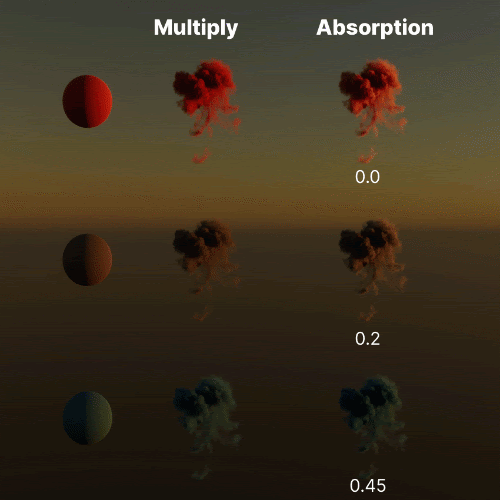
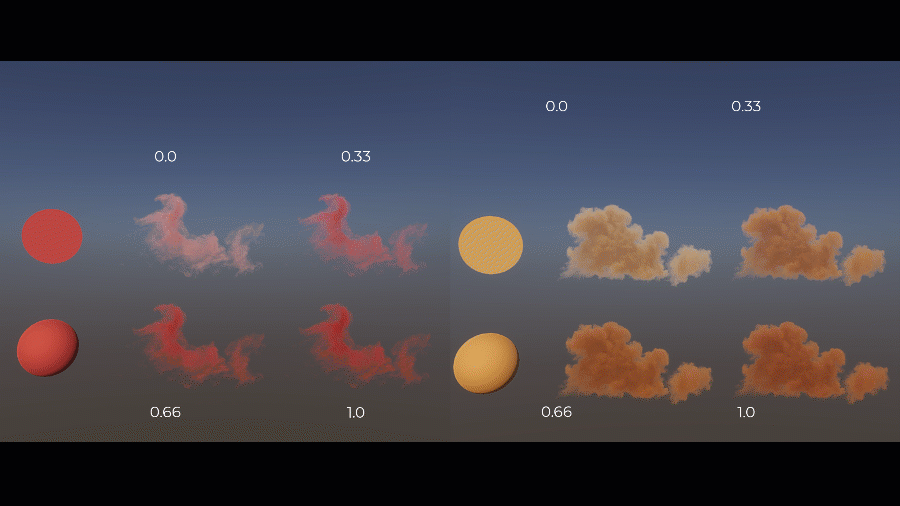
We also provide two different ways of applying color to smoke. You can achieve this either by deriving light absorption per color component from the lightmaps (for a more realistic behavior of colored smoke) or with a simple multiply (the cheapest way).

The 6-way lighting rendering output in VFX Graph offers various controls to customize the look of the effect and create different effects reusing the same lightmaps.
It takes only a few minutes to add beautiful 6-way smoke to your project. You must be working in Unity 2022.2 or above and use VFX Graph and HDRP.
To get you up to speed, we’ve created a library of ready-to-use maps. We provide both high-fidelity assets that you can process and pack as you want – for example, using the VFX Toolbox – and more compact versions that are lightweight and ready for your game.

To create an effect using these maps and 6-way lighting follow these steps:
- Drag and drop the maps in Unity’s Asset folder.
- Create and open a new VFX Graph asset.
- Create a new Particle Lit Output and select it.
- In the Inspector, select Six Way Smoke Lit in the Material Type dropdown.

- Set the Positive and Negative Axes Lightmap in the Output context with the maps that you imported.
- Test with different lighting conditions.
To learn more about VFX Graph in general, visit our website and read our e-book The definitive guide to creating advanced visual effects in Unity.
For the next iterations on 6-way lighting, we will be focusing on Shader Graph integration and Universal Render Pipeline (URP) support. We also have ideas to lift up some inherent limitations of the technique (flatness revealed upon receiving shadows, lightmaps local to a particle and not taking occluding neighbors into account, and more).
We are also working on adding Volumetric Fog output to VFX Graph, allowing visual effects to generate volumetric fog. This allows to push even further smoke effects combining this feature with 6-way lighting. It is already available in Alpha in 2023.1.a25.
And, of course, we are looking toward actual volumetric fluid simulation, playback, and rendering. All these will give you a full palette of techniques to render beautiful and realistic smoke effects based on your target platforms and budget.
Share your feedback with us or ask questions through our dedicated Unity forum thread. To propose new features and vote for upcoming features under consideration, check out our public rendering roadmap.