Use object pooling to boost performance of C# scripts in Unity
By implementing common game programming design patterns in your Unity project, you can efficiently build and maintain a clean, organized, and readable codebase. Design patterns not only reduce refactoring and the time spent testing, they speed up onboarding and development processes, contributing to a solid foundation for growing your game, development team, and business.
Think of design patterns not as finished solutions you can copy and paste into your code, but as extra tools that, when used correctly, can help you build larger, scalable applications.
This page explains object pooling and how it can help improve the performance of your game. It includes an example of how to implement Unity’s built-in object pooling system in your projects.
The content here is based on the free e-book, Level up your code with game programming patterns, which explains well known design patterns and shares practical examples for using them in your Unity project.
Other articles in the Unity game programming patterns series are available on the Unity best practices hub, or, click on the following links:

Understanding object pooling in Unity
Object pooling is a design pattern that can provide performance optimization by reducing the processing power required of the CPU to run repetitive create and destroy calls. Instead, with object pooling, existing GameObjects can be reused over and over.
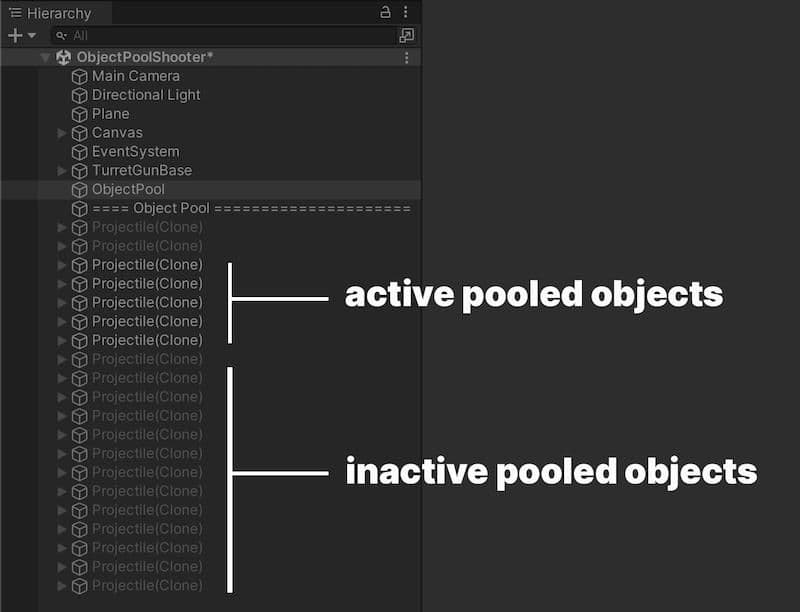
The key function of object pooling is to create objects in advance and store them in a pool, rather than have them created and destroyed on demand. When an object is needed, it’s taken from the pool and used, and when no longer needed, it’s returned to the pool rather than being destroyed.
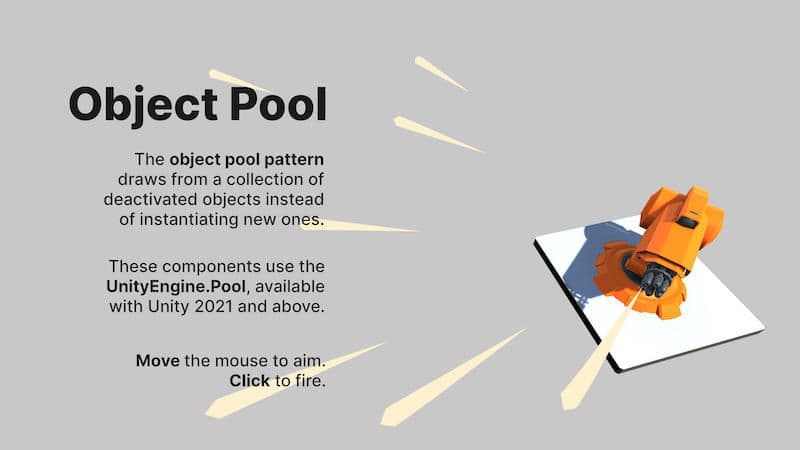
The image above illustrates a common use case for object pooling, that of firing projectiles from a gun turret. Let’s unpack this example step-by-step.
Instead of creating and then destroying, the object pool pattern uses a set of initialized objects kept ready and waiting in a deactivated pool. The pattern then pre-instantiates all the objects needed at a specific moment before gameplay. The pool should be activated during an opportune time when the player won’t notice the stutter, such as during a loading screen.
Once the GameObjects from the pool have been used, they’re deactivated and ready to use for when the game needs them again. When an object is needed, your application doesn’t need to instantiate it first. Instead, it can request it from the pool, activate and deactivate it, and then return it to the pool instead of destroying it.
This pattern can reduce the cost of the heavy lifting needed from memory management to run garbage collection, as explained in the next section.

Memory allocation
Before jumping into examples of how to leverage object pooling, let’s look briefly at the root problem it helps to address.
The pooling technique is not just useful for reducing CPU cycles spent on instantiation and destroy operations. It also optimizes memory management by reducing the overhead of object creation and destruction, which requires that memory be allocated and deallocated, and constructors and destructors called.
Managed memory in Unity
Unity’s C# scripting environment offers a managed memory system. It helps manage the release of memory, so you don’t need to manually request this through your code. The memory management system also helps guard memory access, ensuring that memory you no longer use is freed up and preventing access to memory that is not valid for your code.
Unity uses a garbage collector to reclaim memory from objects that your application and Unity are no longer using. However, this also impacts runtime performance, because allocating managed memory is time consuming for the CPU, and garbage collection (GC) might stop the CPU from doing other work until it completes its task.
Every time you create a new object or destroy an existing one in Unity, memory is allocated and deallocated. This is where object pooling comes into play: It reduces stuttering that may result from garbage collection spikes. GC spikes often accompany creating or destroying a large number of objects due to the allocation of memory. Besides premature garbage collections, the process can also cause memory fragmentation that makes it harder to find free contiguous memory regions.
By recycling the same existing objects by deactivating and activating them, you can create an effect, such as firing hundreds of bullets offscreen, when in reality, you simply disable and recycle them.
Learn more about memory management in our advanced profiling guide.

Using UnityEngine.Pool
Although you can create your own custom system to implement object pooling, there is a built-in ObjectPool class in Unity you can use to implement this pattern efficiently in your project (available in Unity 2021 LTS and onwards).
Let’s look at how to leverage the built-in object pooling system using the UnityEngine.Pool API with this sample project that’s available on Github. Once on the Github page, go to Assets>7 Object Pool >Scripts > ExampleUsage2021 for the files.
Note: You can look at this tutorial from Unity Learn to see an example of object pooling from an earlier version of Unity.
This example consists of a turret rapidly firing projectiles (set to 10 projectiles per second by default) when the mouse button is pressed. Each projectile travels across the screen and needs to be destroyed when it leaves the screen. Without object pooling, this can create a considerable drag on the CPU and memory management, as explained in the previous section.
By using object pooling, it appears as if hundreds of bullets are being fired offscreen when in reality, they are simply disabled and recycled over and over.
The code in the example script helps make sure the pool size is large enough to show the concurrently active objects, thus camouflaging the fact that the same objects are being constantly reused.
If you’ve used Unity’s Particle System, then you have firsthand experience with an object pool. The Particle System component contains a setting for the maximum number of particles. This recycles available particles, preventing the effect from exceeding a maximum number. The object pool works similarly, but with any GameObject of your choosing.
Unpacking RevisedGun.cs
Let’s take a look at the code in RevisedGun.cs which is located in the Github demo via Assets>7 Object Pool >Scripts > ExampleUsage2021.
The first thing to notice is the inclusion of the pool namespace:
using UnityEngine.Pool;
By using the UnityEngine.Pool API you get a stack-based ObjectPool class to track objects with the object pool pattern. Depending on your needs, you can also use a CollectionPool class (List, HashSet, Dictionary, etc.)
Then, you apply specific settings for your gun-firing characteristics, including the Prefab to spawn (named projectilePrefab of the type RevisedProjectile).
The ObjectPool interface is referenced from RevisedProjectile.cs (which is explained in the next section) and initialized in the Awake function.
private void Awake()
{
objectPool = new ObjectPool<RevisedProjectile>(CreateProjectile,
OnGetFromPool, OnReleaseToPool,
OnDestroyPooledObject,collectionCheck, defaultCapacity, maxSize);
}
If you explore the ObjectPool<T0> constructor, you’ll see that it includes the helpful ability to set up some logic when:
First creating a pooled item to populate the pool
Taking an item from the pool
Returning an item to the pool
Destroying a pooled object (e.g., if you hit a maximum limit)
Note how the built-in ObjectPool class also includes options for both a default and maximum pool size, the latter being the maximum number of items stored in the pool. It gets triggered when you call Release and if the pool is full, it’s destroyed instead.
Let’s look at how the code example takes several actions that specify how Unity should handle the object pooling efficiently according to your specific use case.
First, the createFunc is passed that’s used to create a new instance when the pool is empty, which in this case is the CreateProjectile() that instantiates a new profile Prefab.
private RevisedProjectile CreateProjectile()
{
RevisedProjectile projectileInstance = Instantiate(projectilePrefab);
projectileInstance.ObjectPool = objectPool;
return projectileInstance;
}
The OnGetFromPool gets called when you ask for an instance of the GameObject, so you enable the GameObject you are getting from the pool by default.
private void OnGetFromPool(RevisedProjectile pooledObject)
{
pooledObject.gameObject.SetActive(true);
}
The OnReleaseToPool is used when the GameObject is no longer needed and is returned back to the pool – in this example, it’s simply a matter of deactivating it again.
private void OnReleaseToPool(RevisedProjectile pooledObject)
{
pooledObject.gameObject.SetActive(false);
}
OnDestroyPooledObject gets called when you exceed the maximum number of pooled items allowed. With the pool already full, the object will be destroyed.
private void OnDestroyPooledObject(RevisedProjectile pooledObject)
{
Destroy(pooledObject.gameObject);
}
The collectionChecks is used to initialize the IObjectPool and will throw an exception when you try to release a GameObject that has already been returned to the pool manager, but this check is only performed in the Editor. By turning it off, you can save some CPU cycles, however, with the risk of getting an object returned that has already been reactivated.
As the name implies, the defaultCapacity is the default size of the stack/list that will contain your elements, and thus how much memory allocation you want to commit up front. The maxPoolSize will be the maximum size of the stack, and the created pooled GameObjects should never exceed this size. That means that if you return an item to a pool that is full the item will be destroyed instead.
Then, in FixedUpdate() you’ll get a pooled object instead of instantiating a new projectile every time you run the logic for firing a bullet.
RevisedProjectile bulletObject = objectPool.Get();
It’s as simple as that.
Unpacking RevisedProjectile.cs
Now let’s take a look at the RevisedProjectile.cs script.
Besides setting up a reference to the ObjectPool, which makes releasing the object back to the pool more convenient, there are a few details of interest.
The timeoutDelay is used to keep track of when the projectile has been “used” and can be returned to the game pool again – this happens by default after three seconds.
The Deactivate() function activates a coroutine called DeactivateRoutine(float delay), which not only releases the projectile back to the pool with objectPool.Release(this), but also resets the moving Rigidbody velocity parameters.
This process addresses the problem of “dirty items”: objects that were used in the past and need to be reset due to their undesirable state.
As you can see in this example, the UnityEngine.Pool API makes setting up object pools efficient, because you don’t have to rebuild the pattern from scratch, unless you have a specific use case for doing so.
You’re not limited to GameObjects only. Pooling is a performance optimization technique for reusing any type of C# entity: a GameObject, an instanced Prefab, a C# dictionary, and so on. Unity offers some alternative pooling classes for other entities, such as the DictionaryPool<T0,T1> which offers support for Dictionaries, and HashSetPool<T0> for HashSets. Learn more about these in the documentation.
The LinkedPool uses a linked list to hold a collection of object instances for reuse, which may lead to better memory management (depending on your case) since you only use memory for the elements that are actually stored in the pool.
Compare this to the ObjectPool, which simply uses a C# stack and a C# array underneath and as such, contains a big chunk of contiguous memory. The drawback is that you spend more memory per item and more CPU cycles to manage this data structure in the LinkedPool than in the ObjectPool where you can utilize the defaultSize and maxSize to configure your needs.

Other ways to implement object pooling
How you use object pools will vary by application, but the pattern commonly appears when a weapon needs to fire multiple projectiles, as illustrated with the example earlier.
A good rule of thumb is to profile your code every time you instantiate a large number of objects, since you run the risk of causing a garbage collection spike. If you are detecting significant spikes that put your gameplay at risk of stuttering, consider using an object pool. Just remember that object pooling can add more complexity to your codebase due to the need to manage the multiple life cycles of the pools. Additionally, you may also end up reserving memory your gameplay doesn’t necessarily need by creating too many premature pools.
As mentioned earlier, there are several other ways to implement object pooling outside of the example included in this article. One way is to create your own implementation that you can customize to your needs. But you’ll need to be mindful of the complications of type and thread safety, as well as defining custom object allocation/deallocation.
Happily, the Unity Asset Store offers some great alternatives to save you time.
More advanced resources for programming in Unity
The e-book, Level up your code with game programming patterns, provides a more thorough example of a simple custom object pool system. Unity Learn also offers an introduction to object pooling, which you can find here, and a full tutorial for using the new built-in object pooling system in 2021 LTS.
All advanced technical e-books and articles are available on the Unity best practices hub. The e-books are also available on the advanced best practices page in documentation.