5 common lightmapping problems and tips to help you fix them


I recently developed a guide to Progressive Lightmapper troubleshooting in order to help developers get the most out of Baked Global Illumination (GI) in the Unity Editor. Here, I unpack five of the most common lightmapping problems and their solutions, supported by images and links to pages in the Unity Manual. For the full guide, visit the forums.

If certain prerequisites are not met, the Progressive Lightmapper might fail to generate lighting in your scene. These conditions include, but are not limited to:
- No objects marked as GI Contributors
- No baked lights in the scene
- Shader issues
To correct this, I recommend trying one of the fixes laid out below.
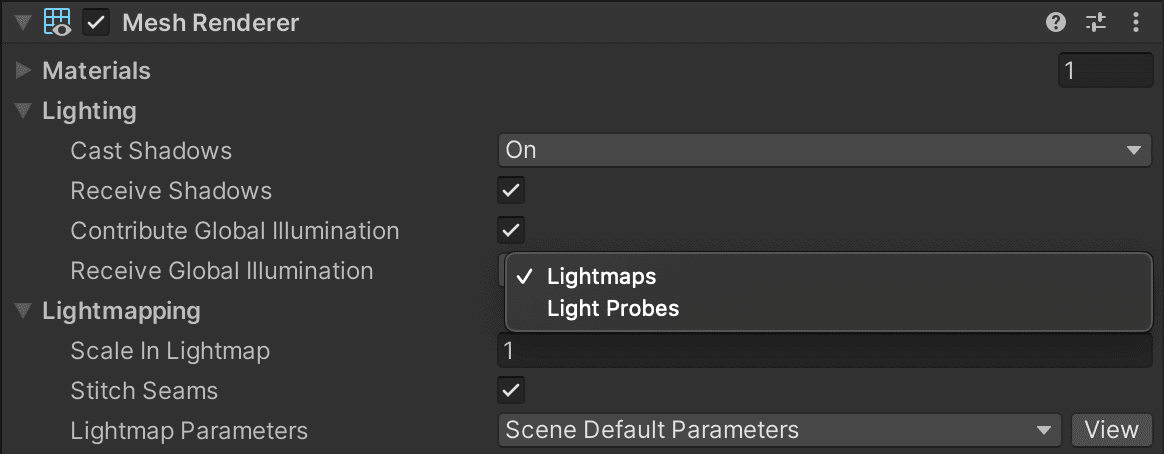
Mark objects you want to lightmap as GI Contributors by following these steps:
Select your GameObject.
Navigate to the Mesh Renderer component.
Unfold the Lighting header.
Check the Contribute to Global Illumination checkbox.
Doing so will enable the Receive Global Illumination parameter underneath. It contains two options:
- Lightmaps: Meant for static lightmapped objects – GameObject will receive and contribute GI to lightmaps.
- Light Probes: Meant for small props and objects not fit for lightmapping – GameObject will receive GI from Light Probes and will contribute GI to the surrounding lightmaps.
Only Mixed and Baked lights can contribute to Baked GI. Select lights in your scene, then set the Mode to either Mixed or Baked in the Light component. Other properties that are worth checking include:
- Color: Dark colors will have low or no GI contribution. Choose bright colors for lights and use the Intensity property to boost or dim them.
- Intensity: The higher the intensity, the brighter the light. Ensure that your lights are bright enough for meaningful GI contribution.
- Indirect Multiplier: This property controls the intensity of the indirect bounce. Make sure that it is not set to zero. Otherwise, the light will have no contribution to GI at all. Note that setting this value above one will make the lighting in your scene non-compliant to the physically based rendering (PBR) standard.
- Visit No Baked Global Illumination in the scene forum
In the Lighting window (accessible via Window > Rendering > Lighting), make sure that the Lighting Settings Asset field is not left blank. If there is no asset assigned, click on the New Lighting Settings button. This will create and assign an asset, unlocking the properties in the window for editing.
Once this is complete, verify that:
- You have ticked the Baked Global Illumination checkbox, which enables Baked GI computations. This checkbox will also expose the Lighting Mode drop-down list.
- The Max Bounces value is not set to zero. The higher this value, the more the light will bounce around the environment.
- The Indirect Intensity slider is not set to zero. Setting this slider to zero will diminish all indirect lighting in the scene.
Custom shaders could be the reason why GI computation has failed. For debug purposes, use the built-in shaders that come with the Unity Editor. Those are:
- Standard Shader: Available in the Built-in Render Pipeline
- Lit Shader: Available in the Universal Render Pipeline (URP)
- Lit Shader: Available in the High Definition Render Pipeline (HDRP)
If Unity generates lighting after switching to one of the shaders outlined above, the problem might be with the custom shaders. In this case, make sure that the surface shaders contain the LIGHTMAP_ON shader keyword.
Check out the Meta Pass page for details on how to further customize the Baked GI output using shaders.
Other potential fixes
If the above steps have not solved your problem, consider trying these potential fixes:
- Select a different lightmapping backend in the Lighting window. If lighting fails to bake when using the Progressive GPU, but succeeds when baking with the Progressive CPU, this might be the result of a hardware or driver problem.
- Update the GPU drivers. Please refer to the GPU manufacturer’s page for the correct drivers for your system. (For Linux machines, check the Linux driver setup section in this forum thread).
- Ensure that your GPU meets the minimum requirements. Please refer to this forum thread.
- Clear the GI Cache. To clear it, navigate to Preferences > GI Cache and click on the Clean Cache button. Keep in mind that this will delete all lighting data present in the scene, requiring you to regenerate lighting.
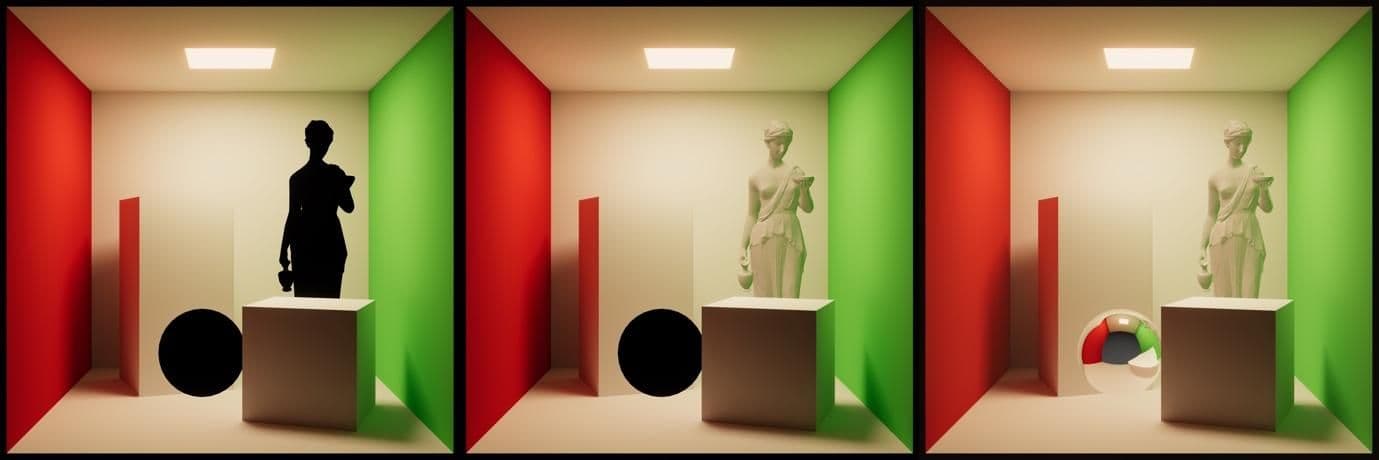
Certain objects that appear unlit or out of place might indicate a problem with the scene setup, which often reproduces when dynamic objects have no Light Probes to sample the lighting from. Furthermore, any glossy metallic material in the scene might appear as black if no local Reflection Probes are present.
To correct this, I recommend trying one of the fixes laid out below.
Dynamic objects – or GI Contributors receiving GI from Light Probes – need Light Probes to sample indirect lighting data. If none are present, objects will fall back to sampling the Ambient Probe (i.e., the Light and Reflection Probe that is always present in the scene).
To mitigate this, set up a Light Probe network in the scene, adding more probes in areas of high importance. Make sure that there are enough Light Probes to encompass all affected objects, and generate lighting again to see the effect.
Reflective metallic objects might still render as black, even after placing a dense network of Light Probes. To shade such objects, you need to place a Reflection Probe that encompasses the affected object. Generate the lighting again or re-bake the probe in the Reflection Probe Component by clicking the Bake button.
If you observe black areas in the reflections, try increasing the Bounces count. This will increase the number of bounces, thus creating reflections within reflections. You can access this property in Lighting > Environment > Environment Lighting.
Visit Objects are missing lighting forum
If performing the previous steps still does not solve the issue, inspect the Mesh Renderer component of the affected object. Under the Probes section, make sure that the Light Probes and Reflection Properties are set to anything other than Off.

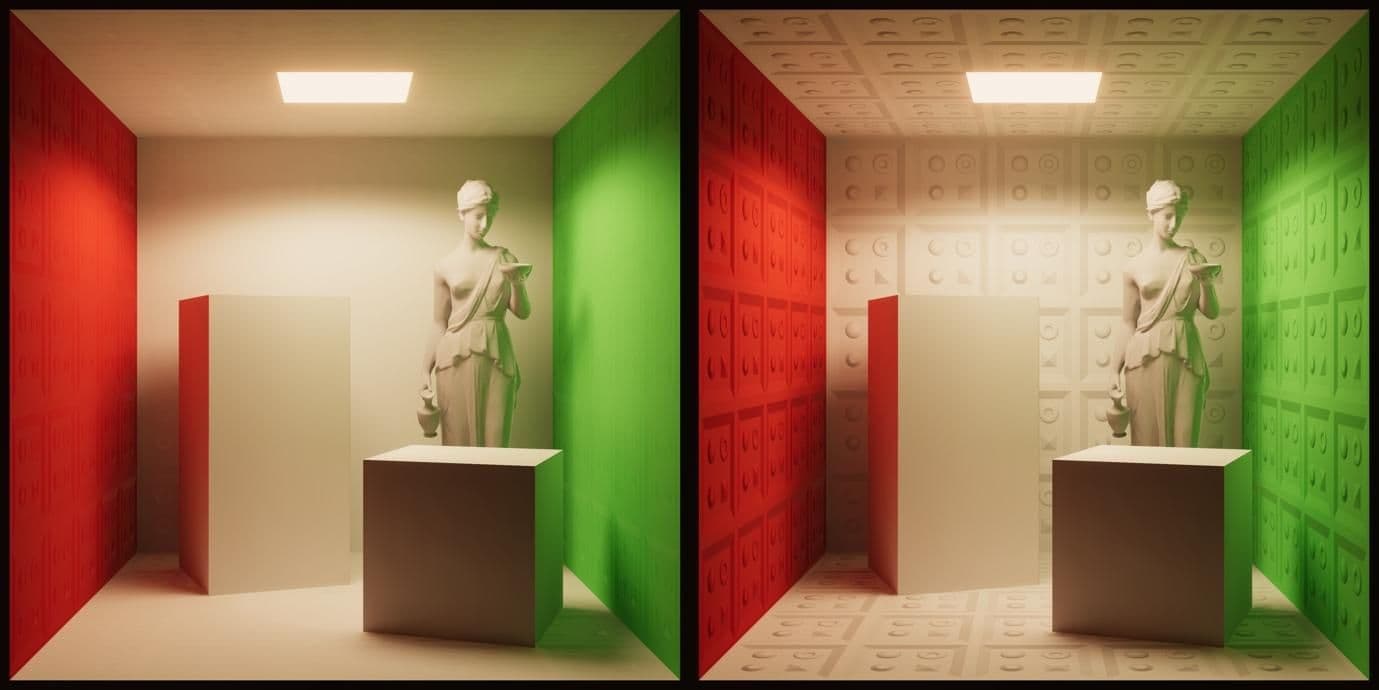
Pure black materials will absorb all direct and indirect light. This is physically correct behavior. In real life, no naturally occurring material is completely black. For example, one of the darkest natural materials, coal, measures at “50, 50, 50” on an RGB luminosity scale.
Adjust your material color values to follow the physically based shading standards. In the Built-in Render Pipeline, you can use the Validate Albedo Scene View Draw Mode to determine whether Albedo values are PBR-compliant. You can use the Rendering Debugger in URP and HDRP to do the same.
If you are working with multiple scenes, check that the scene containing lighting is set as the Active Scene. By default, Unity sets the first loaded scene as the Active Scene, which might have a detrimental effect in the standalone player builds.

There are two types of issues related to emissive material rendering:
- Emissive materials do not appear as “glowing,” which indicates a post-processing issue.
- Emissive materials are not contributing to Global Illumination, which indicates an issue with object or material setup.
To correct either of these issues, I recommend trying one of the fixes laid out below.
To create the impression of a glowing material, enable Bloom in your post-processing stack of choice. Refer to Built-in RP, URP, or HDRP documentation for tips on how to do this.
If you intend on using emissive objects for lightmapping, make sure that:
- You have marked the GameObject in question as a GI Contributor. Due to the self-illuminating nature of emissive objects, you can set their Receive Global Illumination property to Light Probes. This will save space in the lightmap atlas.
- The Global Illumination property is set to Baked in the Material Inspector. This property is available under the Emission input. Refer to Built-in RP, URP, or HDRP documentation for more details.

In the Lighting window, make sure that the Indirect Intensity property is not set to zero. Setting it to zero will disable all indirect lighting, including baked contribution from baked emissive objects.
Visit Emissive materials not rendering forum
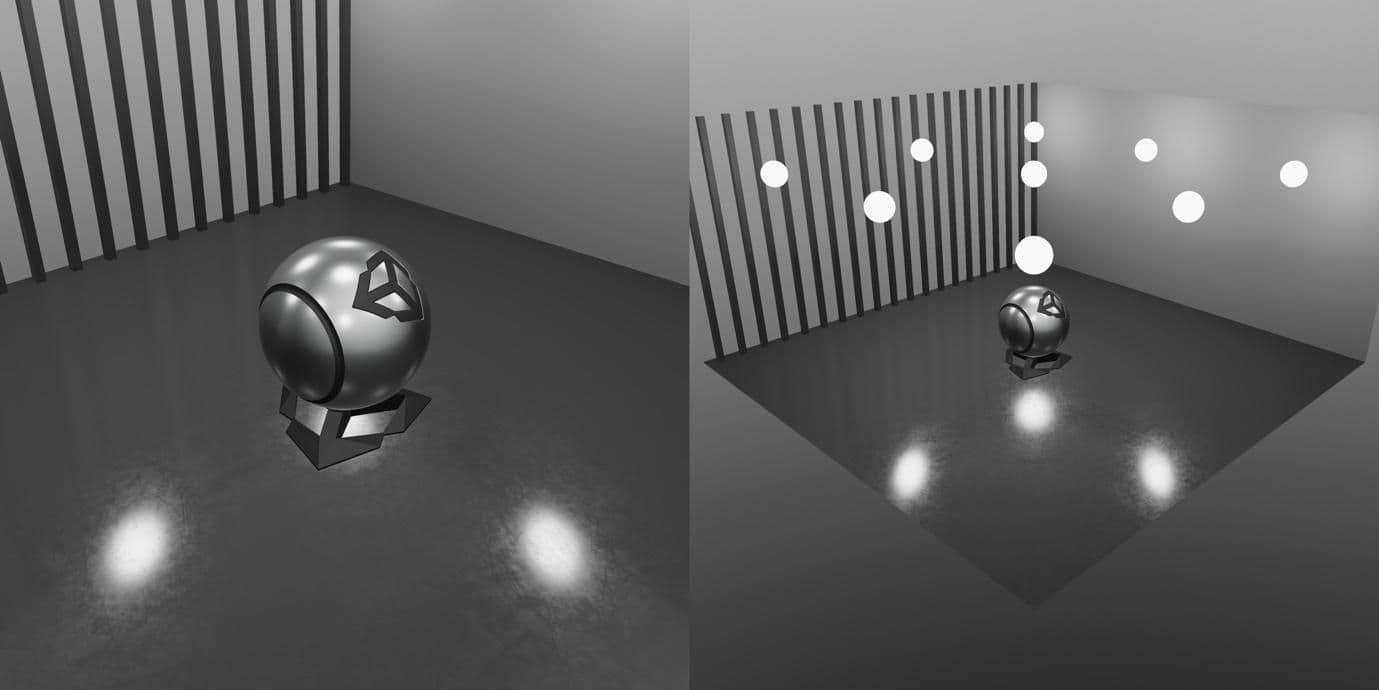
When baking in Non-directional mode, the Unity Editor will not create a separate texture to hold directionality information. This will result in objects looking flat after baking.
It is worth noting that low frequency normal maps are hard to capture using directionality textures. Such textures will appear flat when generating lighting using fully baked lights.
To correct this, I recommend trying one of the fixes laid out below.

In the Lighting window, set the Directional Mode property to Directional. This mode will generate a secondary texture that will store dominant light direction. Normal maps will have a good representation of relief, but will lack specular response.
Visit Flat normal maps Forum
Mixed lights provide real-time specular and normal response. The Progressive Lightmapper bakes indirect lighting into a lightmap. This combination ensures the highest quality material response when using baked lighting.

If your project allows for it, switch the light Mode to Mixed in the Light component. Note that Mixed lights have the same performance cost as real-time lights. Depending on the Lighting Mode used, Mixed lights will cast real-time shadows but not baked soft shadows.
Probe-lit GameObjects will often have a better material response than those lit by Baked lights. If your art direction allows for it, set their Receive Global Illumination property to Light Probes in the Mesh Renderer component. Note that you can also use Light Probe Proxy Volume (LPPV) to add a spatial gradient to probe-lit objects.

One of the inherent limitations of Baked lights is that they do not provide real-time specular response to materials. This means that glossy materials will lack specular highlights after generating lighting.
To correct this, I recommend trying one of the fixes laid out below.
Unlike Baked lights, Mixed lights provide real-time direct specular response to materials. If specular highlights are important in your scene, switch the light Mode to Mixed in the Light component.
Visit Missing specular response forum
It is possible to imitate specular response from lights by using emissive objects. To do so, follow these steps:
Place a Reflection Probe in your scene.
Right-click in the Hierarchy panel and select 3D Object > Sphere.
Select the newly created object and set its Static Editor Flag to Reflection Probe Static.
In the Project panel, create a new material by right-clicking and selecting Create > Material.
Select the newly created material and enable the Emission checkbox. Set the Global Illumination property to None.
Drag and drop the material onto the sphere to assign it.
Place the sphere in the same position as your light.
Generate lighting.
After following the above steps, you should be able to see the emissive objects captured in the Reflection Probe cubemap. You can hide those objects after baking or set up a Culling Mask in the Camera component.
For more tips on troubleshooting the Progressive Lightmapper, check out the full guide in the forums. If you’d like to discuss this article or share other solutions, feel free to connect with me there or here. Finally, be sure to watch for new technical blogs from other Unity developers as part of the ongoing Tech from the Trenches series.