Download our new 2D sample project: Lost Crypt


We put our new 2D tools through their paces to create a 2D side-scroller demo. In this post we show how these integrated 2D tools can help you create high-end visuals with Unity.
Highly skilled teams have been making gorgeous 2D games with Unity for years, but we wanted to enable everyone, from individual artists to large teams, to have even more 2D tools available to create great-looking games. And many of them will be production-ready as part of Unity 2019.3, which is currently available in beta.
We created Lost Crypt using the complete suite of 2D tools. This lively scene features animation, light effects, organic terrain, shaders, and post-processing, all made natively in 2D. It shows how teams and projects of all sizes, targeting any platform, can now get more engaging and beautiful results faster.
Lost Crypt should run well on any desktop computer and we have also implemented on-screen controls with the new Input System in case you want to run it on an iOS or Android device. In our tests it ran at 30 fps on common devices like an iPhone 6S.
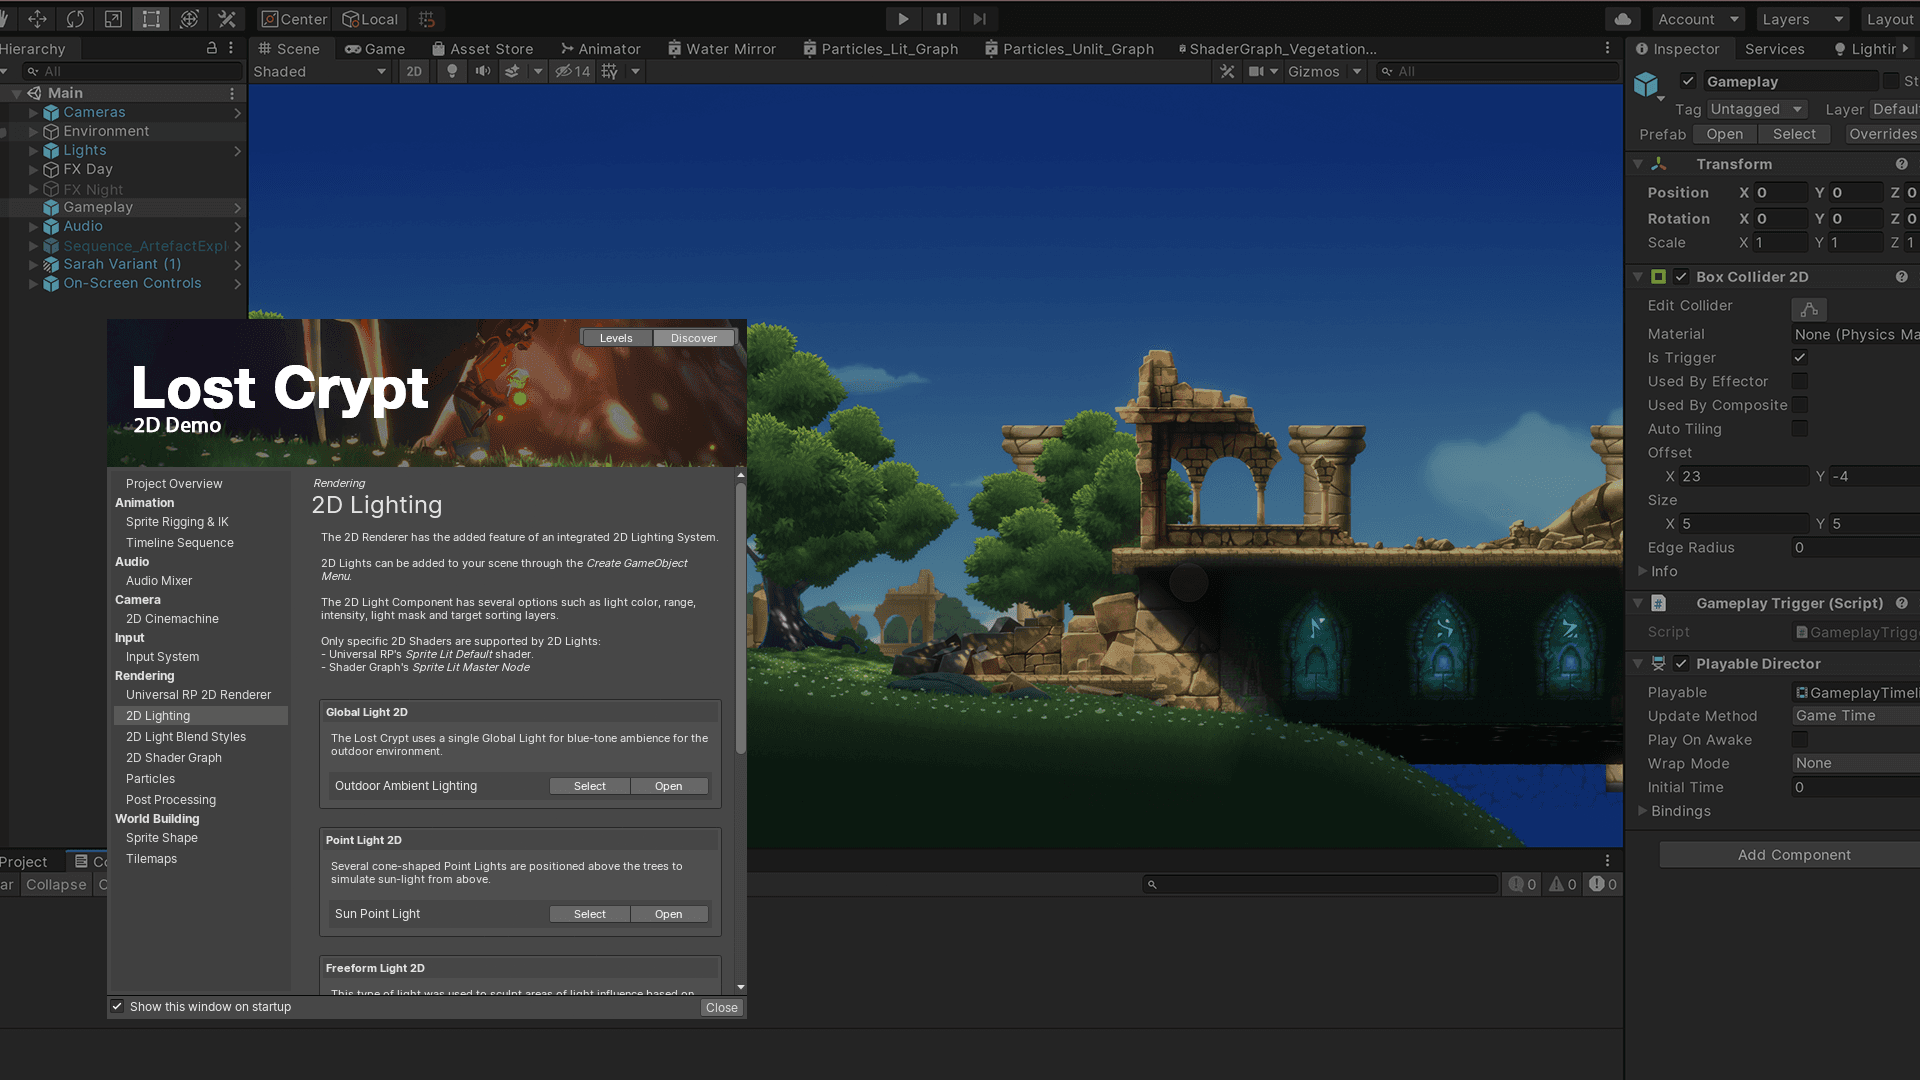
Once you’ve downloaded Lost Crypt from the Asset Store, we recommend that you start with a blank New Project and select 2D, then import the project from My Assets in the Package Manager, or by clicking My Assets on your Asset Store page. The project includes all the 2D packages you need. It will then overwrite the project settings, changing rendering settings to the 2D Renderer within the Universal Render Pipeline.

Once you import it, you will see the Main Scene. When you click Play you should be able to play normally using the keyboard arrows and spacebar to jump.
The scripts and game logic are fairly simple, as the main focus of the demo was to make use of the 2D tools to materialize the demo’s concept art.
We’ve broken down the demo into several tasks and picked which 2D tools to leverage for that visual challenge.

The character was designed in Photoshop and imported directly with the 2D PSD Importer. Open the Sara.psb file with the Sprite Editor to see the character setup and rig. If you open the file with Photoshop, you will see how we kept the different parts and layer names intact.

One of the features available with the Universal Render Pipeline is the new Sprite-Lit material. Compared to the usual Sprite-Default material, this one allows Sprites to react to 2D lighting conditions.
We imported the character Normal maps in the Sprite Editor, using the Secondary Textures drop-down menu. You can add Normal and Mask maps to 2D animated characters, regular Sprites, tilemaps, and Sprite shapes.

The character has 2D IK solvers in the legs to help the animator focus on positioning the ankle and foot tips correctly, then the legs will follow realistically.

Once we rigged the character, we made the different animations with the Animation tool and Animator to control those states. You can see how the tool works in this talk from GDC 2019.
The character’s ponytail is a different child GameObject and is controlled by 2D Physics. It reacts realistically to movement because every bone of the ponytail has a Hinge Joint 2D component with some restrictions. That allows her hair to move freely without curling too much or overreacting to the character movement.

One of the most powerful possibilities of having dynamic lighting on Sprites is to alter the appearance of the environment. Using the same Sprites, you can change the mood, time of day or darkness of an area, which opens up a wealth of gameplay mechanics from stealth mechanics to lively rich worlds.

We controlled the lights in the Scene with simple scripts that hold a Color gradient value (light color from daytime to nighttime) and the lights and materials change color following the Time parameter in the parent GameObject. With this kind of setup, you can visually control how different lights blend with each other.

One of the challenges that developers of 2D games had in the early days was to efficiently create organic terrain like hills, slopes or irregular ground, which was only achievable through carefully crafted tile sheets. Years later, this was easier to achieve using multiple Sprites representing parts of the terrain, but the workflow or performance could be better.

With 2D Sprite Shape you can generate terrain and colliders similarly to how you would do it in a vector-based drawing application. You can adjust the brushes (Sprite Shape Profiles) and start creating without worrying about having to adjust many Sprites or colliders as you iterate on the environment.
Lost Crypt also uses some of the Sprite Shape extras like the NodeAttach script to attach elements to the spline, so they follow the spline. In this demo, the rocks use this script and the ConformingSpline in the flowers layer to follow the shape of the grass spline. You can use this feature for gameplay or for decorative elements like we did in the foreground grass layer.
Tilemaps is probably one of the most essential 2D tools, not only to save memory space with small chunks of graphics that can be “tile-able” and repeatable, but because it’s also crucial for level design.

In Lost Crypt, we used the 2D Tilemap Editor (available via Package Manager) to recreate the crypt interior where it uses some additional Tilemap extra tools (available on GitHub) to make the level-design process more efficient. For example, we used Rule Tile, a tile type that allows you to paint tiles like they were brushes. It automatically selects the right tile based on the neighbouring tiles or ends.

Some common elements in games are fire effects, so we added one in Lost Crypt. We started by creating some GameObject torches using the Particle System and Shader Graph for 2D and used the Sprite-Lit Master node for the output shader. We made the fire animation in a traditional Sprite sheet that the Particle System uses to play the animation.

The shader we made for the flame utilizes an HDR tint color to increase the intensity of the glowing around the object using the Volume post-processing. The parent GameObject contains some sparks particles and some lights that illuminate the alcove.
Another common use case for shaders are reflections and refractions (e.g., water, ice, mirrors or monitors that display another area of the level) are quite common in games.

We achieved the water effect in the crypt entirely with Shader Graph. We exposed several parameters (like water color, waves speed, and distortion, ripple effect, etc.), which allowed us to adjust the final appearance in the Scene. In order to project a mirrored image of the environment, we added an additional camera that would output the image in a texture to be read by the Shader Graph. Additionally, we added a pass of post-processing bloom to make the water caustics glow, which gives the water surface a nice effect.


One way we animated the environment was to make the tree branches sway in the wind. To achieve this effect, we decided to have just one shader for each tree’s foliage Prefab – that would create variety and avoid repetition.
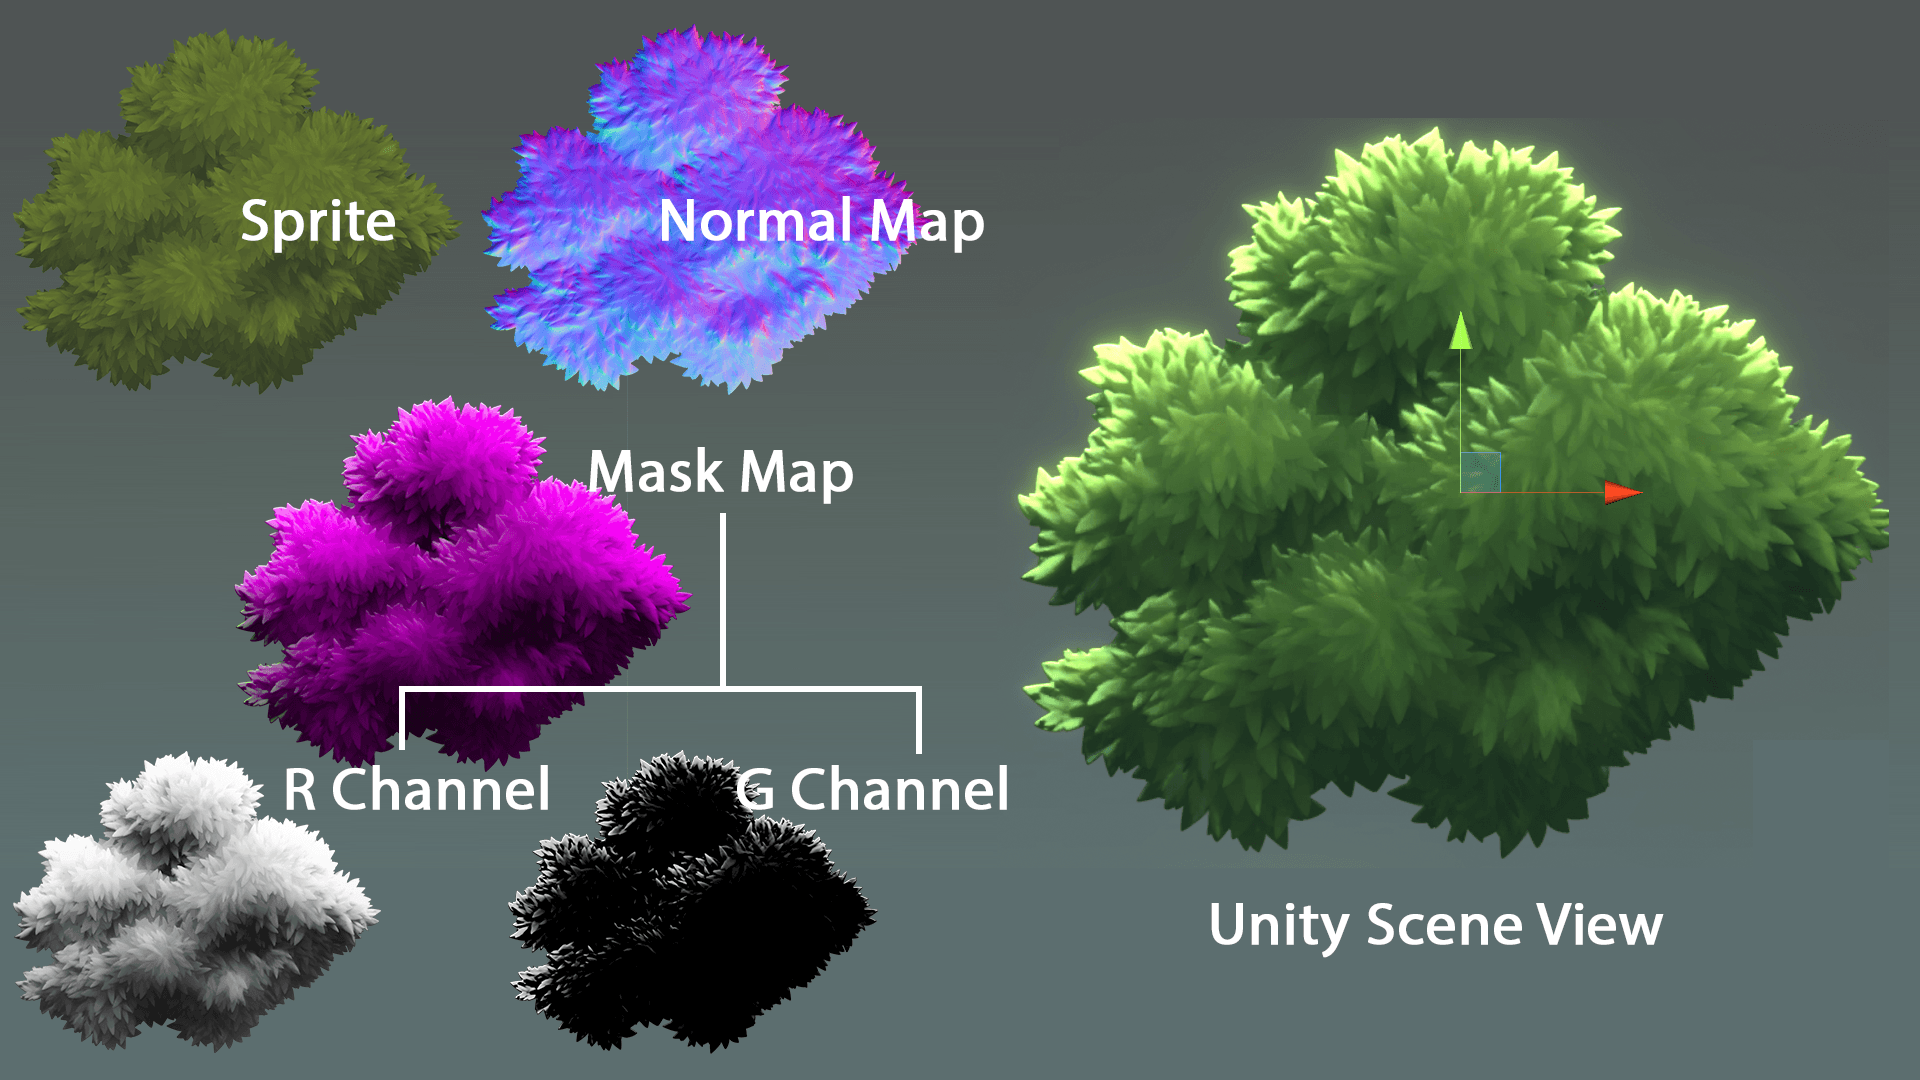
On the Vegetation Wind-Lit graph, you can see how we created two effects. One is the animation or sway effect, which we created by displacing the Vertex position following a few parameters that modify a noise pattern. The second effect uses the G or green channel to adjust the tone of the rim light around the foliage.

Light Blend Styles are a collection of properties in the 2D Renderer that describe how lights should affect Sprites. For example, you can create a blend style that will only affect a particular channel. When you add a light in the scene that uses that blend style, it will only affect the areas of the Sprite that the Mask map channel information dictates.
In the example below, the parametric light uses our Direct Lighting blend style, which only affects the areas indicated in the R channel of that Sprite’s Mask map.

Lost Crypt has a short cinematic when our adventurer grabs the magic wand in the crypt. To make the moment a bit more special, we changed the mood of the environment and spawn particles at the right time with Timeline, since we want to observe the change to nighttime. To follow the particles flying into the woods, we switched Cinemachine cameras by also having an animation track blending camera.

The glowing ring that appears when you grab the wand uses of Sprite-type lights. The ring graphic simply expands and fades, creating an aura that lights up the environment.
We achieved the particle glow effect mostly with the Bloom effect in Volume post-processing. Also, the material/shader for the particles and trail uses an HDR color to define how much intensity the post-processing effect should apply to this object.

Look closely at the woods – you can see some spectral creatures in there. To do that, we created a shader that could be used for other ghosts. They are transparent but a fresnel effect adds some shine in the edges of the Sprite making them wobble like floating creatures.
One interesting effect in the shader is the tracking of the wand GameObject transform position. For example, when the wand is close to the ghouls they become brighter. In order to achieve that, we attached a small script to the wand that updates its position in the material shader.

The ghouls also have a small animation that swaps from one graphic to another. In order to do that, we created a Mask map with different graphics in each channel: R with one visual, G with the alternate visual, and B for the fresnel effect.

For a final layer of polish, we added some post-processing effects included in the Universal Render Pipeline. For example, we created an empty GameObject and attached the Volume component to it. In Lost Crypt we use bloom, white balance, and vignette, but there are many other effects that can be used in 2D projects like motion blur, color correction of film grain effects.

We hope the Lost Crypt demo will help you understand how you can use our integrated suite of 2D tools for similar use cases. If you have any questions about the Lost Crypt, you can reach us on the forum.
If you have specific questions about our 2D tools, check out the dedicated threads in the 2D section of the forum and under Beta & Experimental features.
Want to go behind the scenes with Lost Crypt in real-time? Sign up for our lively webinar where Global Content Evangelist Andy Touch will explain how we used 2D lights, shaders, and post-processing in Lost Crypt. The 2D team from R&D will also join us to answer your questions about the suite of 2D tools or the project itself.
There’s a limited number of spaces, so make sure you register soon and add a reminder in your calendar.