Esta página da Web foi automaticamente traduzida para sua conveniência. Não podemos garantir a precisão ou a confiabilidade do conteúdo traduzido. Se tiver dúvidas sobre a precisão do conteúdo traduzido, consulte a versão oficial em inglês da página da Web.
Rigging de personagens, ou animação esquelética, é o primeiro passo na animação de um personagem digital. Vincular um modelo a uma hierarquia esquelética de ossos e controles permite que você posicione e anime personagens.
Como funciona o Rigging de Animação?
Animadores usam rigging para posicionar e animar um personagem ou objeto através de uma rede de movimentos. Os rigs ajudam a controlar a manipulação desse personagem ou objeto. Em vez de agir diretamente sobre o objeto, eles criam uma estrutura hierárquica capaz do movimento ou mudança desejada. Isso é um rig, e o objeto é controlado por esse rig.
O rig pode ser qualquer coisa, mas tipicamente, há um ou mais “controles” que foram configurados para permitir diferentes tipos de movimento ou mudanças no objeto. Essas mudanças podem ser tão simples quanto traduções ou rotações, mas podem crescer para incluir a automação de comportamentos e movimentos complexos.
Para personagens, os animadores usarão técnicas de rigging mais complexas. “Esqueletos,” “juntas,” e outros “deformadores” podem ser usados para mudar a aparência da geometria. Isso permite a pose e a deformação personalizada do modelo.
Ao usar softwares 3D como Maya, Blender ou 3ds Max, um artista de rigging pode criar diferentes tipos de rigs para animação. Um animador pode então manipular os controles do rig, muito parecido com mover e posicionar uma marionete digital. Eles usam keyframes para registrar mudanças na posição dos controles ao longo do tempo para criar o movimento animado. Esses tipos de modelos rigados podem então ser importados em motores de jogo como Unity.
O que é Rigging de Personagem?
Rigging de personagem é o processo de pegar um modelo 3D (ou 2D) estático e transformá-lo em um fantoche digital posável. Esse processo tem muitas etapas, mas quase sempre envolve a criação de uma estrutura esquelética feita de ossos ou "juntas", e a ligação do modelo ou "pele" a essas juntas. Quanto mais rigs um personagem tem, mais complexos e sutis movimentos eles são capazes de realizar.
Uma vez que o modelo pode se mover com o esqueleto, o artista de rigging criará um conjunto de controles que o animador usará para posar o personagem. A criação, layout e funcionalidade desse esquema de controle estão no coração do trabalho do artista de rigging.
Além disso, a aparência do modelo mudará quando posado, o que é chamado de "deformação". Um artista de rigging é responsável por fazer ajustes no modelo do personagem quando posado, e usa um sistema para conduzir essas mudanças. O resultado final é um fantoche digital que é fácil para um animador posar, que parece atraente após a deformação, e tem comportamentos complexos automatizados.
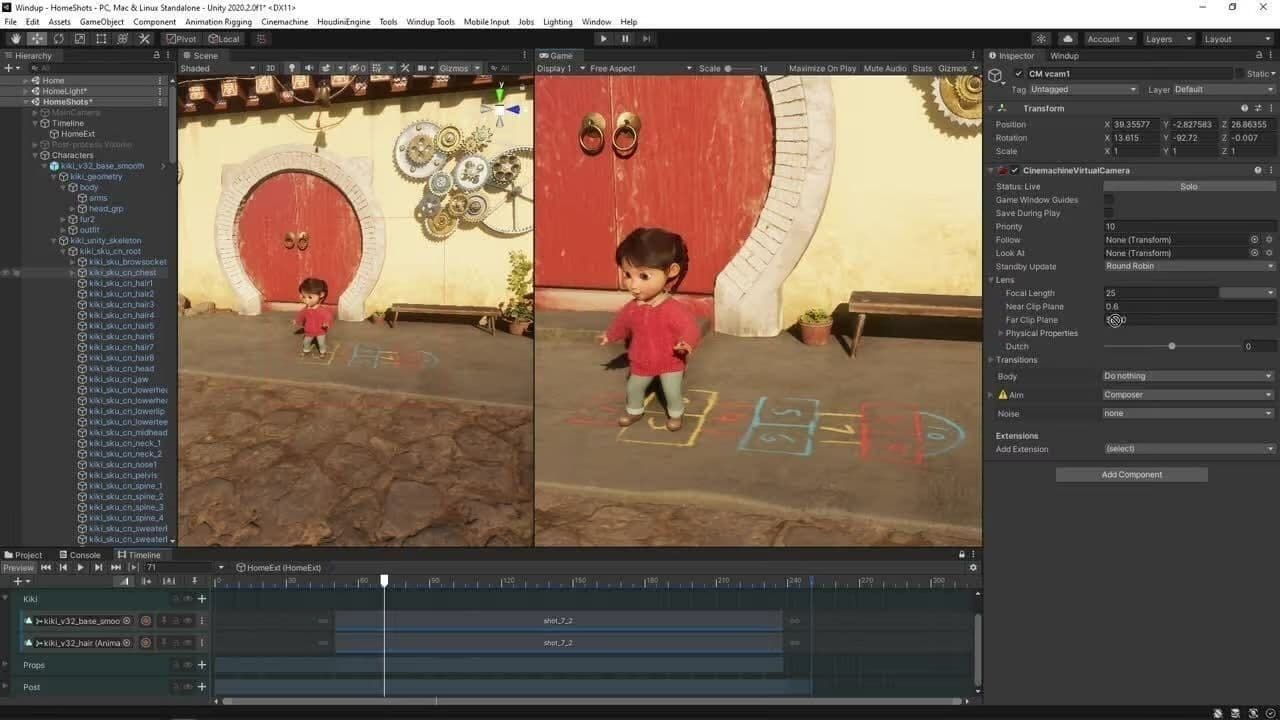
Clique no vídeo acima e vá aos bastidores do WiNDUP para ver como personagens animados são projetados e trazidos à vida. Vá para 3:18 para obter uma breve introdução sobre como o rigging de personagens é realizado no Unity.
Rigging para animação 2D e 3D
Rigging é a técnica mais comum para animar personagens, criaturas ou objetos em filmes, TV e videogames. Qualquer coisa que exija movimento pode ser rigged para animação. Rigging com software 3D pode ajudar a automatizar movimentos mais complexos, como física de ragdoll, aplicando uma simulação física precisa em todas as estruturas esqueléticas.
Para começar a rigging, os animadores primeiro precisam de um personagem ou objeto 2D ou 3D. Ao criar o rig, os animadores devem pensar sobre o que querem que seu rig faça, como ele deve se mover e onde estarão as articulações ou pivôs. Em seguida, eles criarão uma estrutura hierárquica, ou esqueleto se for um personagem, junto com um conjunto de controles.
Depois, eles conectarão o objeto ou personagem ao rig, um processo que pode ser simples ou complexo, dependendo do tipo de rig necessário. A partir daí, um animador pode manipular o rig para criar animação mais facilmente.
This content is hosted by a third party provider that does not allow video views without acceptance of Targeting Cookies. Please set your cookie preferences for Targeting Cookies to yes if you wish to view videos from these providers.
Neste vídeo, o YouTuber Brackeys explica os princípios da rigging de animação e como você pode aplicá-los em uma ampla variedade de cenários. Ele também fornece um tutorial passo a passo de como a rigging de animação é realizada no Unity Editor.
O que considerar ao fazer Rigging de Personagem?
Movimento hierárquico independente
Para criar uma sensação de ritmo e equilíbrio na animação - e uma aparência mais crível - o movimento hierárquico é a ordem em que diferentes partes de um personagem ou objeto se movem. Por exemplo, em um ciclo de caminhada, a cabeça e o pescoço se moverão primeiro, seguidos pelo torso, quadris e pernas.
Isso também cria uma sensação de peso e gravidade, ou velocidade e impulso. O movimento hierárquico independente também pode se referir à maneira como diferentes elementos dentro de uma animação se movem em relação uns aos outros, como dois personagens caminhando lado a lado.
Para criar uma sensação de ritmo e equilíbrio na animação – e uma aparência mais crível – o movimento hierárquico é a ordem em que diferentes partes de um personagem ou objeto se movem. Por exemplo, em um ciclo de caminhada, a cabeça e o pescoço se moverão primeiro, seguidos pelo torso, quadris e pernas.
Isso também cria uma sensação de peso e gravidade, ou velocidade e impulso. O movimento hierárquico independente também pode se referir à maneira como diferentes elementos dentro de uma animação se movem em relação uns aos outros, como dois personagens caminhando lado a lado.
Pintura de peso precisa
Um modelo de personagem rigado está ligado a uma hierarquia de articulações ou um esqueleto. Os vértices individuais do modelo são pesados entre diferentes articulações, que é como eles se movem quando você move o esqueleto.
Para que um modelo de personagem deforme corretamente quando animado, é necessário um peso de pintura preciso. Este é um processo de adicionar ou remover pesos de vértices específicos em uma malha para articulações correspondentes no esqueleto. Isso geralmente é feito pintando na malha usando uma ferramenta de pincel em software de animação 3D. Uma pintura de peso limpa pode dar maior controle sobre a deformação de um personagem e melhorar a aparência do resultado final.
Restrições de movimento do osso
Para produzir uma animação realista ou estilizada, é essencial entender os princípios do movimento. Entender como um objeto se move em relação a outros objetos é conhecido como restrição de movimento. Existem dois tipos: restrições cinemáticas e restrições dinâmicas.
Restrições cinemáticas definem o movimento de um objeto sem considerar as forças que atuam sobre ele. Por exemplo, um objeto não pode se mover mais rápido do que a velocidade da luz.
Restrições dinâmicas levam em conta as forças que atuam sobre um objeto, por exemplo, um objeto só pode acelerar a uma certa taxa.
Restrições de movimento do osso controlam seu grau de liberdade dentro de sua transformação para criar um movimento natural.
Quais são as melhores práticas de rigging de personagens?
Cinemática direta
A cinemática direta é o processo de manipular uma hierarquia de articulações da raiz para a ponta, ou em uma direção "para frente". Para posicionar um braço usando cinemática direta, comece girando o braço superior, seguido pelo cotovelo e, finalmente, o pulso. Esse tipo de movimento resulta em arcos agradáveis quando animados, mas torna mais difícil definir a posição exata do ponto final, já que sua posição é uma combinação das rotações do restante da cadeia de articulações e é ajustada manualmente.
Cinemática inversa
A cinemática inversa é o processo de manipular uma hierarquia de articulações da ponta para a raiz, ou em uma direção "inversa". Para posicionar um braço usando cinemática inversa, você só precisa mover a mão, e as rotações do cotovelo e do braço superior serão calculadas com base na posição final da mão. Esse tipo de movimento torna possível travar a mão de um personagem em um ponto no espaço, ou seus pés no chão, sem deslizar. No entanto, animar arcos naturais ao longo de toda a cadeia de articulações pode ser mais difícil.
Chaves dirigidas
Também conhecidas como chaves dirigidas, as chaves permitem que você realize animações "baseadas em condição" de keyframe, como girar uma roda para abrir uma porta, de forma mais eficiente. Dependendo da hierarquia de animação (ou seja, o que impulsiona o resultado desejado), você precisa criar um link dependente entre um par de objetos. Por exemplo, sua roda é o "motor principal", e a porta é a "dirigida". Você então define isso como uma chave. O motor principal irá liderar a dirigida, e o movimento da dirigida ocorre automaticamente à medida que você anima o motor principal.
Formas de mistura
Mudar a forma de um objeto dentro da sua cena requer "deformadores". Formas de mistura é um deformador que é usado para criar a ilusão de uma forma mudando para outra de maneira natural – por exemplo, um olho piscando.
Restrições
Para refinar um rig para torná-lo mais fácil de manipular, você pode usar restrições para controlar automaticamente a posição, orientação ou escala. Existem vários tipos – restrições de mira controlam a orientação de um objeto para que ele aponte para outro objeto na cena, como a direção do olhar. Restrições de ponto fazem com que um objeto siga outro, e restrições vetoriais forçam a direção de uma cadeia de cinemática inversa a seguir outro objeto, como controlar a direção do joelho.
Curvas de controle
Qualquer propriedade animável pode ter uma curva de animação que permite que você veja os valores em mudança das propriedades como linhas em um gráfico, em vez de trilhas lineares mostrando apenas quando os keyframes ocorrem. Uma curva de controle de animação tem várias chaves que atuam como pontos de controle pelos quais a curva passa. A curva entre cada quadro-chave de um movimento animado define o movimento entre as duas chaves.