Prefabricados ligeros y otros consejos para obtener 60 fps en teléfonos de gama baja
Lo que obtendrá de esta página: consejos de Michelle Martin, ingeniera de software de MetalPop Games, sobre cómo optimizar juegos para una variedad de dispositivos móviles, para que pueda llegar a tantos jugadores potenciales como sea posible.
Con su juego de estrategia móvil, Galactic Colonies, MetalPop Games enfrentó el desafío de hacer posible que los jugadores construyeran enormes ciudades en sus dispositivos de gama baja, sin que su velocidad de fotogramas bajara ni su dispositivo se sobrecalentara. Vea cómo encontraron un equilibrio entre imágenes atractivas y un rendimiento sólido.
Construyendo ciudades en dispositivos de gama baja
A pesar de lo potentes que son los dispositivos móviles hoy en día, todavía es difícil ejecutar entornos de juego grandes y atractivos a una velocidad de fotogramas sólida. Lograr 60 fps sólidos en un entorno 3D a gran escala en un dispositivo móvil antiguo puede ser un desafío.
Como desarrolladores, podríamos centrarnos en teléfonos de gama alta y asumir que la mayoría de los jugadores tendrán suficiente hardware para ejecutar nuestro juego sin problemas. Pero esto resultará en el bloqueo de una gran cantidad de jugadores potenciales, ya que todavía hay muchos dispositivos más antiguos en uso. Todos esos son clientes potenciales que no desea excluir.
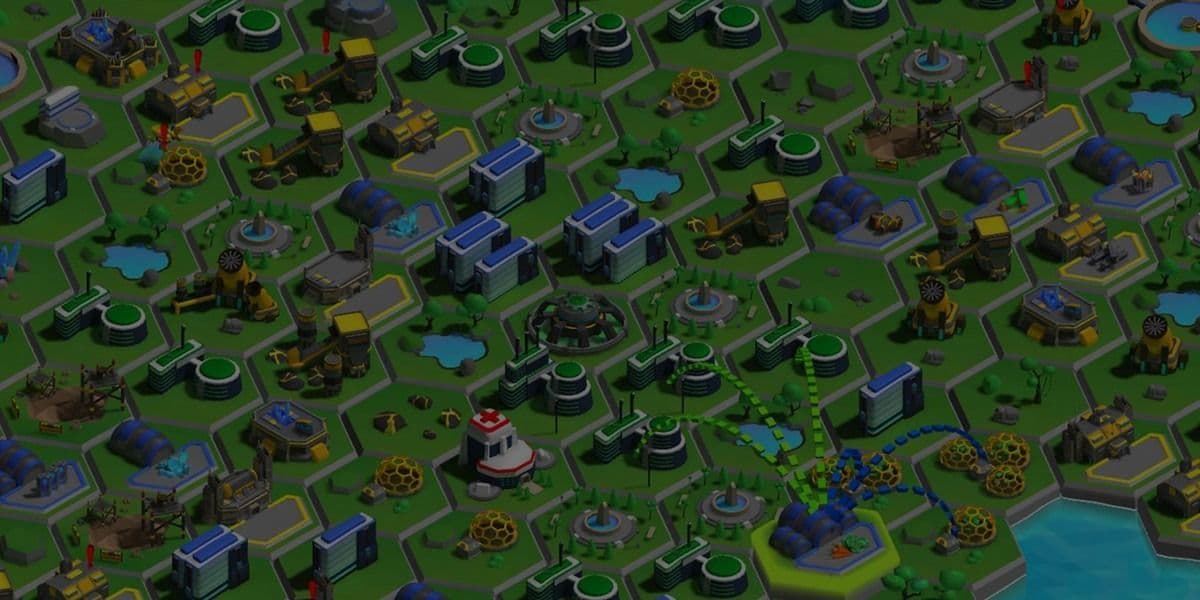
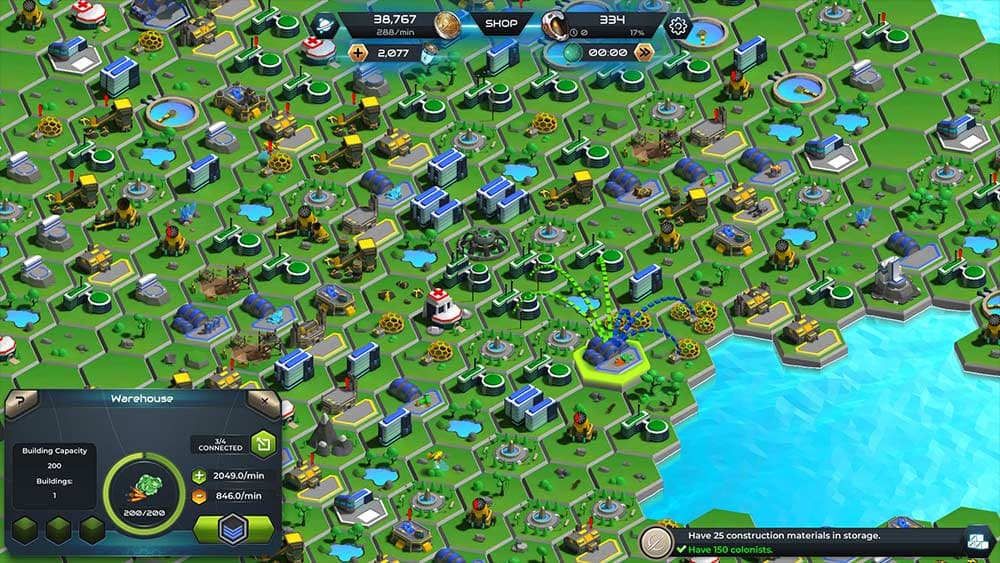
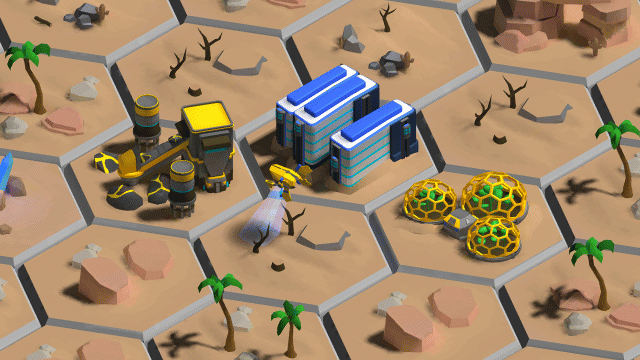
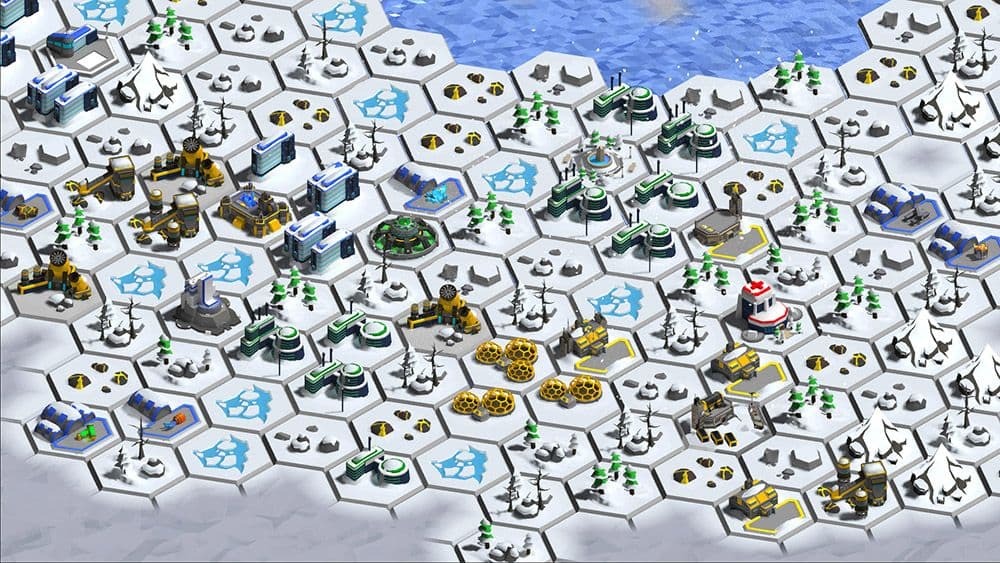
En nuestro juego, Galactic Colonies, los jugadores colonizan planetas alienígenas y construyen enormes colonias formadas por una gran cantidad de edificios individuales. Mientras que las colonias más pequeñas pueden tener sólo una docena de edificios, las más grandes pueden tener fácilmente cientos de ellos.
Esta era nuestra lista de objetivos cuando comenzamos a desarrollar el proyecto:
- Queremos mapas enormes con grandes cantidades de edificios
- Queremos correr rápido en dispositivos móviles más baratos y/o antiguos
- Queremos que las luces y sombras se vean bien
- Queremos un canal de producción sencillo y fácil de mantener
Retos de iluminación en el móvil
Una buena iluminación en tu juego es clave para que los modelos 3D se vean geniales. En Unity eso es fácil: configura tu nivel, coloca tus luces dinámicas y listo. Y si necesita vigilar el rendimiento, simplemente hornee todas las luces y agregue algo de SSAO y otros atractivos visuales a través de la pila de posprocesamiento. ¡Ahí lo tienes, envíalo!
Para los juegos móviles, necesitas una buena serie de trucos y soluciones para configurar la iluminación. Por ejemplo, a menos que esté dirigido a dispositivos de alta gama, no desea utilizar ningún efecto de posprocesamiento. Del mismo modo, una escena grande llena de luces dinámicas también reducirá drásticamente la velocidad de fotogramas.
La iluminación en tiempo real puede resultar costosa en una PC de escritorio. En los dispositivos móviles, las limitaciones de recursos son aún mayores y no siempre puedes permitirte todas esas funciones interesantes que te gustaría tener.
Horneado ligero al rescate
Por lo tanto, no querrás agotar las baterías de los teléfonos de tus usuarios más de lo necesario al tener demasiadas luces elegantes en tu escena.
Si superas constantemente los límites del hardware, el teléfono se calentará y, en consecuencia, reducirá la velocidad para protegerse. Para evitar esto, puedes hornear todas las luces que no proyecten sombras en tiempo real.
El proceso de horneado de luz es el cálculo previo de luces y sombras para una escena (estática) cuya información luego se almacena en un mapa de luz. Luego, el renderizador sabe dónde aclarar o oscurecer un modelo, creando la ilusión de luz.
Renderizar cosas de esta manera es rápido porque todos los costosos y lentos cálculos de luz se han realizado fuera de línea y, en tiempo de ejecución, el renderizador (sombreador) solo necesita buscar el resultado en una textura.
La desventaja aquí es que tendrá que enviar algunas texturas de mapas de luz adicionales, lo que aumentará el tamaño de su compilación y requerirá algo de memoria de textura adicional en tiempo de ejecución. También perderá algo de espacio porque sus mallas necesitarán mapas de luz UV y se harán un poco más grandes. Pero en general obtendrás un tremendo aumento de velocidad.
Pero para nuestro juego esto no era una opción, ya que el jugador construye el mundo del juego en tiempo real. El hecho de que constantemente se descubran nuevas regiones, se agreguen nuevos edificios o se mejoren los existentes impide cualquier tipo de horneado ligero eficiente. Simplemente presionar el botón Hornear no funcionará cuando tienes un mundo dinámico que el jugador puede cambiar constantemente.
Por lo tanto, nos enfrentamos a una serie de problemas que surgen al hornear luces para escenas altamente modulares.
Una tubería para prefabricados horneados ligeros
Los datos de horneado de luz en Unity se almacenan y se asocian directamente con los datos de la escena. Esto no es un problema si tienes niveles individuales y escenas prediseñadas y sólo un puñado de objetos dinámicos. Puedes hornear previamente la iluminación y listo.
Obviamente, esto no funciona cuando creas niveles dinámicamente. En un juego de construcción de ciudades, el mundo no está creado previamente. En cambio, en gran medida se ensambla dinámicamente y sobre la marcha según la decisión del jugador de qué construir y dónde construirlo. Esto generalmente se hace creando instancias de Prefabs dondequiera que el jugador decida construir algo.
La única solución a este problema es almacenar todos los datos relevantes de la iluminación dentro de la casa prefabricada en lugar de la escena. Desafortunadamente, no existe una manera fácil de copiar los datos de qué mapa de luz usar, sus coordenadas y escala en una casa prefabricada.
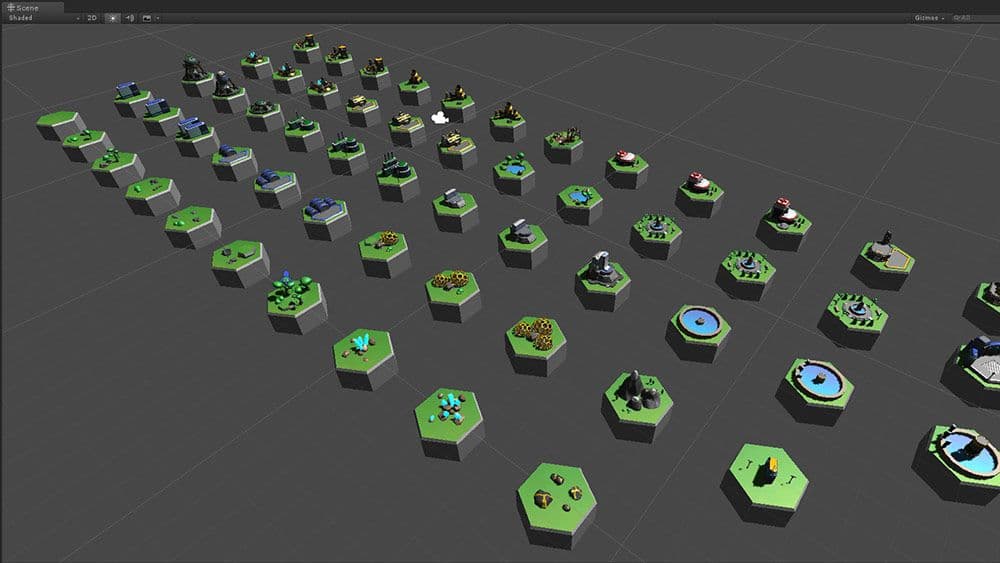
El mejor enfoque para lograr una canalización sólida que maneje prefabricados livianos es crear los prefabricados en una escena diferente y separada (varias escenas, de hecho) y luego cargarlos en el juego principal cuando sea necesario. Cada pieza modular se hornea livianamente y luego se cargará en el juego cuando sea necesario.
Observe de cerca cómo funciona el horneado ligero en Unity y verá que renderizar una malla horneada ligera en realidad es simplemente aplicarle otra textura e iluminar, oscurecer (o a veces colorear) la malla un poco. Todo lo que necesitas es la textura del mapa de luz y las coordenadas UV, las cuales son creadas por Unity durante el proceso de horneado de la luz.
Durante el horneado de luz, el proceso Unity crea un nuevo conjunto de coordenadas UV (que apuntan a la textura del mapa de luz) y un desplazamiento y escala para la malla individual. Las luces al volver a hornear cambian estas coordenadas cada vez.
Cómo utilizar canales UV
Para desarrollar una solución a este problema, es útil comprender cómo funcionan los canales UV y cómo utilizarlos mejor.
Cada malla puede tener múltiples conjuntos de coordenadas UV (llamados canales UV en Unity). En la mayoría de los casos, un conjunto de UV es suficiente, ya que las diferentes texturas (Diffuse, Spec, Bump, etc.) almacenan la información en el mismo lugar de la imagen.
Pero cuando los objetos comparten una textura, como un mapa de luz, y necesitan buscar la información de un lugar específico en una textura grande, a menudo no hay manera de agregar otro conjunto de UV para usar con esta textura compartida.
El inconveniente de múltiples coordenadas UV es que consumen memoria adicional. Si usa dos conjuntos de UV en lugar de uno, duplicará la cantidad de coordenadas UV para cada uno de los vértices de la malla. Cada vértice ahora almacena dos números de punto flotante, que se cargan en la GPU al renderizar.
Creando las casas prefabricadas
Unity genera las coordenadas y el mapa de luz, utilizando la funcionalidad de horneado de luz normal. El motor escribirá las coordenadas UV del mapa de luz en el segundo canal UV del modelo. Es importante tener en cuenta que el conjunto principal de coordenadas UV no se puede utilizar para esto porque es necesario desenvolver el modelo.
Imagina una caja usando la misma textura en cada uno de sus lados: Todos los lados individuales de la caja tienen las mismas coordenadas UV, porque reutilizan la misma textura. Pero esto no funcionará para un objeto con mapa de luz, ya que cada lado de la caja recibe luces y sombras individualmente. Cada lado necesita su propio espacio en el mapa de luz con sus datos de iluminación individuales. De ahí la necesidad de un nuevo conjunto de UV.
Para configurar un nuevo Prefab ligero, todo lo que necesitamos hacer es almacenar tanto la textura como sus coordenadas para que no se pierdan y copiarlas en el Prefab.
Una vez finalizada la cocción de la luz, ejecutamos un script que recorre todas las mallas de la escena y escribe las coordenadas UV en el canal UV2 real de la malla, con los valores de compensación y escala aplicados.
El código para modificar las mallas es relativamente sencillo (consulte el ejemplo a continuación).
Para ser más especifico: Esto se hace con una copia de las mallas, y no con la original, porque haremos más optimizaciones en nuestras mallas durante el proceso de horneado.
Las copias se generan automáticamente, se guardan en un Prefab y se les asigna un nuevo material con un sombreador personalizado y el mapa de luz recién creado. Esto deja nuestras mallas originales intactas y los prefabricados horneados a la luz están inmediatamente listos para usar.
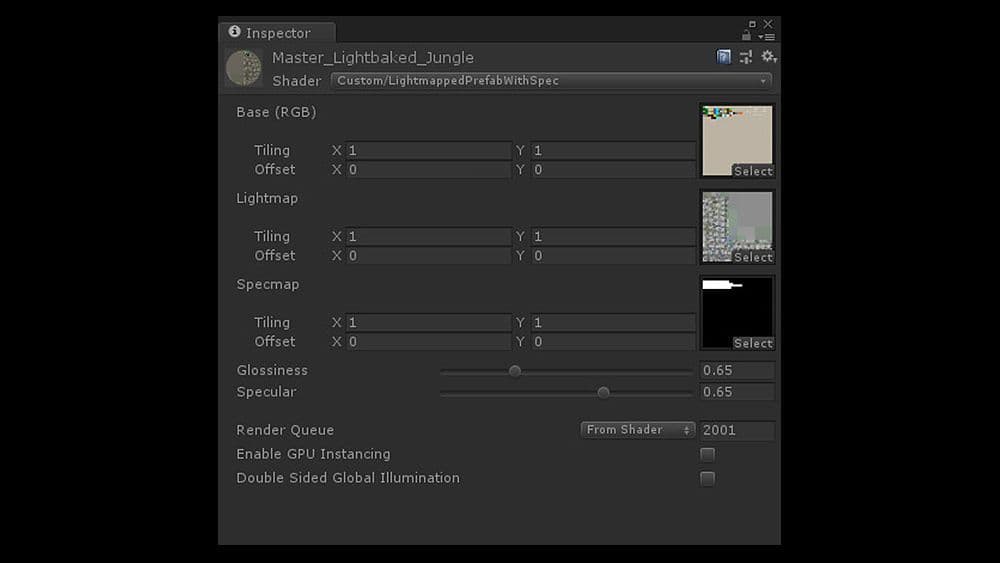
Un sombreador de mapa de luz personalizado
Esto hace que el flujo de trabajo sea muy simple. Para actualizar el estilo y la apariencia de los gráficos, simplemente abra la escena adecuada, realice todas las modificaciones hasta que esté satisfecho y luego inicie el proceso automatizado de creación y copia. Cuando finalice este proceso, el juego comenzará a usar los prefabricados actualizados y las mallas con la iluminación actualizada.
La textura del mapa de luz real se agrega mediante un sombreador personalizado, que aplica el mapa de luz como una segunda textura de luz al modelo durante el renderizado. El sombreador es muy simple y corto, y además de aplicar el color y el mapa de luz, calcula un efecto especular/brillante falso y barato.
Aquí está el código del sombreador; La imagen de arriba es de una configuración de material usando este sombreador.
Configuración y procesamiento por lotes estático
En nuestro caso tenemos cuatro escenarios diferentes con todos los Prefabs montados. Nuestro juego presenta diferentes biomas como tropical, hielo, desierto, etc. y dividimos nuestras escenas en consecuencia.
Todos los prefabricados que se utilizan en una escena determinada comparten un único mapa de luz. Esto significa una única textura extra, además de que los prefabricados comparten un solo material. Como resultado, pudimos renderizar todos los modelos como estáticos y renderizar por lotes casi todo nuestro mundo en una sola llamada de sorteo.
Las escenas de horneado de luz, en las que se colocan todos nuestros mosaicos/edificios, tienen fuentes de luz adicionales para crear reflejos localizados. Puedes colocar tantas luces como necesites en las escenas de configuración, ya que de todos modos se apagarán todas.
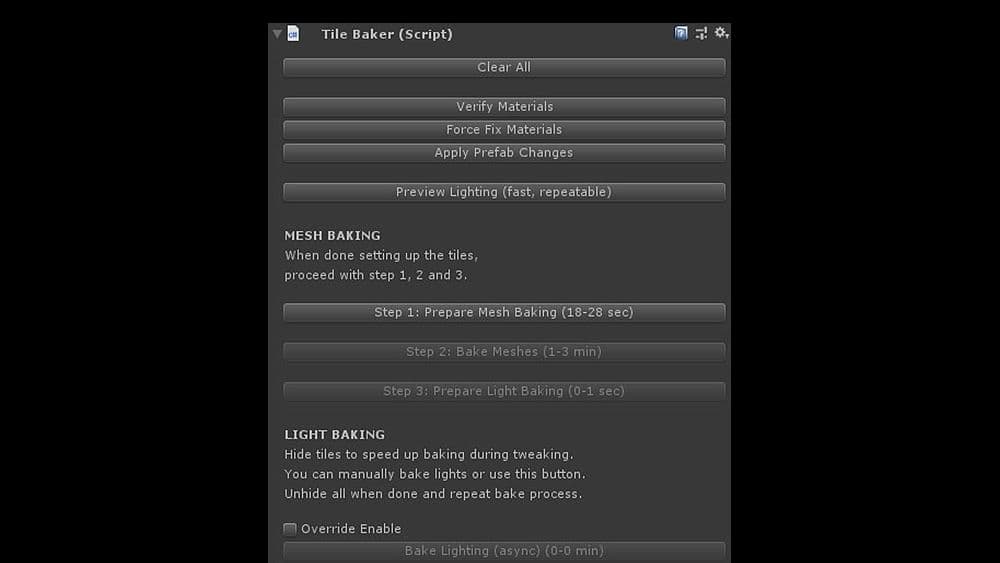
Un cuadro de diálogo de interfaz de usuario personalizado
El proceso de horneado se maneja en un cuadro de diálogo de interfaz de usuario personalizado que se encarga de todos los pasos necesarios. Asegura que:
- El material correcto está asignado a todas las mallas
- Todo lo que no es necesario hornear durante el proceso queda oculto.
- Las mallas se combinan/hornean.
- Se copian los UV y se crean los prefabricados.
- Todo tiene el nombre correcto y se extraen los archivos necesarios del sistema de control de versiones.
Los prefabricados con el nombre adecuado se crean a partir de las mallas para que el código del juego pueda cargarlos y usarlos directamente. Los metaarchivos también se cambian durante este proceso, para que no se pierdan las referencias a las mallas de Prefabs.
Este flujo de trabajo nos permite modificar nuestros edificios tanto como queramos, iluminarlos como queramos y luego dejar que el guión se encargue de todo.
Cuando volvemos a nuestra escena principal y ejecutamos el juego, simplemente funciona, sin necesidad de intervención manual ni otras actualizaciones.
Luz falsa y bits dinámicos
Uno de los inconvenientes obvios de una escena en la que el 100% de la iluminación está precocida es que es difícil tener objetos dinámicos o movimiento. Cualquier cosa que arroje una sombra requeriría un cálculo de luces y sombras en tiempo real, lo cual, por supuesto, nos gustaría evitar por completo.
Pero sin ningún objeto en movimiento, el entorno 3D parecería estático y muerto.
Por supuesto, estábamos dispuestos a vivir con algunas restricciones, ya que nuestra principal prioridad era lograr buenos efectos visuales y un renderizado rápido. Para crear la impresión de una colonia o ciudad espacial viva y en movimiento, no se necesitan muchos objetos para moverse. Y la mayoría de estos no necesariamente requerían sombras, o al menos no se notaría la ausencia de las sombras.
Comenzamos dividiendo todos los bloques de construcción de la ciudad en dos casas prefabricadas separadas. Una porción estática, que contenía la mayoría de los vértices, todos los bits complejos de nuestras mallas, y una dinámica, que contenía la menor cantidad de vértices posible.
Las partes dinámicas de una casa prefabricada son bits animados colocados encima de los estáticos. No están horneados con luz y utilizamos un sombreador de iluminación falso muy rápido y económico para crear la ilusión de que el objeto estaba iluminado dinámicamente.
Los objetos tampoco tienen sombra o creamos una sombra falsa como parte del bit dinámico. La mayoría de nuestras superficies son planas, por lo que en nuestro caso eso no fue un gran obstáculo.
No hay sombras en las partes dinámicas, pero apenas se notan, a menos que sepas buscarlas. La iluminación de los prefabricados dinámicos también es falsa: no hay ninguna iluminación en tiempo real.
El primer atajo barato que tomamos fue codificar la posición de nuestra fuente de luz (sol) en el sombreador de iluminación falso. Es una variable menos que el sombreador necesita buscar y completar dinámicamente desde el mundo.
Siempre es más rápido trabajar con un valor constante que con un valor dinámico. Esto nos consiguió una iluminación básica, lados claros y oscuros de las mallas.
Especular/Brillo
Para hacer las cosas un poco más brillantes, agregamos un cálculo especular/brillante falso a los sombreadores tanto para los objetos dinámicos como para los estáticos. Los reflejos especulares ayudan a crear una apariencia metálica pero transmiten la curvatura de una superficie.
Dado que las luces especulares son una forma de reflexión, se requiere el ángulo de la cámara y la fuente de luz entre sí para calcularlo correctamente. Cuando la cámara se mueve o gira, lo especular cambia. Cualquier cálculo de sombreador requeriría acceso a la posición de la cámara y a cada fuente de luz en la escena.
Sin embargo, en nuestro juego, solo tenemos una fuente de luz que usamos para especular: el sol. En nuestro caso, el sol nunca se mueve y puede considerarse una luz direccional. Podemos simplificar mucho el sombreador usando solo una luz y asumiendo una posición fija y un ángulo de entrada para ella.
Aún mejor, nuestra cámara en Galactic Colonies muestra la escena desde arriba, como la mayoría de los juegos de construcción de ciudades. La cámara se puede inclinar un poco y acercar y alejar, pero no puede girar alrededor del eje superior.
En general, siempre se mira el entorno desde arriba. Para fingir una apariencia especular barata, fingimos que la cámara estaba completamente fija y que el ángulo entre la cámara y la luz era siempre el mismo.
De esta manera podríamos volver a codificar un valor constante en el sombreador y lograr un efecto de brillo/especificación económico de esa manera.
Por supuesto, usar un ángulo fijo para el especular es técnicamente incorrecto, pero es prácticamente imposible notar la diferencia siempre que el ángulo de la cámara no cambie mucho.
Para el jugador, la escena seguirá pareciendo correcta, que es el objetivo de la iluminación en tiempo real.
Iluminar un entorno en un videojuego en tiempo real siempre ha consistido en que parezca correcto visualmente, en lugar de simularse físicamente correctamente.
Debido a que casi todas nuestras mallas comparten un material, con muchos detalles provenientes del mapa de luz y los vértices, agregamos un mapa de textura especular, para indicarle al sombreador cuándo y dónde aplicar el valor de especificación, y con qué fuerza. Se accede a la textura mediante el canal UV principal, por lo que no requiere un conjunto adicional de coordenadas. Y como no tiene muchos detalles, tiene una resolución muy baja y apenas ocupa espacio.
Para algunos de nuestros bits dinámicos más pequeños con un número bajo de vértices, incluso podríamos utilizar el procesamiento por lotes dinámico automático de Unity, acelerando aún más el renderizado.
Una pila de prefabricados horneados ligeros
Todas estas sombras a veces pueden crear nuevos problemas, especialmente cuando se trabaja con edificios relativamente modulares. En un caso, teníamos un almacén que el jugador podía construir y que mostraría el tipo de mercancías almacenadas en él en el edificio real.
Esto causa problemas ya que tenemos un objeto horneado con luz encima de un objeto horneado con luz. ¡Lightbake-cepción!
Abordamos el problema utilizando otro truco barato:
- La superficie donde se debía agregar el objeto adicional tenía que ser plana y utilizar un color gris específico que combinara con el edificio de base
- A cambio de esto, pudimos cocinar los objetos en una superficie plana más pequeña y colocarlos sobre la zona con solo un pequeño desfase
- Las luces, los reflejos, los brillos de colores y las sombras se cocinaron en el mosaico (tile)
Se aplican algunas restricciones
Construir y hornear nuestros prefabricados de esta manera nos permite tener mapas enormes con cientos de edificios mientras mantenemos un recuento de llamadas de sorteo súper bajo. Todo nuestro mundo de juego está más o menos renderizado con un solo material y estamos en un punto en el que la interfaz de usuario consume más llamadas de sorteo que nuestro mundo de juego. Cuantos menos materiales diferentes tenga que renderizar Unity, mejor será para el rendimiento de tu juego.
Esto nos deja un amplio espacio para agregar más cosas a nuestro mundo, como partículas, efectos climáticos y otros elementos atractivos para la vista.
De esta manera, incluso los jugadores con dispositivos más antiguos pueden construir grandes ciudades con cientos de edificios manteniendo estables 60 fps.