
Indem Sie die Leistung Ihres Spiels für eine breite Palette von Plattformen und Geräten profilieren und optimieren, können Sie Ihre Spielerbasis erweitern und Ihre Erfolgschancen erhöhen.
Auf dieser Seite finden Sie Informationen zu zwei Tools, mit denen Sie die Speichernutzung in Ihrer Anwendung in Unity analysieren können: das eingebaute Memory Profiler-Modul und das Memory Profiler-Paket, ein Unity-Paket, das Sie zu Ihrem Projekt hinzufügen können.
Die Informationen hier sind ein Auszug aus dem E-Book " Ultimate guide to profiling Unity games", das Sie kostenlos herunterladen können. Das E-Book wurde von externen und internen Unity-Experten für Spielentwicklung, Profiling und Optimierung erstellt.
Lesen Sie weiter, um mehr über die Speicherprofilerstellung in Unity zu erfahren.
Die Erstellung von Speicherprofilen ist nützlich, um die Speicherbeschränkungen der Hardwareplattform zu testen, Ladezeiten und Abstürze zu verringern und Ihr Projekt mit älteren Geräten kompatibel zu machen. Es kann auch relevant sein, wenn Sie die CPU/GPU-Leistung verbessern wollen, indem Sie Änderungen vornehmen, die die Speichernutzung erhöhen. Sie ist weitgehend unabhängig von der Laufzeitleistung.
Es gibt zwei Möglichkeiten, die Speichernutzung in Ihrer Anwendung in Unity zu analysieren.
Das Modul Memory Profiler: Dies ist ein eingebautes Profilermodul, das Ihnen grundlegende Informationen darüber liefert, wo Ihre Anwendung Speicher verwendet.
Das Memory-Profiler-Paket Dies ist ein Unity-Paket, das Sie zu Ihrem Projekt hinzufügen können. Es fügt dem Unity-Editor ein zusätzliches Memory-Profiler-Fenster hinzu, mit dem Sie die Speichernutzung in Ihrer Anwendung noch detaillierter analysieren können. Sie können Snapshots speichern und vergleichen, um Speicherlecks zu finden. Oder Sie sehen sich das Speicherlayout an, um Fragmentierungsprobleme zu erkennen.
Mit diesen integrierten Werkzeugen können Sie die Speichernutzung überwachen, Bereiche einer Anwendung ausfindig machen, in denen die Speichernutzung höher ist als erwartet, und die Speicherfragmentierung erkennen und verbessern.
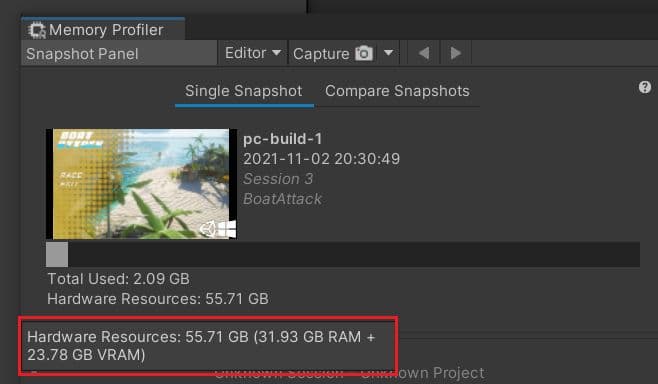
Für die Multiplattform-Entwicklung ist es wichtig, die Speicherbeschränkungen der Zielgeräte zu kennen und zu berücksichtigen. Halten Sie sich beim Entwerfen von Szenen und Ebenen an das Speicherbudget, das für jedes Zielgerät festgelegt wurde. Durch das Festlegen von Grenzen und Richtlinien können Sie sicherstellen, dass Ihre Anwendung innerhalb der Grenzen der Hardwarespezifikationen der jeweiligen Plattform gut funktioniert.
Spezifikationen zum Gerätespeicher finden Sie in der Entwicklerdokumentation. Beispielsweise ist die Xbox One-Konsole laut Dokumentation auf 5 GB maximal verfügbaren Speicher für im Vordergrund laufende Spiele beschränkt.
Es kann auch nützlich sein, um Inhaltsbudgets für die Mesh- und Shader-Komplexität sowie für die Texturkompression festzulegen. All dies hat Einfluss darauf, wie viel Speicher zugewiesen wird. Diese Budgetzahlen können während des Entwicklungszyklus des Projekts herangezogen werden.
Bestimmen Sie die physischen RAM-Grenzen
Jede Zielplattform hat eine Speichergrenze, und wenn Sie diese kennen, können Sie ein Speicherbudget für Ihre Anwendung festlegen. Verwenden Sie den Memory Profiler, um sich einen Snapshot anzusehen. Die Hardwareressourcen (siehe Abbildung oben) zeigen die Größe des physischen RAM (Random Access Memory) und des VRAM (Video Random Access Memory). Diese Zahl berücksichtigt nicht die Tatsache, dass möglicherweise nicht der gesamte Platz zur Verfügung steht. Sie ist jedoch ein nützlicher Richtwert, mit dem man arbeiten kann.
Es ist ratsam, die Hardware-Spezifikationen für die Zielplattformen zu vergleichen, da die hier gezeigten Zahlen nicht immer das vollständige Bild zeigen. Developer-Kit-Hardware hat manchmal mehr Speicher, oder Sie arbeiten mit Hardware, die eine einheitliche Speicherarchitektur hat.
Ermitteln Sie für jede von Ihnen unterstützte Plattform die Hardware mit der niedrigsten Spezifikation in Bezug auf den Arbeitsspeicher, und orientieren Sie sich bei der Entscheidung über das Speicherbudget daran. Denken Sie daran, dass möglicherweise nicht der gesamte physische Speicher zur Verfügung steht. Auf einer Konsole könnte beispielsweise ein Hypervisor laufen, um ältere Spiele zu unterstützen, die einen Teil des Gesamtspeichers beanspruchen könnten. Überlegen Sie sich einen Prozentsatz (z. B. 80 % des Gesamtbetrags), den Sie verwenden wollen. Für mobile Plattformen könnten Sie auch eine Aufteilung in mehrere Spezifikationsstufen in Erwägung ziehen, um eine bessere Qualität und mehr Funktionen für die Nutzer höherwertiger Geräte zu unterstützen.
Sobald Sie ein Speicherbudget definiert haben, sollten Sie Speicherbudgets pro Team festlegen. So erhalten beispielsweise Ihre Umgebungsgrafiker für jede geladene Ebene oder Szene eine bestimmte Menge an Speicherplatz, das Audioteam bekommt Speicherplatz für Musik und Soundeffekte zugewiesen, und so weiter.
Es ist wichtig, mit den Budgets im Verlauf des Projekts flexibel zu sein. Wenn ein Team weit unter dem Budget liegt, sollten Sie den Überschuss einem anderen Team zuweisen, wenn es die Bereiche des Spiels, die es entwickelt, verbessern kann.
Sobald Sie sich für Speicherbudgets für Ihre Zielplattformen entschieden und diese festgelegt haben, besteht der nächste Schritt darin, Profiling-Tools zu verwenden, die Sie bei der Überwachung und Verfolgung der Speichernutzung in Ihrem Spiel unterstützen.
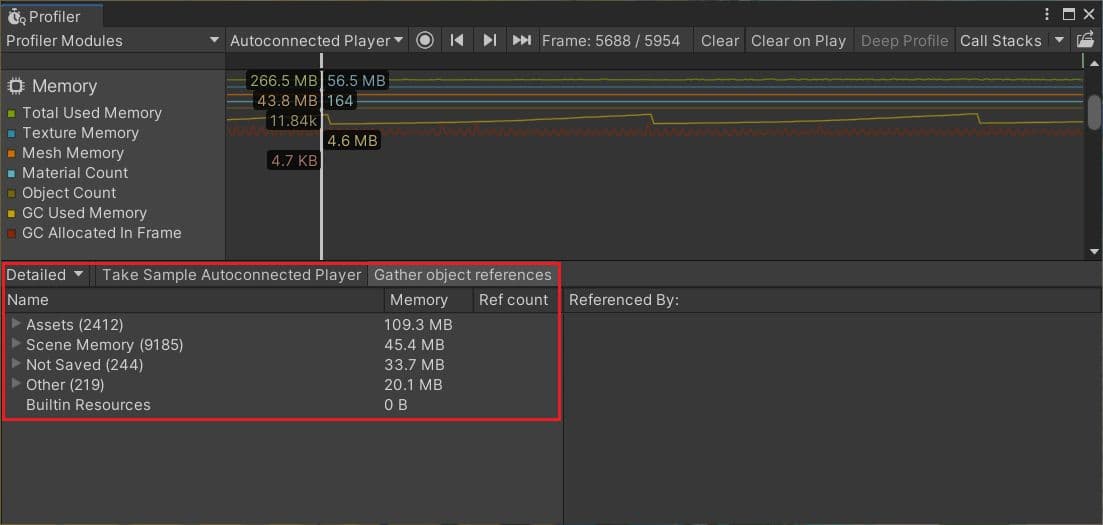
Das Modul Memory Profiler bietet zwei Ansichten: Einfach und detailliert. Verwenden Sie die einfache Ansicht, um sich einen Überblick über die Speichernutzung Ihrer Anwendung zu verschaffen. Wechseln Sie bei Bedarf zur Detailansicht, um die Daten weiter aufzuschlüsseln.
Einfach
Der Wert für den gesamten reservierten Speicher ist der von Unity Memory verfolgte Gesamtbetrag. Darin enthalten ist der Speicher, den Unity reserviert hat, aber im Moment nicht verwendet (diese Zahl ist der gesamte verwendete Speicher).
Der Wert für den vom System verwendeten Speicher ist der Wert, den das Betriebssystem als von Ihrer Anwendung verwendet ansieht. Wenn diese Zahl jemals 0 anzeigt, bedeutet dies, dass der Profiler-Zähler auf der Plattform, für die Sie ein Profil erstellen, nicht implementiert ist. In diesem Fall ist der beste Indikator der gesamte reservierte Speicher. Es wird auch empfohlen, in diesen Fällen zu einem plattformeigenen Profiling-Tool zu wechseln, um detaillierte Speicherinformationen zu erhalten.
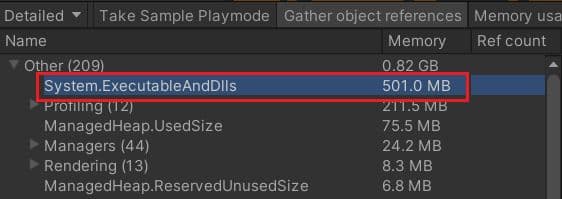
Um herauszufinden, wie viel Speicher von Ihrer ausführbaren Datei, den DLLs und der Mono Virtual Machine verbraucht wird, reichen Frame-by-Frame-Speicherzahlen nicht aus. Verwenden Sie eine detaillierte Schnappschusserfassung, um diese Art von Speicheraufschlüsselung zu untersuchen.
Hinweis Der Referenzbaum in der Detailansicht des Memory Profiler-Moduls zeigt nur die nativen Referenzen an. Referenzen von Objekten, die von UnityEngine.Object erben, werden möglicherweise mit dem Namen ihrer verwalteten Shells angezeigt. Es kann aber auch sein, dass sie nur deshalb auftauchen, weil sich unter ihnen Native Objects befinden. Sie werden nicht unbedingt einen verwalteten Typ sehen. Nehmen wir als Beispiel ein Objekt mit einer Texture2Din einem seiner Felder als Referenz. In dieser Ansicht sehen Sie auch nicht, welches Feld den Verweis enthält. Für diese Art von Details verwenden Sie das Memory Profiler Package.
Um auf einer hohen Ebene zu bestimmen, wann die Speichernutzung beginnt, sich den Plattformbudgets zu nähern, verwenden Sie die folgende "Back of the napkin"-Berechnung:
Verwendeter Systemspeicher (oder reservierter Gesamtspeicher, wenn "System Used" 0 anzeigt) + ungefährer Puffer an nicht verfolgtem Speicher / Gesamtspeicher der Plattform
Wenn sich diese Zahl 100% des Speicherbudgets Ihrer Plattform nähert, verwenden Sie das Paket Memory Profiler, um herauszufinden, warum.
Viele der Funktionen des Memory Profiler-Moduls wurden durch das Memory Profiler-Paket ersetzt, aber Sie können das Modul weiterhin zur Ergänzung Ihrer Speicheranalyse verwenden.
Zum Beispiel:
Denken Sie bei der Festlegung des Speicherbudgets daran, das Profil auf dem Gerät mit den niedrigsten Spezifikationen für Ihre Zielplattform zu erstellen. Überwachen Sie die Speichernutzung genau und behalten Sie dabei Ihre Zielvorgaben im Auge.
In der Regel sollten Sie ein Profil mit einem leistungsstarken Entwicklersystem erstellen, das über viel Arbeitsspeicher verfügt (Platz zum Speichern großer Speicherabzüge oder zum schnellen Laden und Speichern dieser Abzüge ist wichtig).
Die Erstellung von Speicherprofilen unterscheidet sich insofern von der Erstellung von CPU- und GPU-Profilen, als sie selbst zusätzlichen Speicher-Overhead verursachen kann. Möglicherweise müssen Sie den Arbeitsspeicher auf Geräten der oberen Leistungsklasse (mit mehr Arbeitsspeicher) profilieren, aber achten Sie besonders auf die Speicherbudgetgrenze für die Zielspezifikation der unteren Leistungsklasse.
Punkte, die bei der Profilerstellung für die Speichernutzung zu beachten sind:
Hinweis Der Unity-Editor wird im Allgemeinen immer einen größeren Speicherbedarf aufweisen, da zusätzliche Objekte vom Editor und Profiler geladen werden. Es kann sogar Asset-Speicher angezeigt werden, der bei einem Build nicht in den Speicher geladen wird, z. B. von Asset-Bündeln (abhängig vom Simulationsmodus "Adressierbare Objekte") oder Sprites und Atlanten oder für Assets, die im Inspektor angezeigt werden. Einige der Referenzketten können im Editor auch verwirrender sein.
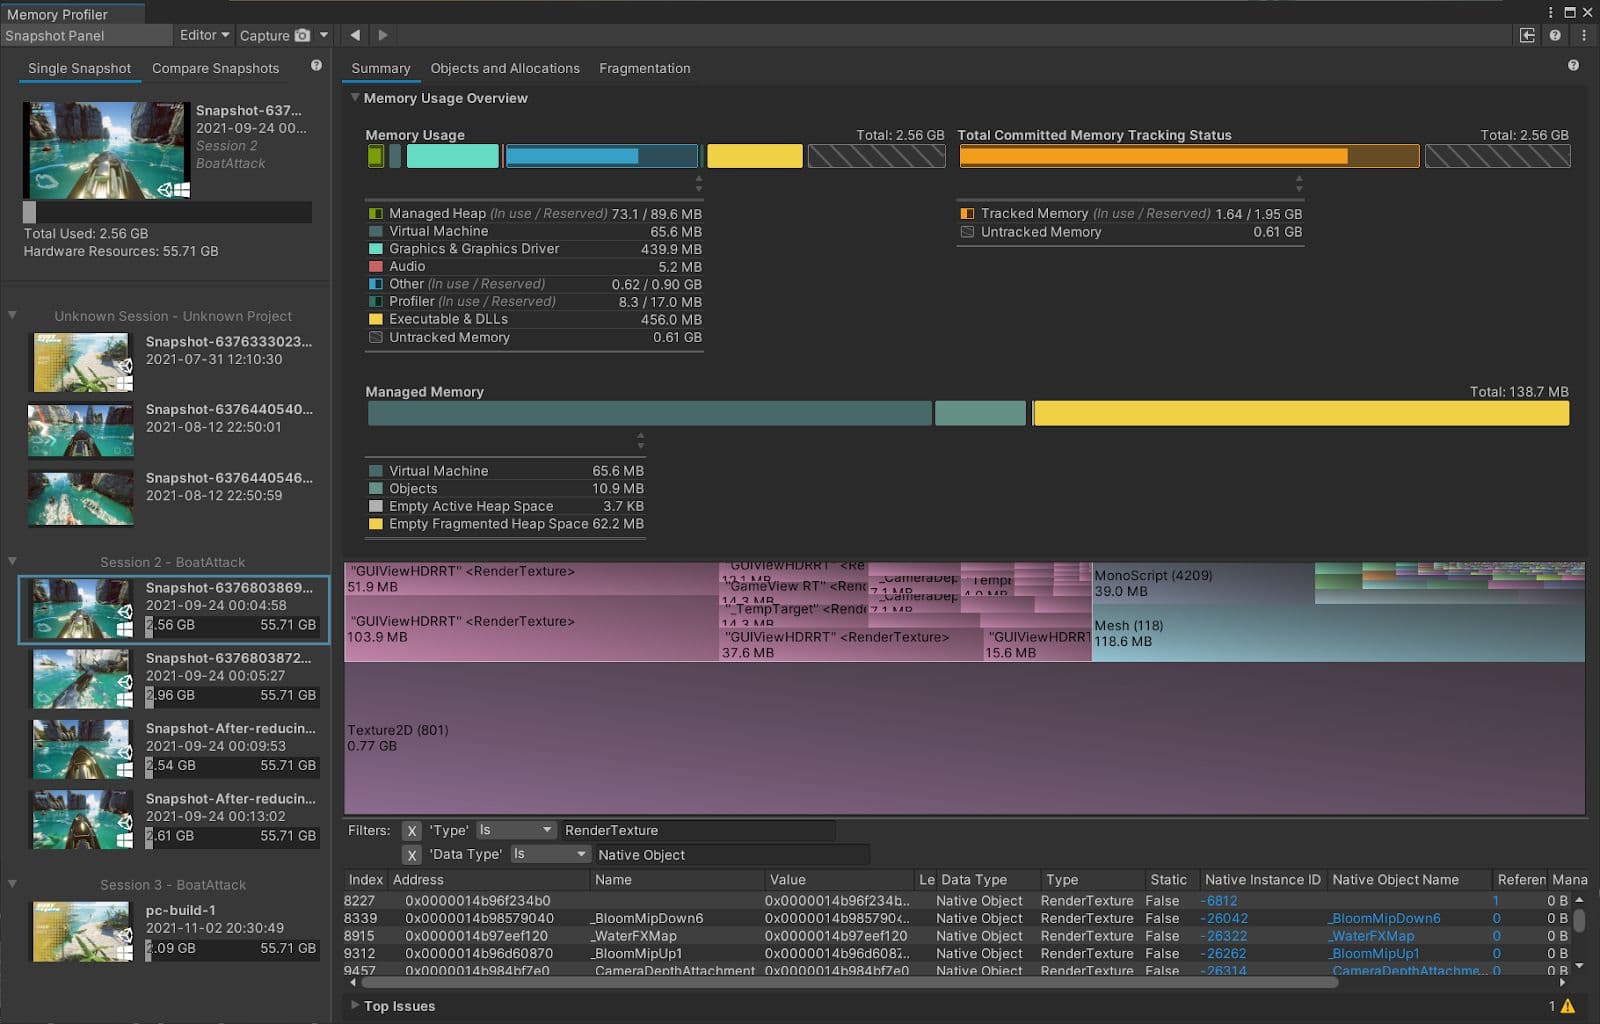
Der Memory Profiler ist derzeit in der Vorschau für Unity 2019 LTS oder neuer, wird aber voraussichtlich in Unity 2022 LTS verifiziert werden.
Ein großer Vorteil des Memory Profiler-Pakets besteht darin, dass es neben der Erfassung nativer Objekte (wie das Memory Profiler-Modul) auch die Anzeige von verwaltetem Speicher, das Speichern und Vergleichen von Snapshots und die noch detailliertere Untersuchung des Speicherinhalts mit visuellen Aufschlüsselungen der Speichernutzung ermöglicht.
Ein Snapshot zeigt die Speicherzuweisungen in der Engine an, so dass Sie schnell die Ursachen für eine übermäßige oder unnötige Speichernutzung ermitteln, Speicherlecks aufspüren oder die Heap-Fragmentierung erkennen können.
Nachdem Sie das Memory Profiler-Paket installiert haben, öffnen Sie es, indem Sie auf Fenster > Analyse > Memory Profiler klicken.
In der oberen Menüleiste des Memory Profilers können Sie das Ziel der Playerauswahl ändern und Snapshots erfassen oder importieren.
Hinweis Erstellen Sie ein Profil des Speichers auf der Zielhardware, indem Sie den Memory Profiler über das Dropdown-Menü Ziel mit dem entfernten Gerät verbinden. Die Profilerstellung im Unity-Editor liefert aufgrund des vom Editor und anderen Werkzeugen verursachten Overheads ungenaue Zahlen.
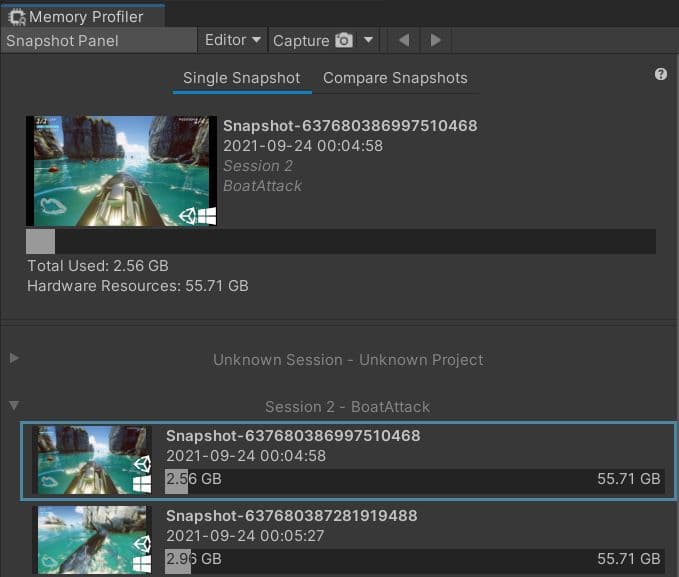
Auf der linken Seite des Memory Profiler-Fensters befindet sich der Workbench-Bereich. Verwenden Sie diese Funktion, um gespeicherte Speicherauszüge zu verwalten und zu öffnen oder zu schließen. In diesem Bereich können Sie auch zwischen den Ansichten "Einzelne Snapshots" und "Snapshots vergleichen" wechseln.
Ähnlich wie der Profile Analyzer ermöglicht der Memory Profiler das Laden zweier Datensätze (Speicher-Snapshots), um sie zu vergleichen. Dies ist besonders nützlich, wenn man sich ansehen will, wie die Speichernutzung im Laufe der Zeit oder zwischen den Szenen gestiegen ist, und wenn man nach Speicherlecks sucht.
Memory Profiler verfügt über eine Reihe von Registerkarten im Hauptfenster, die es Ihnen ermöglichen, Speicher-Snapshots zu analysieren, darunter Zusammenfassung, Objekte und Zuweisungen sowie Fragmentierung. Schauen wir uns jede dieser Optionen im Detail an.
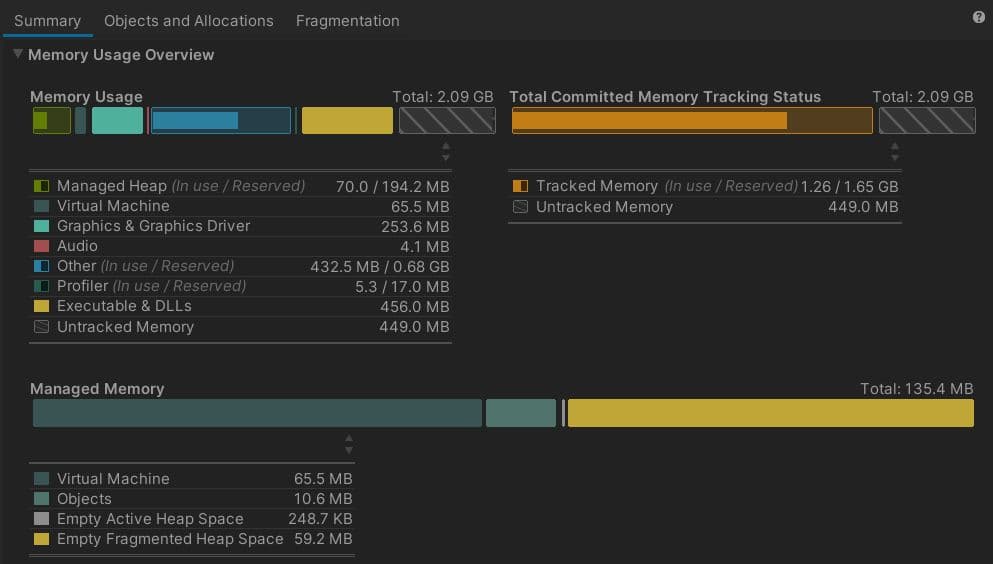
Wählen Sie diese Ansicht, wenn Sie sich einen schnellen Überblick über die Speichernutzung eines Projekts verschaffen wollen. Er enthält auch nützliche und wichtige speicherbezogene Zahlen für den betreffenden Speicherauszug. Sie eignet sich perfekt für einen schnellen Überblick über das Geschehen zum Zeitpunkt der Aufnahme eines Schnappschusses.

Die Baumstrukturansicht zeigt eine Aufschlüsselung des von den Objekten verwendeten Speichers in Form einer grafischen Baumstruktur an, in die Sie eindringen können, um herauszufinden, welche Art von Objekten den meisten Speicher verbraucht.

Unterhalb der Baumstrukturansicht befindet sich eine gefilterte Tabelle, die aktualisiert wird, um die Liste der Objekte in den ausgewählten Gitterzellen anzuzeigen.
Die Baumstruktur zeigt den Speicher, der den Objekten zugeordnet ist, entweder nativ oder verwaltet. Der Speicher von verwalteten Objekten ist in der Regel kleiner als der Speicher von nativen Objekten, so dass er in der Map-Ansicht schwerer zu erkennen ist. Sie können in die Baumkarte hineinzoomen, um sie zu betrachten, aber für die Untersuchung kleinerer Objekte bieten Tabellen normalerweise einen besseren Überblick. Durch Anklicken von Zellen in der Baumstruktur wird die darunter liegende Tabelle nach dem Typ des Abschnitts gefiltert und/oder das spezifische Objekt von Interesse in der Tabelle ausgewählt.
Sie können herausfinden, welche Objekte in dieser Liste referenziert werden und in welchen Feldern der verwalteten Klasse sich diese Referenzen befinden, indem Sie die Tabellenzeile oder die Zelle des Baumdiagramms auswählen, die sie repräsentiert, und dann den Abschnitt Referenzen im Seitenbereich Details überprüfen. Wenn die Seite ausgeblendet ist, können Sie sie über eine Umschalttaste oben rechts in der Symbolleiste des Fensters sichtbar machen.
Hinweis Die Baumansicht zeigt nur die Objekte im Speicher. Es handelt sich nicht um eine vollständige Darstellung des verfolgten Gedächtnisses. Dies ist wichtig für den Fall, dass Sie feststellen, dass die Zahlen in der Übersicht über die Speichernutzung nicht mit der Gesamtsumme des verfolgten Speichers übereinstimmen.
Dies resultiert aus der Tatsache, dass nicht der gesamte native Speicher an Objekte gebunden ist. Sie kann auch aus nicht objektbezogenen nativen Zuweisungen wie ausführbaren Dateien und DLLs, NativeArrays usw. bestehen. Auch abstraktere Konzepte wie "Reservierter, aber ungenutzter Speicherplatz" können in die Summe der nativen Zuweisungen einfließen.
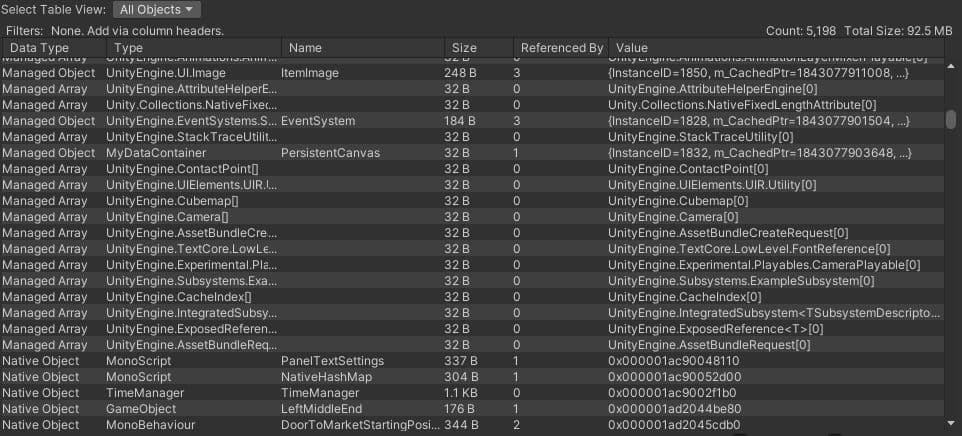
Die Ansicht "Objekte und Zuweisungen" zeigt eine Tabelle, die zum Filtern auf der Grundlage vorgefertigter Auswahlen umgeschaltet werden kann, z. B. "Alle Objekte", "Alle nativen Objekte", "Alle verwalteten Objekte", "Alle nativen Zuweisungen" und andere.
Sie können die untere Tabelle umschalten, um die Objekte, Zuweisungen oder Speicherregionen im ausgewählten Bereich anzuzeigen. Wie bereits für die Baumansicht erwähnt, ist nicht der gesamte Speicher mit Objekten verknüpft. Daher können die Seiten Alle Speicherregionen und Alle nativen Zuweisungen ein vollständigeres Bild Ihrer Speichernutzung vermitteln, wobei die Speicherregionen auch reservierten, aber derzeit nicht verwendeten Speicher enthalten.
Nutzen Sie dies zu Ihrem Vorteil, wenn Sie die Speichernutzung optimieren und darauf abzielen, den Speicher für Hardwareplattformen, deren Speicherbudgets begrenzt sind, effizienter zu packen.
Laden Sie einen Memory Profiler-Snapshot und gehen Sie durch die Tree Map-Ansicht, um die Kategorien in der Reihenfolge vom größten zum kleinsten Speicherplatzbedarf zu prüfen.
Projektanlagen sind oft die größten Speicherverbraucher. Suchen Sie in der Tabellenansicht nach Texturobjekten, Meshes, AudioClips, RenderTexturen, Shadern und vorab zugewiesenen Puffern. All dies sind gute Kandidaten für eine Speicheroptimierung.
Ein Speicherleck tritt typischerweise auf, wenn:
Der Memory Profiler-Vergleichsmodus kann bei der Suche nach Speicherlecks helfen, indem er zwei Snapshots über einen bestimmten Zeitraum vergleicht.
Ein häufiges Speicherleck-Szenario in Unity-Spielen kann nach dem Entladen einer Szene auftreten.
Das Memory Profiler-Paket enthält einen Arbeitsablauf, der Sie durch den Prozess der Entdeckung dieser Arten von Lecks mithilfe des Vergleichsmodus führt.
Durch den differenziellen Vergleich mehrerer Speicher-Snapshots können Sie die Quelle der kontinuierlichen Speicherzuweisungen während der Lebensdauer der Anwendung identifizieren.
In den folgenden Abschnitten finden Sie einige Tipps, wie Sie verwaltete Heap-Zuweisungen in Ihren Projekten identifizieren können.
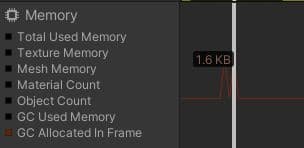
Das Memory-Profiler-Modul im Unity-Profiler stellt verwaltete Zuweisungen pro Frame mit einer roten Linie dar. Dieser Wert sollte die meiste Zeit bei 0 liegen, so dass Spitzen in dieser Zeile auf Frames hinweisen, die Sie auf verwaltete Zuweisungen untersuchen sollten.
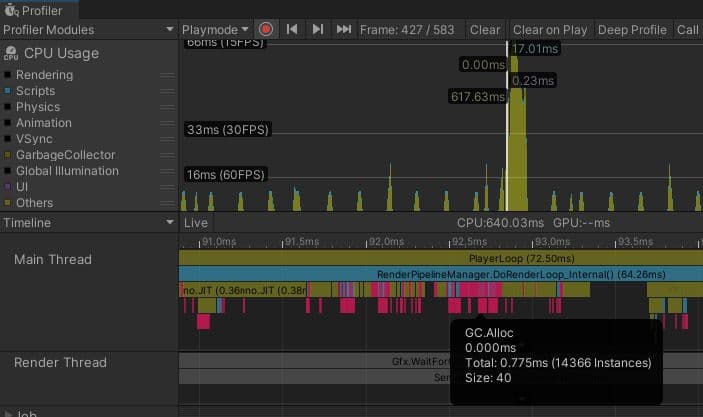
In der Zeitleistenansicht des CPU-Auslastungsprofilers werden Zuweisungen, einschließlich verwalteter Zuweisungen, in rosa Farbe angezeigt, so dass sie leicht zu erkennen sind und sich leicht eingrenzen lassen.
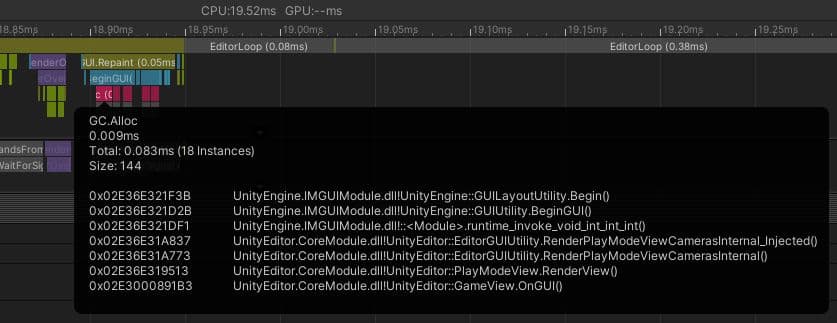
Allokationsaufrufstapel bieten eine schnelle Möglichkeit, verwaltete Speicherzuweisungen in Ihrem Code zu entdecken. Diese liefern die benötigten Call-Stack-Details bei geringerem Overhead im Vergleich zu dem, was Deep Profiling normalerweise hinzufügen würde, und sie können mit dem Standard-Profiler aktiviert werden.
Allokationsaufrufstapel sind im Profiler standardmäßig deaktiviert. Um sie zu aktivieren, klicken Sie auf die Schaltfläche Call Stacks in der Hauptsymbolleiste des Profiler-Fensters. Ändern Sie die Detailansicht in Verwandte Daten.
Hinweis Wenn Sie eine ältere Version von Unity verwenden (vor der Unterstützung von Zuweisungsaufrufstapeln), dann ist Deep Profiling eine gute Möglichkeit, vollständige Aufrufstapel zu erhalten, um verwaltete Zuweisungen zu finden.
GC.Alloc-Beispiele, die in der Hierarchie oder Rohhierarchie ausgewählt wurden, enthalten nun ihre Aufrufstapel. Sie können auch die Aufrufstapel der GC.Alloc-Beispiele im Auswahl-Tooltip in der Timeline sehen.

In der Hierarchieansicht des CPU-Auslastungsprofilers können Sie auf die Spaltenüberschriften klicken, um sie als Sortierkriterien zu verwenden. Die Sortierung nach GC Alloc ist eine gute Möglichkeit, sich auf diese zu konzentrieren.
Project Auditor ist ein experimentelles Werkzeug zur statischen Analyse. Es kann viele nützliche Dinge tun, von denen einige außerhalb des Rahmens dieses Handbuchs liegen, aber es kann eine Liste jeder einzelnen Codezeile in einem Projekt erstellen, die eine verwaltete Zuweisung verursacht, ohne dass das Projekt jemals ausgeführt werden muss. Es ist eine sehr effiziente Methode, um diese Art von Problemen zu finden und zu untersuchen.
Unity verwendet den Boehm-Demers-Weiser-Garbage-Collector, der die Ausführung Ihres Programmcodes anhält und die normale Ausführung erst wieder aufnimmt, wenn seine Arbeit abgeschlossen ist.
Achten Sie auf unnötige Heap-Zuweisungen, die GC-Spitzen verursachen können.
Müllabfuhr zeitlich begrenzen, wann immer möglich
Wenn Sie sicher sind, dass ein Einfrieren der Garbage Collection nicht einen bestimmten Punkt in Ihrem Spiel betrifft, können Sie die Garbage Collection mit System.GC.Collect auslösen.
Unter Automatische Speicherverwaltung verstehen finden Sie Beispiele dafür, wie Sie dies zu Ihrem Vorteil nutzen können.
Verwenden Sie den Incremental Garbage Collector, um die GC-Arbeitslast aufzuteilen
Anstatt eine einzige, lange Unterbrechung während der Programmausführung zu verursachen, verwendet die inkrementelle Garbage Collection mehrere, kürzere Unterbrechungen, die die Arbeitslast auf viele Frames verteilen. Wenn die Garbage Collection eine unregelmäßige Bildrate verursacht, sollten Sie diese Option ausprobieren, um zu sehen, ob sie das Problem der GC-Spitzen reduzieren kann. Verwenden Sie den Profile Analyzer, um den Nutzen für Ihre Anwendung zu überprüfen.
Beachten Sie, dass die Verwendung der GC im inkrementellen Modus einigen C#-Aufrufen Schreib-Lese-Barrieren hinzufügt, was einen gewissen Overhead mit sich bringt, der bis zu ~1 ms pro Frame an Skriptaufruf-Overhead betragen kann. Für eine optimale Leistung ist es ideal, keine GC Allocs in den Haupt-Spielschleifen zu haben, so dass Sie die Incremental GC für eine gleichmäßige Bildrate nicht benötigen und die GC.Collect dort verstecken können, wo ein Benutzer sie nicht bemerkt, z. B. beim Öffnen des Menüs oder beim Laden eines neuen Levels.
Um mehr über den Memory Profiler zu erfahren, lesen Sie die folgenden Ressourcen:

Das E-Book herunterladen Ultimative Anleitung zum Profiling von Unity-Spielenkostenlos herunter, um alle Tipps und Best Practices zu erhalten.